How can ComfyUI be applied to interior design?

In the traditional interior design industry, designers and clients often face a variety of challenges. The process is usually time-consuming and costly because manually drawing design plans and revising them requires a significant amount of time and effort. It is difficult for clients to accurately imagine the final result before the design is completed, leading to poor communication and reduced satisfaction. The flexibility and personalization of traditional design methods are limited, making it hard to quickly respond to market trends and changes in personal preferences.
Therefore, this article focuses on interior design, teaching everyone to apply ComfyUI to their design work. It also recommends some LoRA models suitable for interior design to help everyone generate better interior design schemes using AI.
1. Generate with prompts
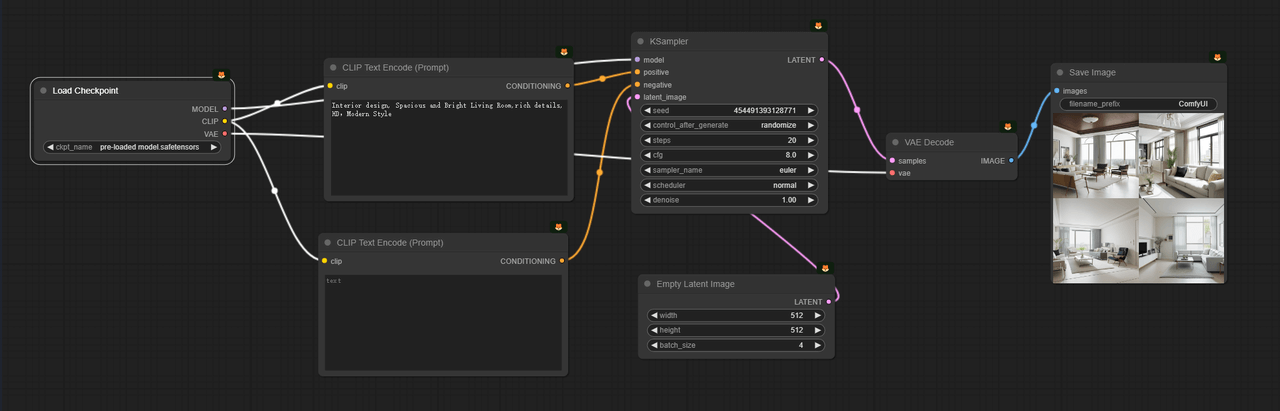
Midjourney may not be as flexible as ComfyUI in controlling interior design styles, making ComfyUI a better choice. The most direct method in ComfyUI is using prompts. Below I have set up a basic workflow. In the positive prompt, I described that I want an interior design image with a bright living room and rich details. The final rendered image met the mentioned requirements with a rational spatial layout. If you add more detailed descriptions, such as the dimensions of the room, the color of the curtains, ceiling design, lighting, etc., the generated images will be more in line with your expectations. For designers, this makes it more convenient to showcase and confirm client preferences.
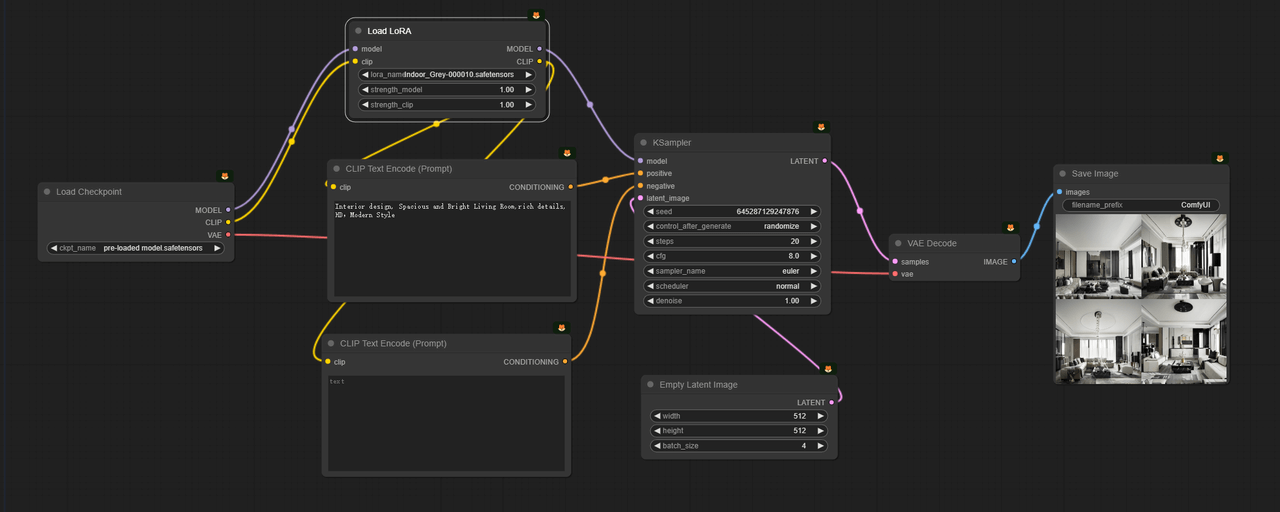
If you want to switch styles, you can modify the content in the prompt box, for example, by adding 'Japanese style' or 'Modern Style' to change the style of the image. However, the style control of the images generated in this way is not very stable and accurate. A recommended practice is to incorporate specific style LoRA models. Here is the workflow for LoRA, which is simple to set up. If you want to further understand the principles of LoRA, you can consult our tutorial on LoRA (opens in a new tab).
Here are the key points to focus on in this workflow:
- Checkpoint: I first found several LoRA models related to interior design on Civitai (opens in a new tab). The page includes a brief introduction to LoRA written by its authors, usually with some usage recommendations. For instance, the author of this model mentions that the LoRA is based on SD1.5 training, and recommends base models: SD 1.5, Chilloutmix, and realistic series of large models. The style tends towards modern interiors, minimalism, grey textures, and modern series. Recommended weight: 0.6-1. Trigger word: Indoor Grey. Recommended samplers: Euler a, DPM++ 2S a Karras, DPM++ SDE Karras.
- Prompt: When using this LoRA for the first time, start with the author's example prompt to generate and see the effect. Refer to the author's recommendations, such as weight and trigger words, to write your own prompt.
- Batch_Size: In the empty latent image node, there is a batch parameter; I set it to 4, which means the model will generate 4 images in sequence. It can be seen that after integrating the LoRA model, simultaneously generating 4 images yields very consistent styles.
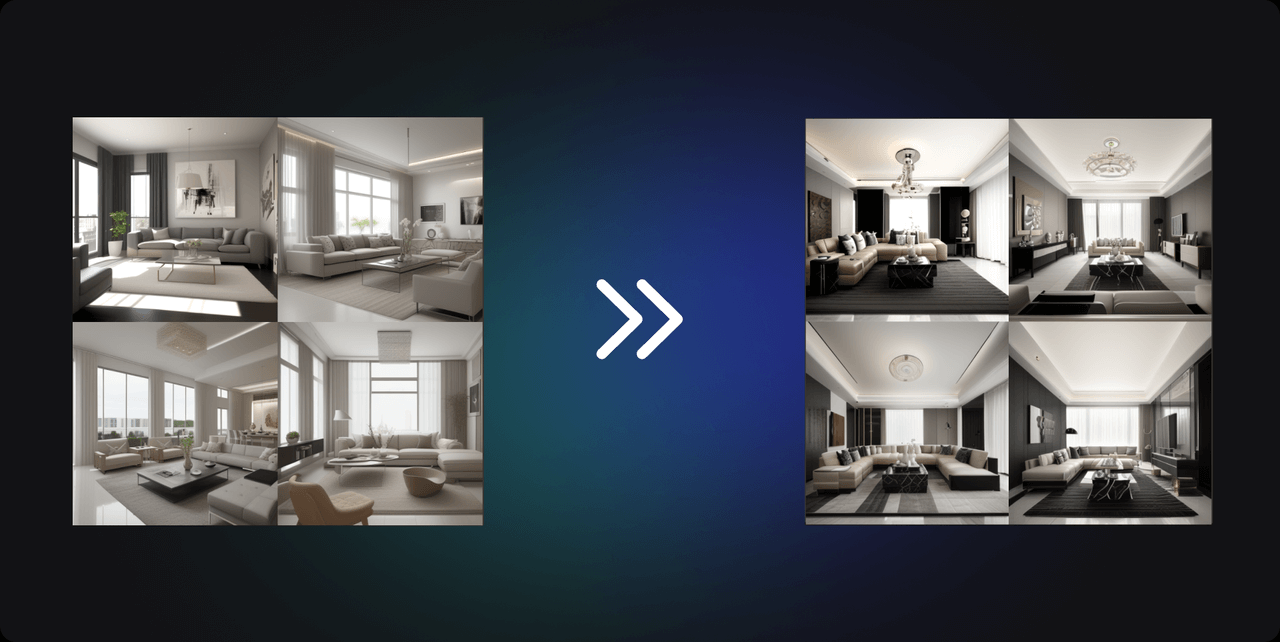
By making a comparison of the generated effects before and after adding the LoRA, it is noticeable that with the same prompt content, after the incorporation of the LoRA model, the modernity is enhanced, the image details are richer, the style and color tone are very uniform, and even the patterns on the tables are consistent.
Here, I recommend some interior design LoRA models that I found satisfying, with four different styles.
Neoclassical Style: neoclassic (opens in a new tab)
Influenced by ancient Greek and Roman art and architecture, this style is evident across various domains such as architecture, furniture design, painting, and sculpture. The generated interior images are elegant and sophisticated, with a classical beauty and rich details.
- Base Model: Stable Diffusion v1.5
- License Agreement: None
- Commercial Use: No
- Trigger Words: neoclassic bedroom, neoclassic living room
Japanese Wabi-Sabi Style: Japan style interior design (opens in a new tab)
Wabi-Sabi emphasizes minimalism, simplicity, and the beauty of nature. This style reflects a unique character in interior design and art, with a deep connection to nature.
- Base Model: Stable Diffusion v1.0
- License Agreement: None
- Commercial Use: No
- Trigger Word: wabi-sabi
Cream Style: Cream style interior design (opens in a new tab)
The cream style features cream, beige, or other soft, warm tones, emphasizing soft, comfortable materials like velvet fabrics and wool, creating a cozy and comforting atmosphere.
- Base Model: Stable Diffusion v1.0
- License Agreement: None
- Commercial Use: No
- Trigger Word: cream style
Modern Style: Modern Grey Style Interior (opens in a new tab)
Modern design focuses on simplicity, with clean lines and geometric shapes. Unnecessary decorations are omitted to value functionality and the simplicity of form. Interior spaces often have minimal partitions, favoring open layouts to enhance the sense of space.
- Base Model: Stable Diffusion v1.5
- License Agreement: None
- Commercial Use: No
- Trigger Word: modern grey
2. Inpainting
ComfyUI supports generating different style concept images from a single base image. However, you might not be satisfied with certain parts of the image. For instance, if you're unhappy with the placement of the sofa or the choice of lighting fixtures in the picture, you might want to modify it by changing the prompt, such as adding the keyword "chandelier." However, using this method could result in changes to other parts of the image, not just the light fixture.
So, how can you change just one area without affecting the rest? You can use inpainting to address this issue. Take this concept image as an example; using inpainting, I was able to change only the decorative painting while keeping the rest of the elements consistent.
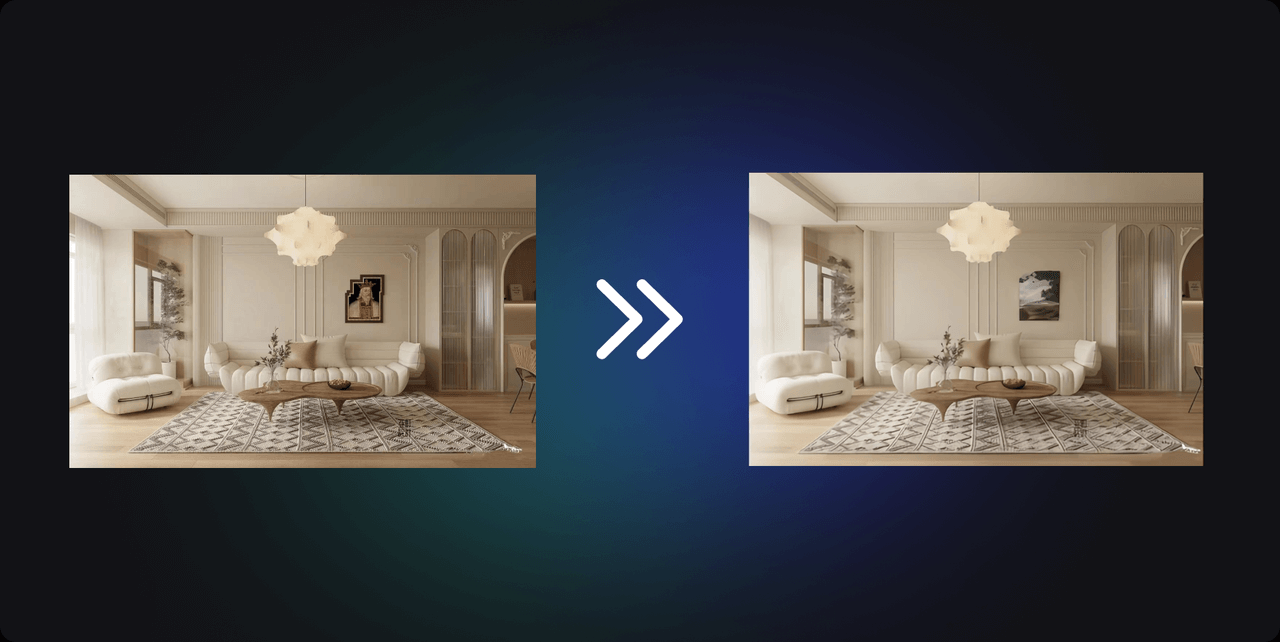
Such a feature is convenient for designers to replace parts of the design in the concept image according to the client's preferences while maintaining unity. Here is ComfyUI's workflow:
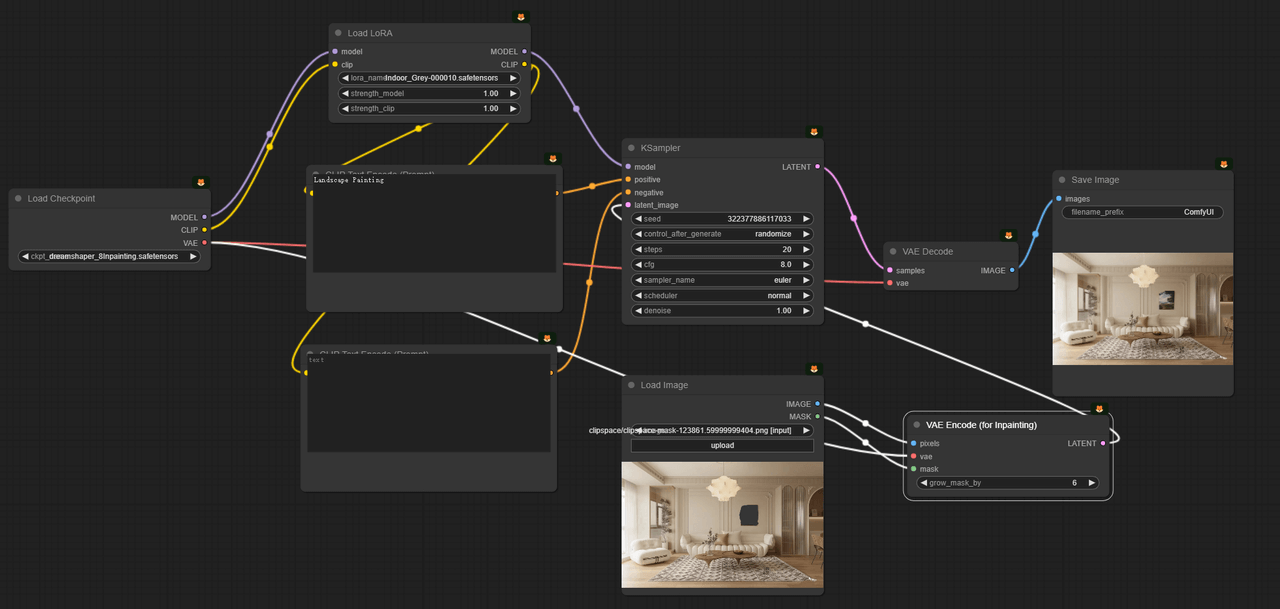
- Checkpoint: First, download the inpainting model Dreamshaper 8-inpainting (opens in a new tab) and place it in the models/checkpoints folder inside ComfyUI. Then switch to this model in the checkpoint node.
- Prompt: Add a Load Image node to upload the picture you want to modify. Connect the Load Image node to VAE Encode (for Inpainting), which in turn connects to KSampler.
- Local Change: Right-click the Load Image node and select Open in MaskEditor from the menu. Once in MaskEditor, you can brush over the area you wish to change. For instance, to alter the background decorative painting, simply mask the painting and enter the desired style, such as a landscape painting, to generate it.
Besides adjusting the model, you can also fine-tune the denoise setting in KSampler. From my testing, the smaller it is, the more it resembles the original image. If you want a larger scene, you can try AI outpainting by adding a Pad Image for Outpainting node. For more detailed steps, refer to our tutorial: Comflowy (opens in a new tab)
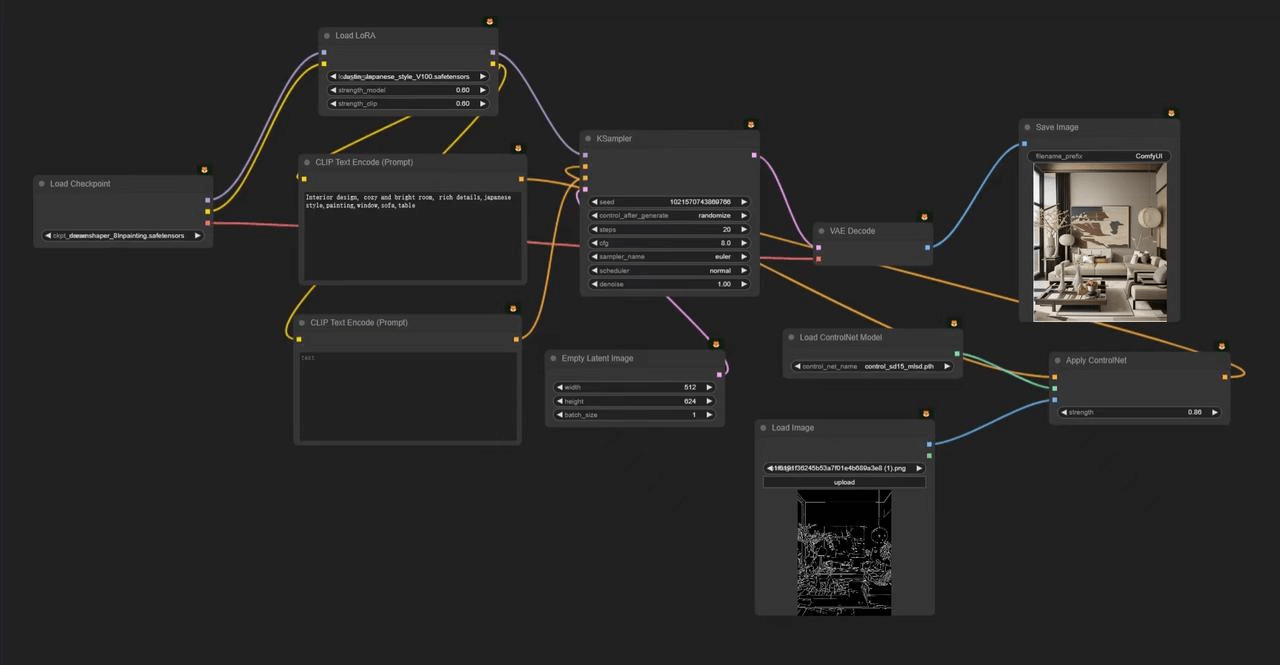
3. Generate with ControlNet
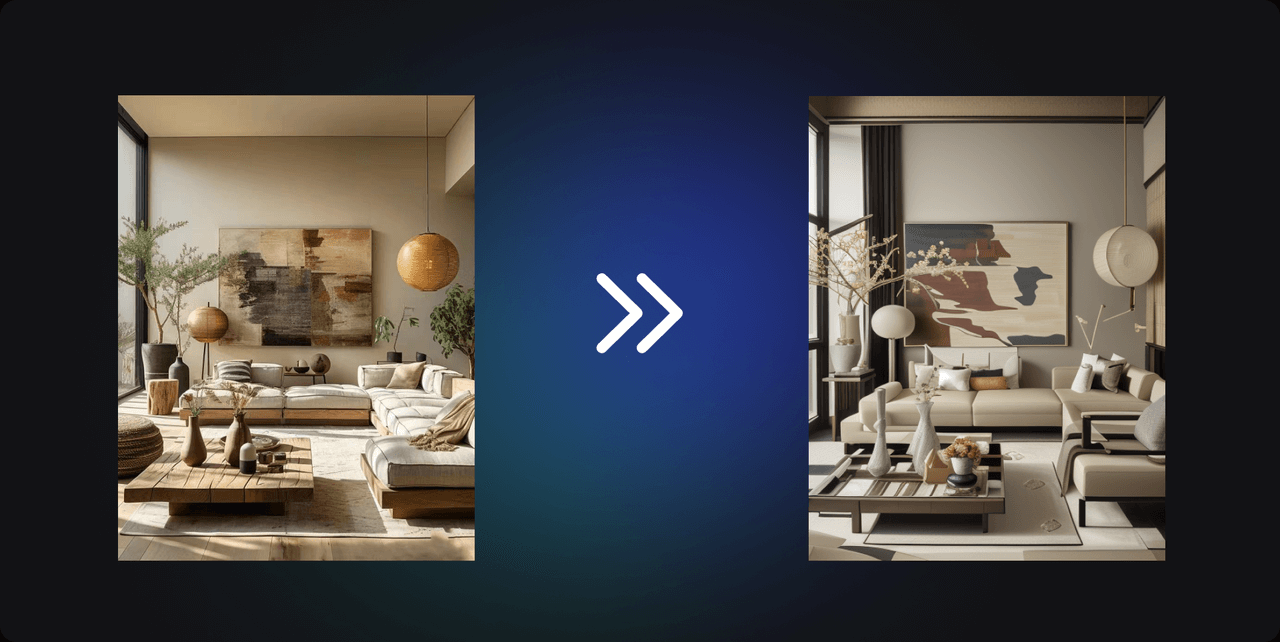
ControlNet can generate images with the same structure as the design base maps we provide. In interior home design, there are some constants, such as the position of windows, load-bearing walls, pipes, etc., that cannot be changed. The placement of sofas and tables can also be fixed, making ControlNet more convenient to use. I tested models that support ControlNet, and found three particularly suitable for interior design scenarios: Canny, M-lsd, and Scribbles.
Canny
The advantage of using the Canny model is that you can control the edges in the model-generated images with Canny edge maps, like this:
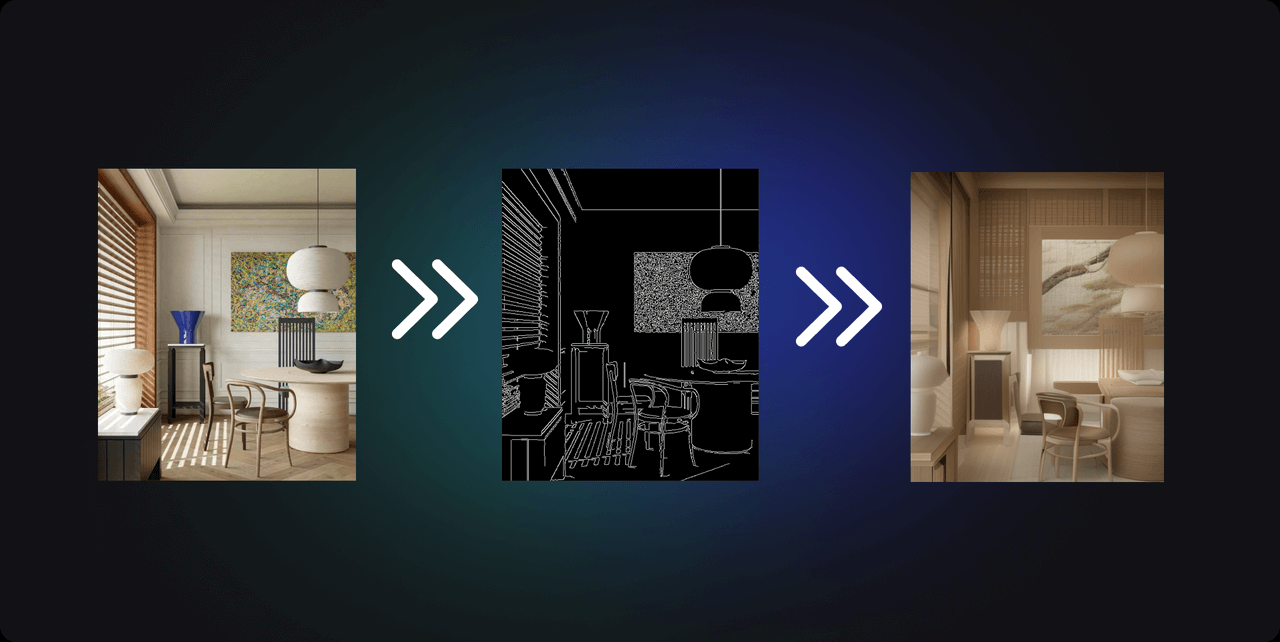
The images generated, despite having different styles, maintain the same composition and content as the original. The workflow construction with ComfyUI is also relatively simple.
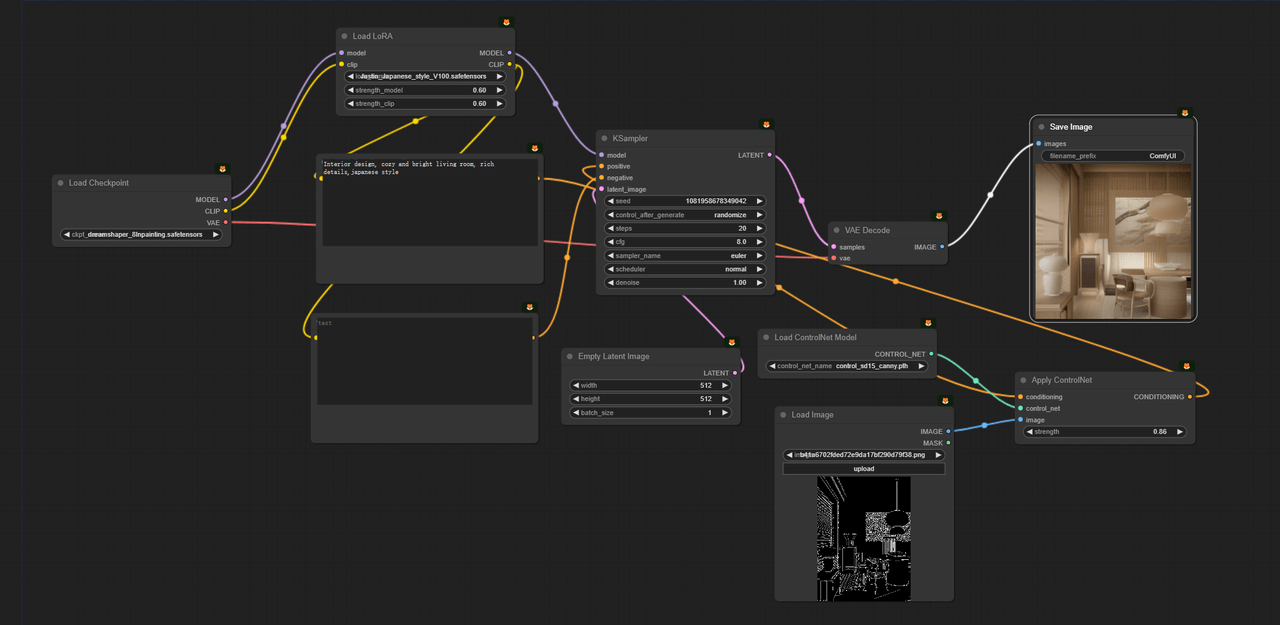
Double-click the panel to add the Apply ControlNet node and connect it to the Load ControlNet Model node, and select the Canny model. Then use the Load Image Model to upload the line drawing image, and finally run the workflow. The generated images preserve the design very well, with only changes in the style of the hard furnishings and furniture. The overall rendering of the image results in a harmonious and unified effect.
M-lsd
M-LSD straight line detection allows you to identify all the straight lines in the room if you want to redesign it. With the help of these lines, you can reset the materials and colors of the furniture in the room.
If I use the following image as a base, I can regenerate it with the M-LSD model. During the generation process, I only need to change the model in Load ControlNet Model to the M-LSD model.
It should be noted that compared to Canny, M-LSD is very accurate in identifying straight lines in the image. You will find that all of the straight lines in the bedroom are recognized. However, curved items like spherical lamps will not be displayed in the recognized line drafts, making them the only variables in the rendered image. The rest of the furniture only changes in terms of material and color.
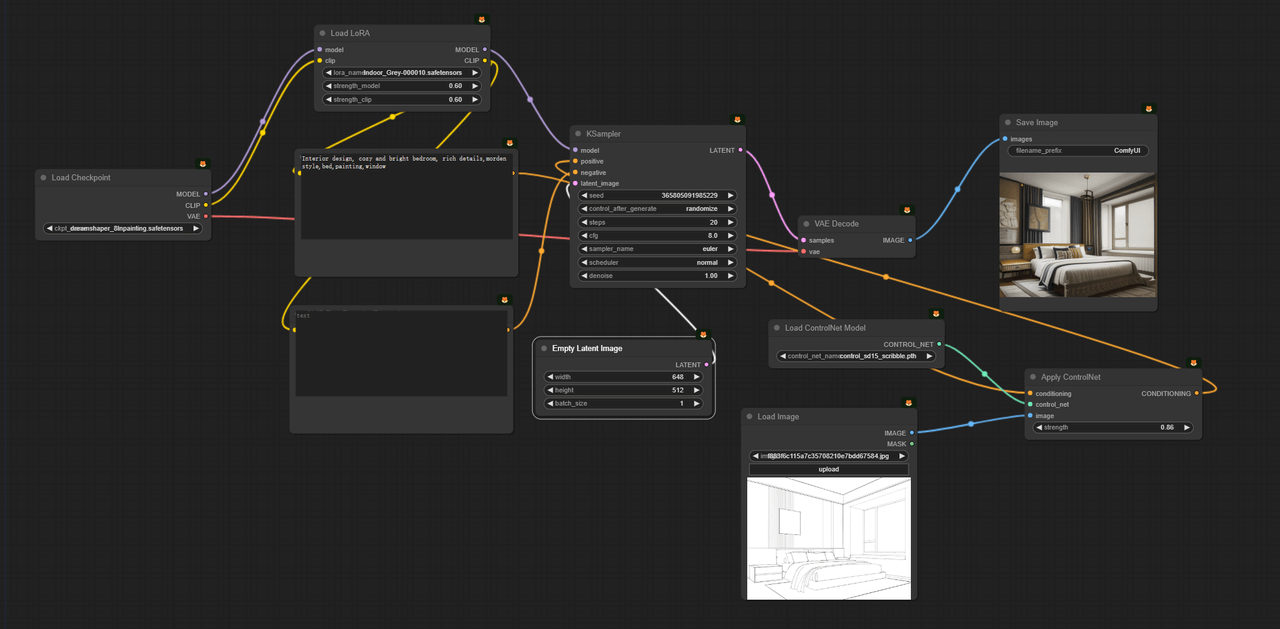
Scribbles
Apart from the two scenarios mentioned, you might also encounter some urgent situations where you need to create draft designs for clients through quick hand-drawn sketches. But creating good hand-drawn drafts can take a long time. With AI, you can try using AI to turn your hand-drawn drafts into commercially viable designs.
The method is very simple; you still need to use the ControlNet model, but now you will import your hand-drawn draft. You can choose your preferred drawing software, like Procreate on an iPad, and then import the doodled image into ComfyUI. Below is the effect image generated by the AI after I imported a simple bedroom line drawing:
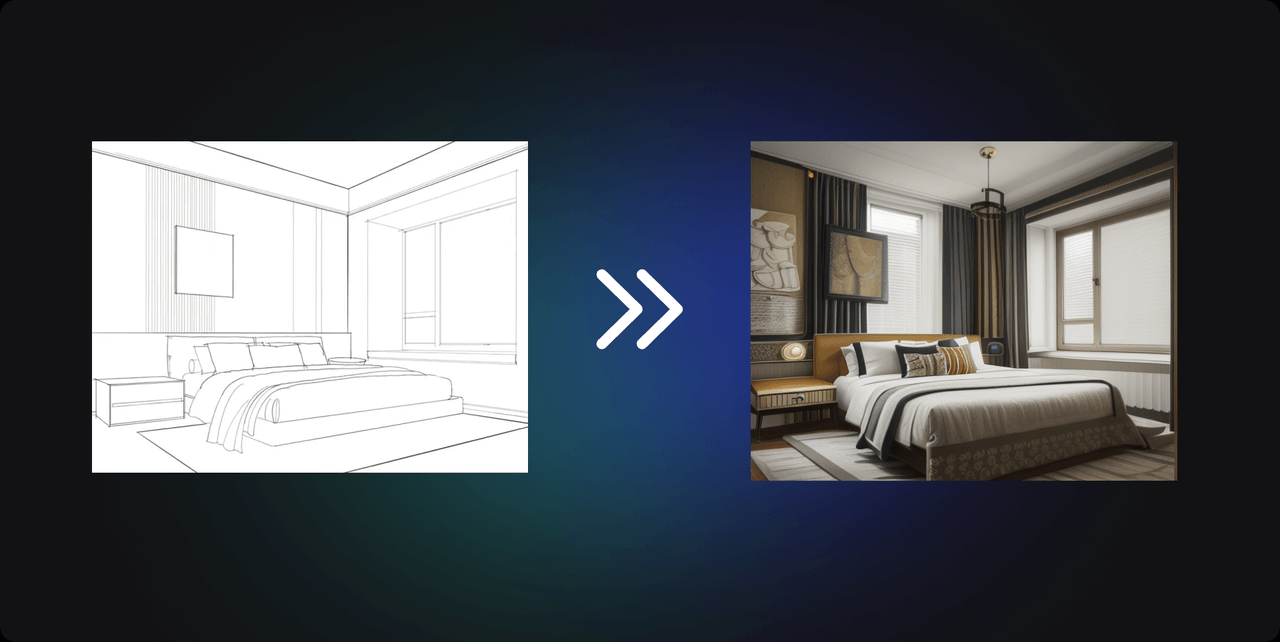
In the positive prompt, I described a cozy interior design image with a bed, windows, and decorative paintings. During the process, I added the Load ControlNet Model node and selected the Scribbles model. I also chose a modern LoRA model. In the end, I generated the image using the Scribbles model.
In addition to these three models, our tutorial also introduces models like Depth and Pose. If you're interested in trying them out, you can consult our tutorial at Comflowy (opens in a new tab).
4. Summary
As we delved deeper into the application and potential of ComfyUI in the field of interior design, you may have developed a strong interest in this innovative AI tool for generating images. To learn more about ComfyUI and to experience how it revolutionizes the design process, please visit Comflowy (opens in a new tab). There, you will find more use cases and a detailed guide on how to use ComfyUI.