How can ComfyUI be applied to interior design ②
In our last issue, we delved into the innovative application of ComfyUI in the field of interior design, unlocking new possibilities in design. In this issue, we will continue this exploration, focusing on real-time live image tools that are more suitable for interior design.
In our AI Newsletter AI Weekly 004, we introduced Krea's real-time rendering and visualization capabilities. Simple brush strokes can create stunning effect images and add materials to specific backgrounds, but it is not a free product, costing $24 per month. Many people have achieved similar effects in ComfyUI, but the user experience is relatively poor.
In this blog post, I will introduce a free, no-registration-required method with a better experience—Krita + ComfyUI. Additionally, Krita has a more powerful brush system and advanced layer management features for convenient secondary image processing.
How to Install ComfyUI in Krita?
Download the Krita Plugin
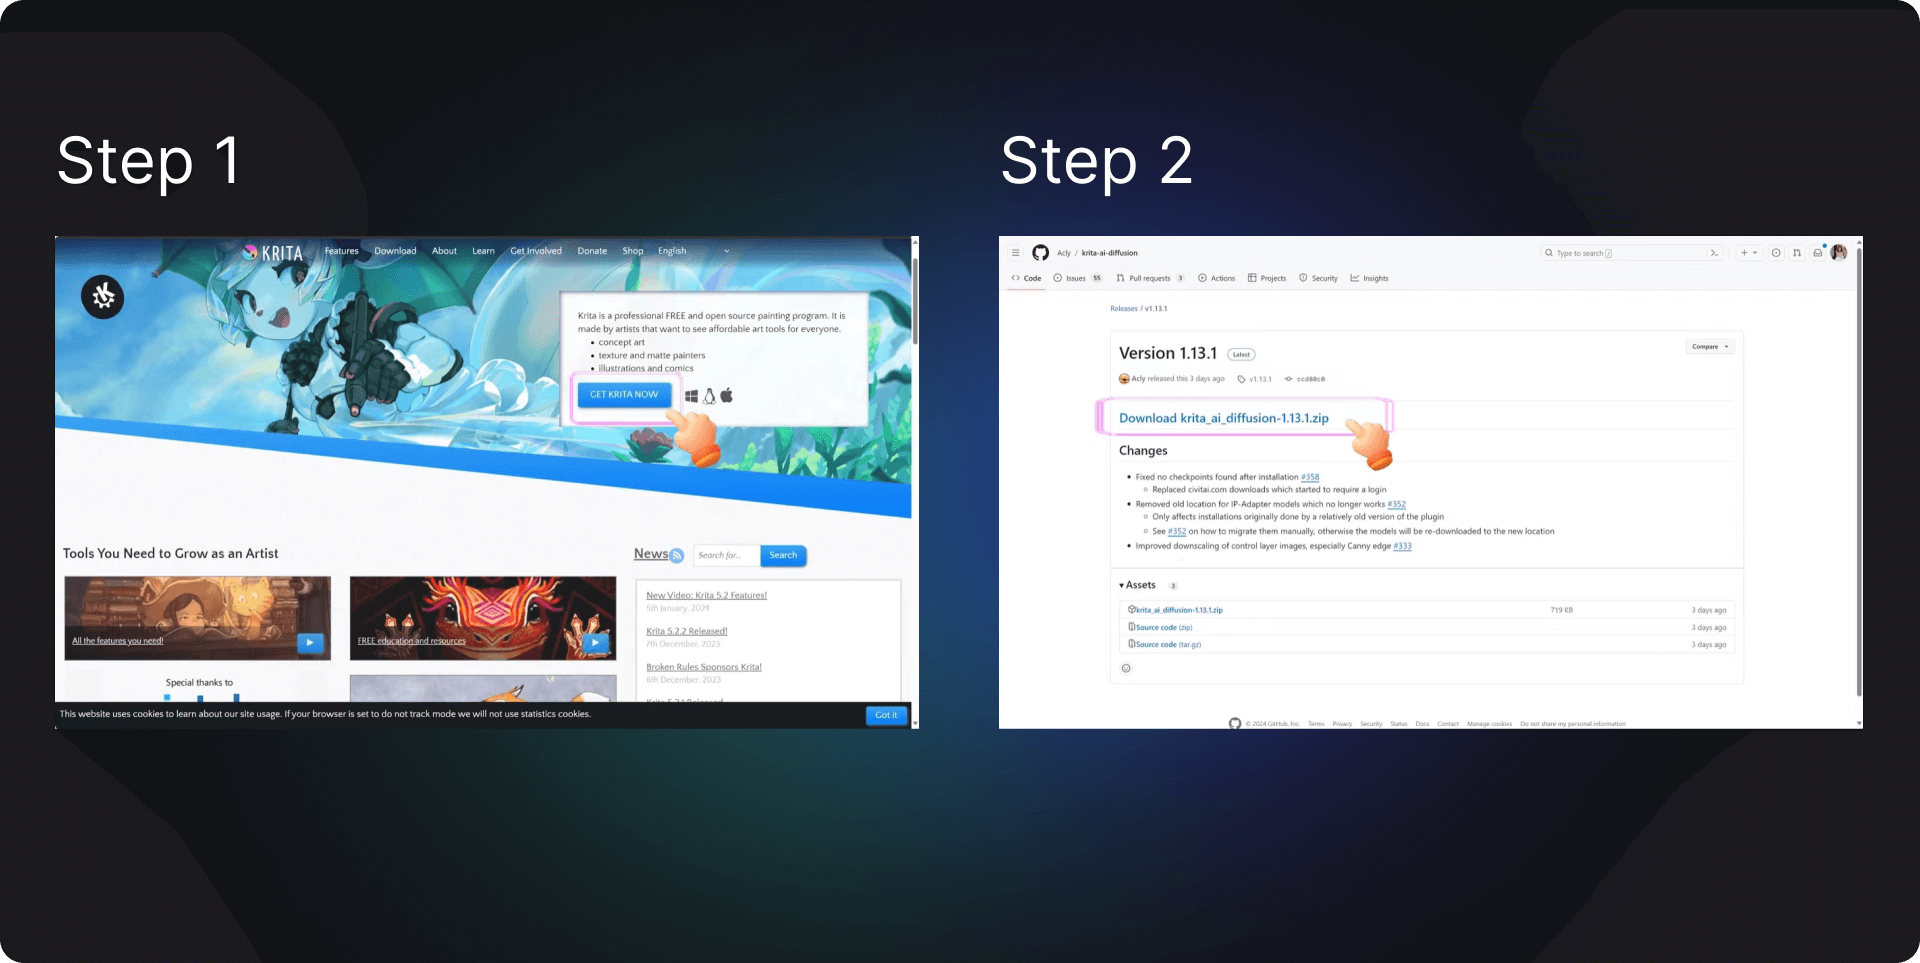
- First, let's talk about how to install it. The first step is to download Krita. Visit the official website Krita (opens in a new tab) and click GET KRITA NOW to download Krita, select the Windows installer 64-bit.
- After installation, go to Krita's GitHub (opens in a new tab), under the title Generative AI for Krita, click Download, and download Download krita ai diffusion-1.13.1.zip. Unzip Download krita ai diffusion-1.13.1.zip to the pykrita directory under krita.
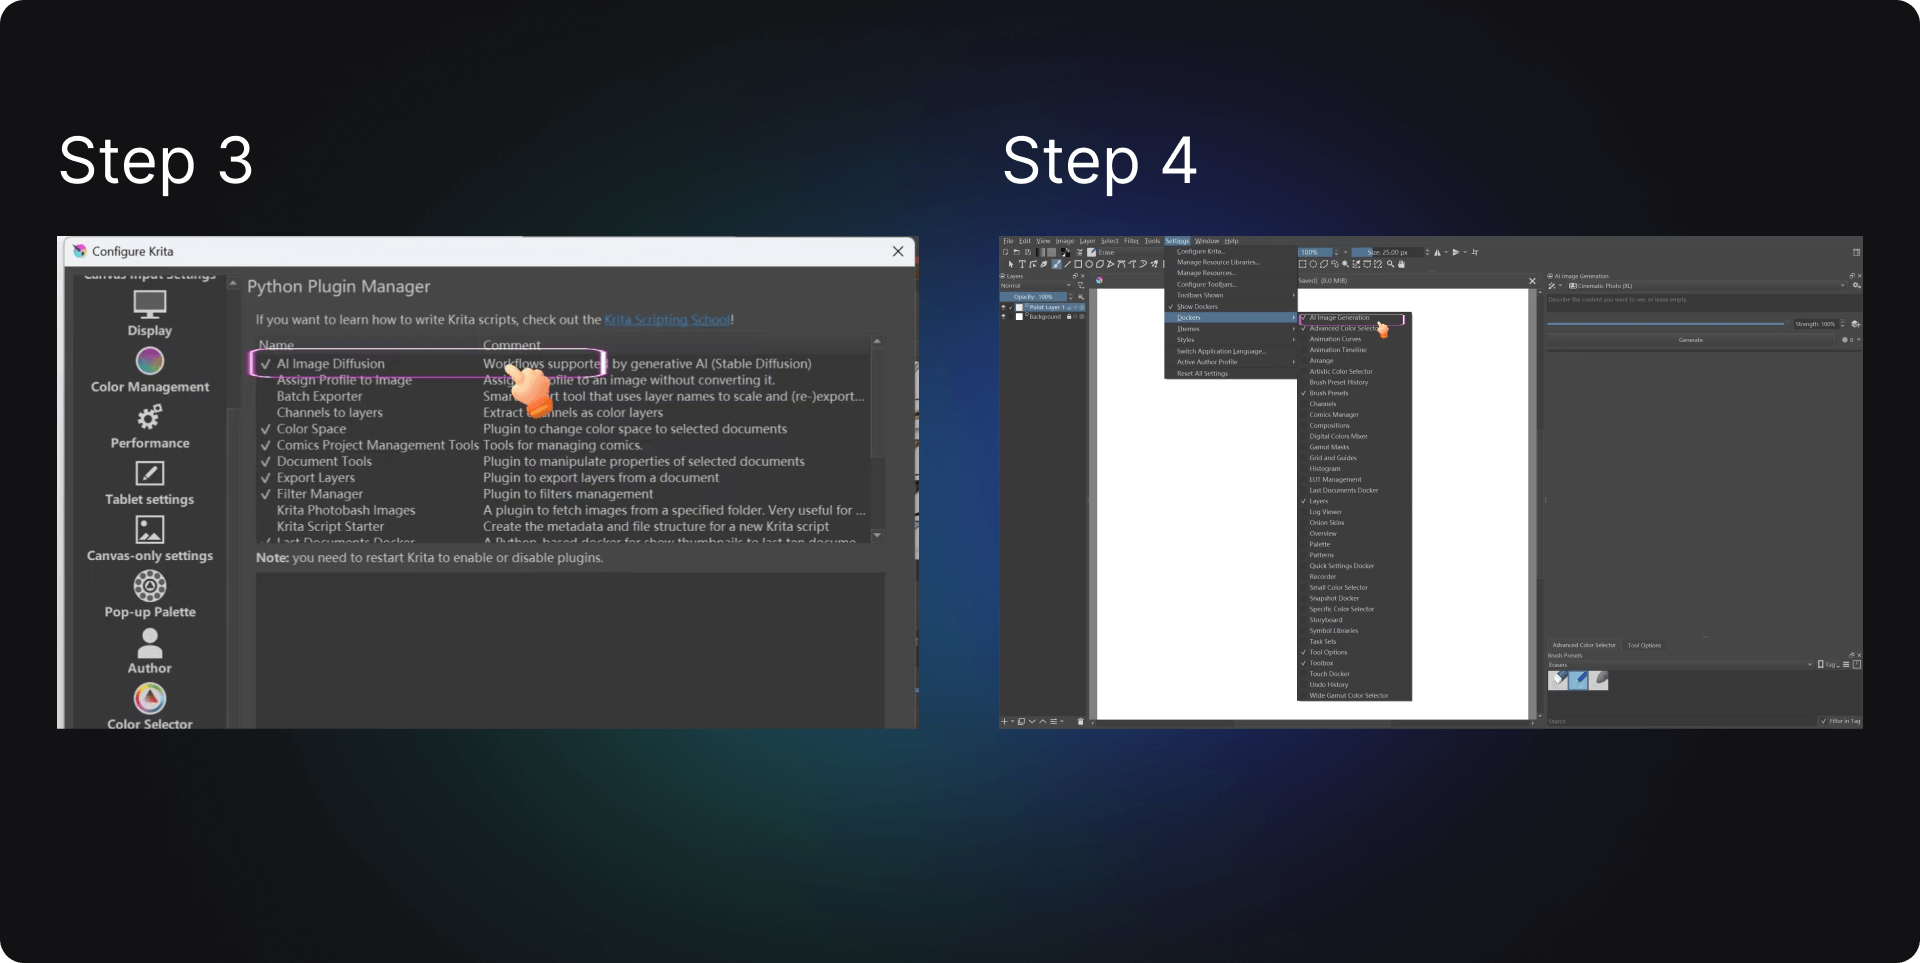
- Open Krita, create a new canvas, go to the menu bar to find the settings, configure Krita, scroll down to the last option to find Python Plugin Manager, click to check the box for AI Image Diffusion, and then click OK.
- Then, in settings, look for the Dockers list, check AI Image Generation, and you will see the AI plugin appear in the right-side window.
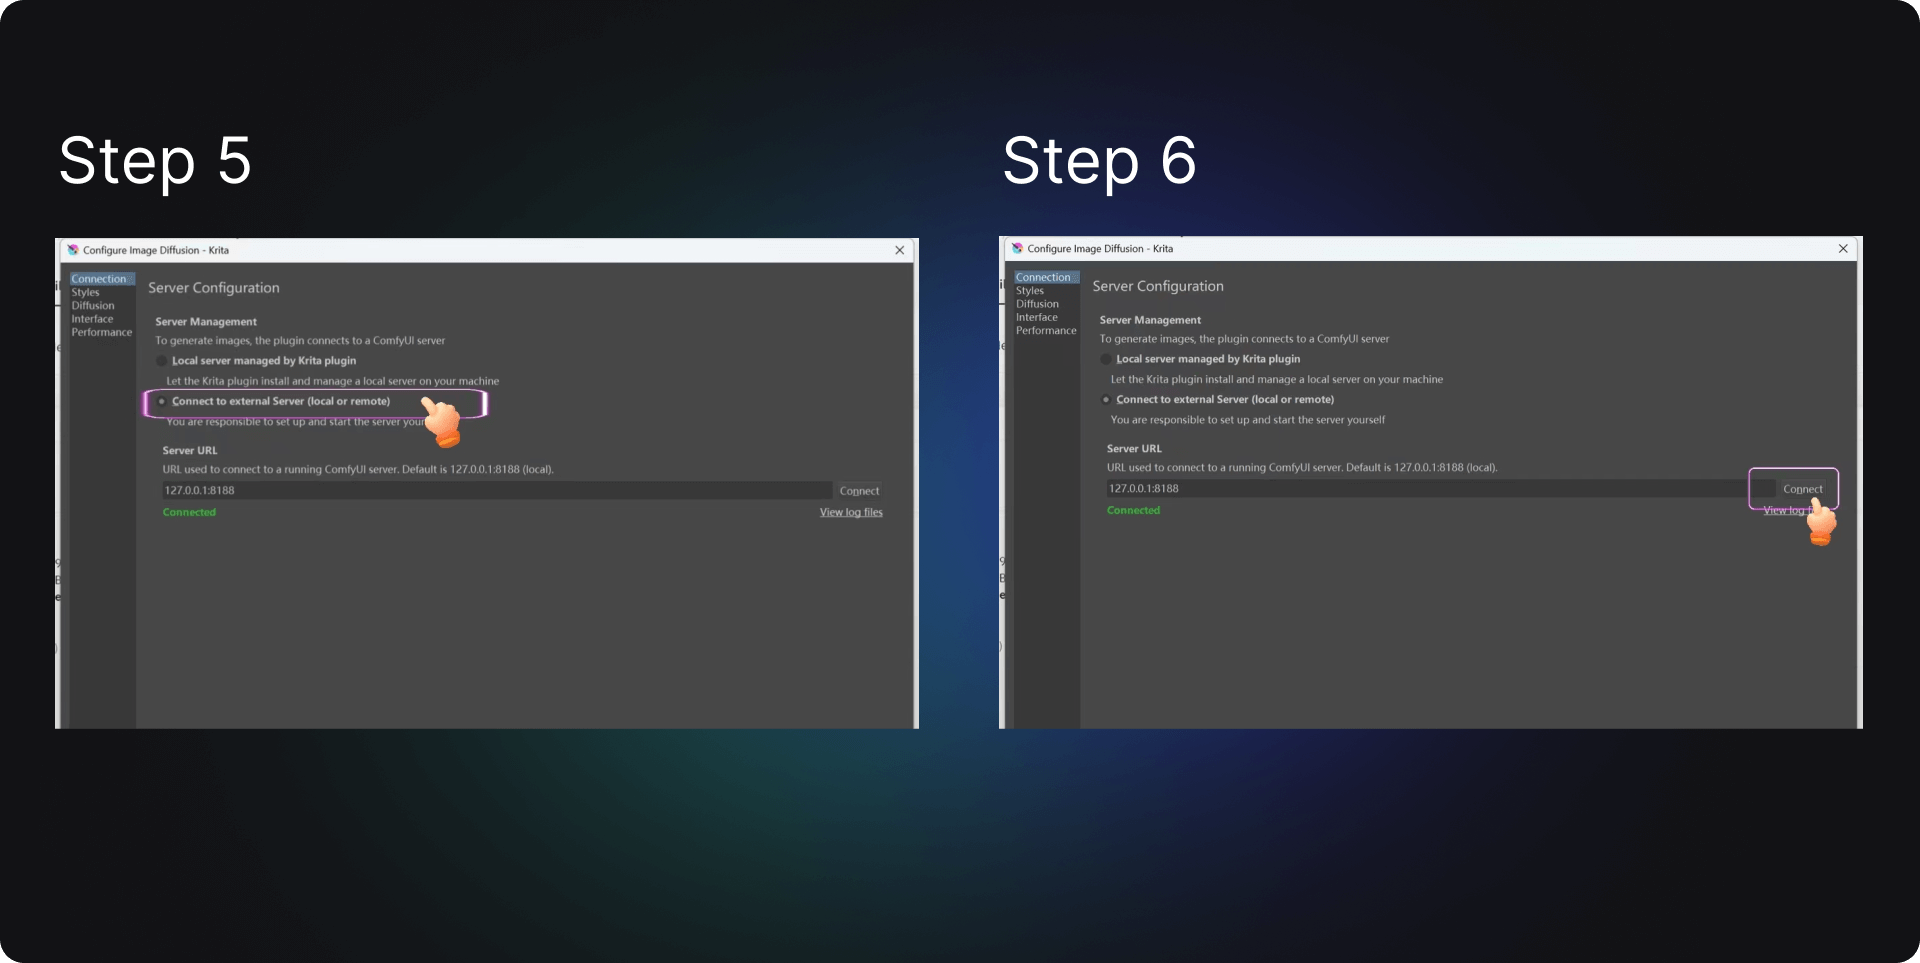
- Click on Configure in the plugin, check the box for Connect to external Server, and save the settings.
- Finally, open ComfyUI, locate the URL address in the run panel, for example, http://127.0.0.1:8188 (opens in a new tab). Make sure it matches in Krita when connecting by entering: 127.0.0.1:8188, and the connection should be successful. Here's a brief introduction to the points of interest:
Potential Issues
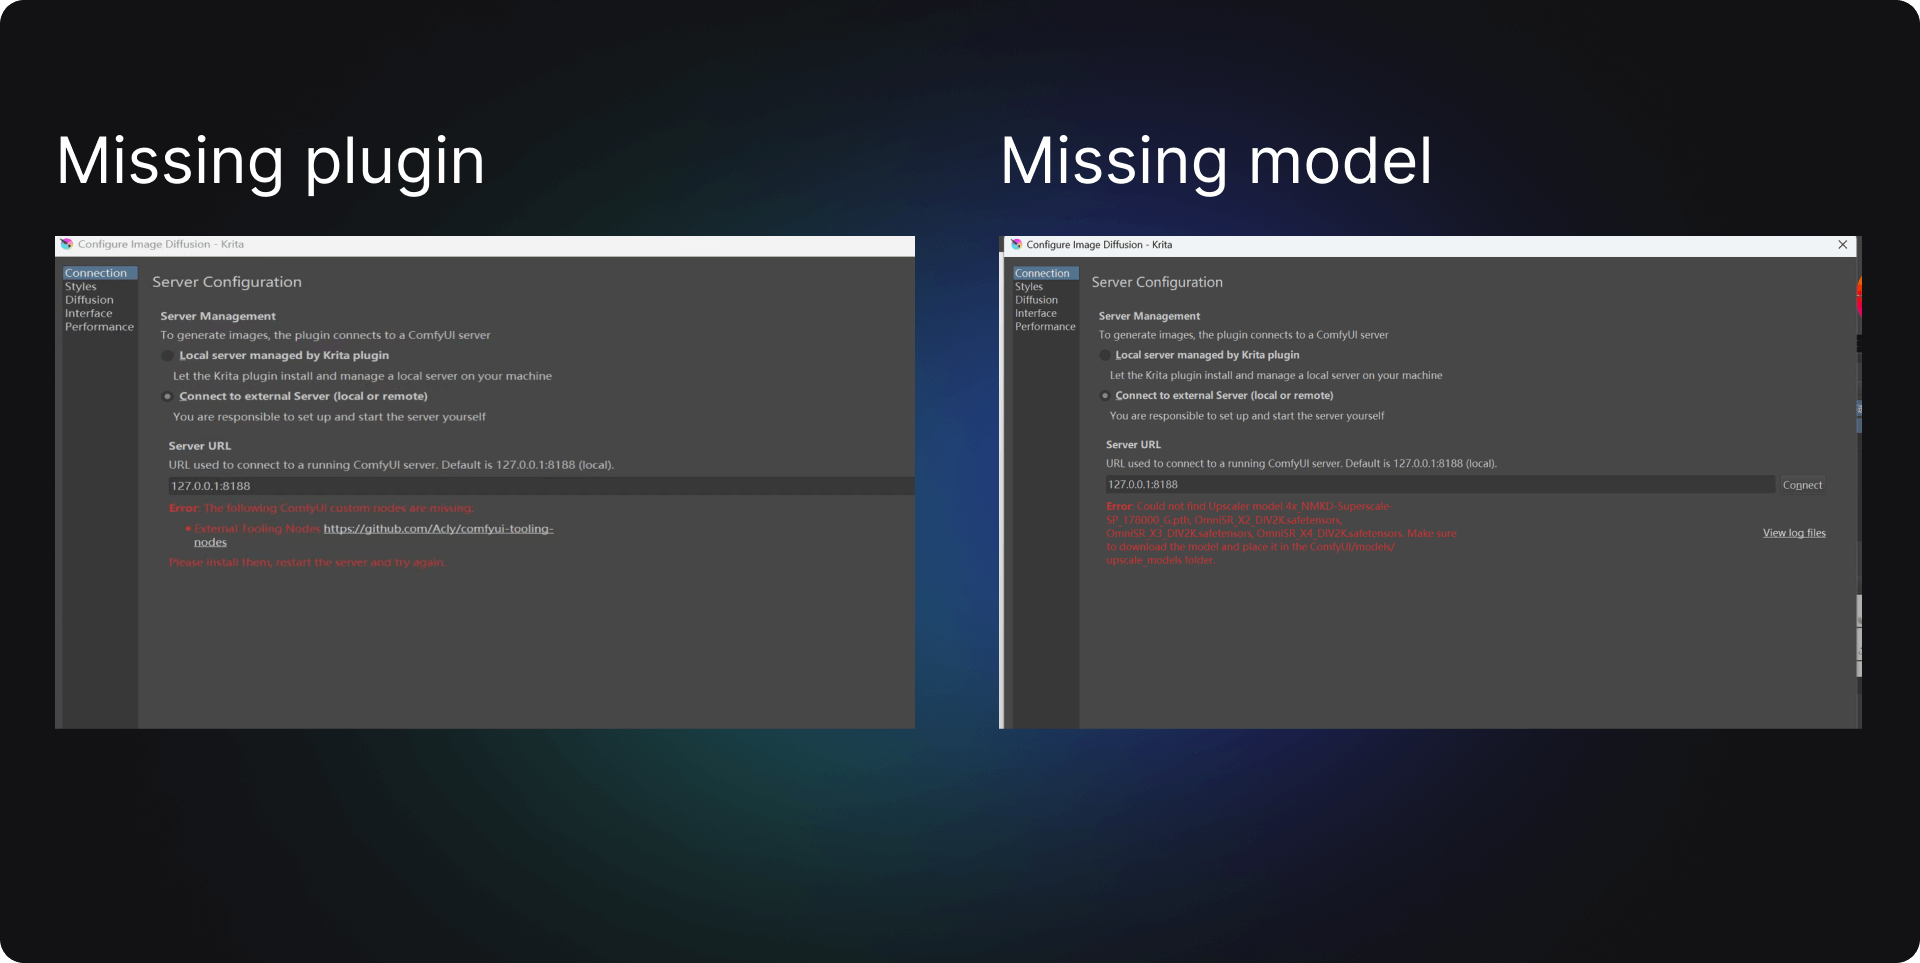
- Missing ComfyUI plugins: If you are missing plugins, entering ComfyUI's URL address in Krita will prompt an error message. For instance, here it alerts me that a tooling node plugin is missing and provides a download link. You just need to copy the link into your browser, download the plugin, and place it in the specified folder to resolve the issue.
- Missing ComfyUI models: After resolving the plugin issue, Krita then indicates that models are missing. You simply need to copy the names of these models into your browser, download them from GitHub, and put them into the designated folder. If your ComfyUI lacks a certain folder, you can follow the instructions to create one without affecting operation.
For example, this error message:
Error: Could not find Upscaler model 4x_NMKD-Superscale-SP_178000_G.pth, OmniSR_X2_DIV2K.safetensors, OmniSR_X3_DIV2K.safetensors, OmniSR_X4_DIV2K.safetensors. Make sure to download the model and place it in the ComfyUI/models/upscale_models folder.
The system alerts me that I am missing four models: 4x_NMKD-Superscale-SP_178000_G.pth, OmniSR_X2_DIV2K.safetensors, OmniSR_X3_DIV2K.safetensors, OmniSR_X4_DIV2K.safetensors. I found their addresses on the browser, downloaded them, and placed them in the ComfyUI/models/upscale models folder. If you encounter similar issues, you can resolve them in the same manner. If you're unsure how to download and import models, you can view the Comflowy download and import tutorial.
Furniture Combination Effect Picture
If you are an interior designer, you often communicate with customers about the details of decorations. At the design's beginning, when discussing the house layout, style, or furniture choices, we can only express through words or show previous effect pictures as references. However, this is challenging for customers who are not familiar with design due to differences in room layouts and personal preferences. Wouldn't it save a lot of effort if customers could see a preliminary decoration effect of their own house during the initial communication?
The answer is yes. In traditional design processes, designers have to go through drawing CAD sketches, modeling, rendering effect pictures, and such steps, which are time-consuming, labor-intensive, and costly to modify. Krita helps us to complete these tasks more efficiently. By simply collaging the furniture pictures into a bare room, it helps generate a high-quality effect picture. Perfectly solving the issue of the customer "seeing the effect picture in advance" at the beginning of the design, if you want to change the design style during this process, you only need to add your LoRA to adjust, saving time and effort.
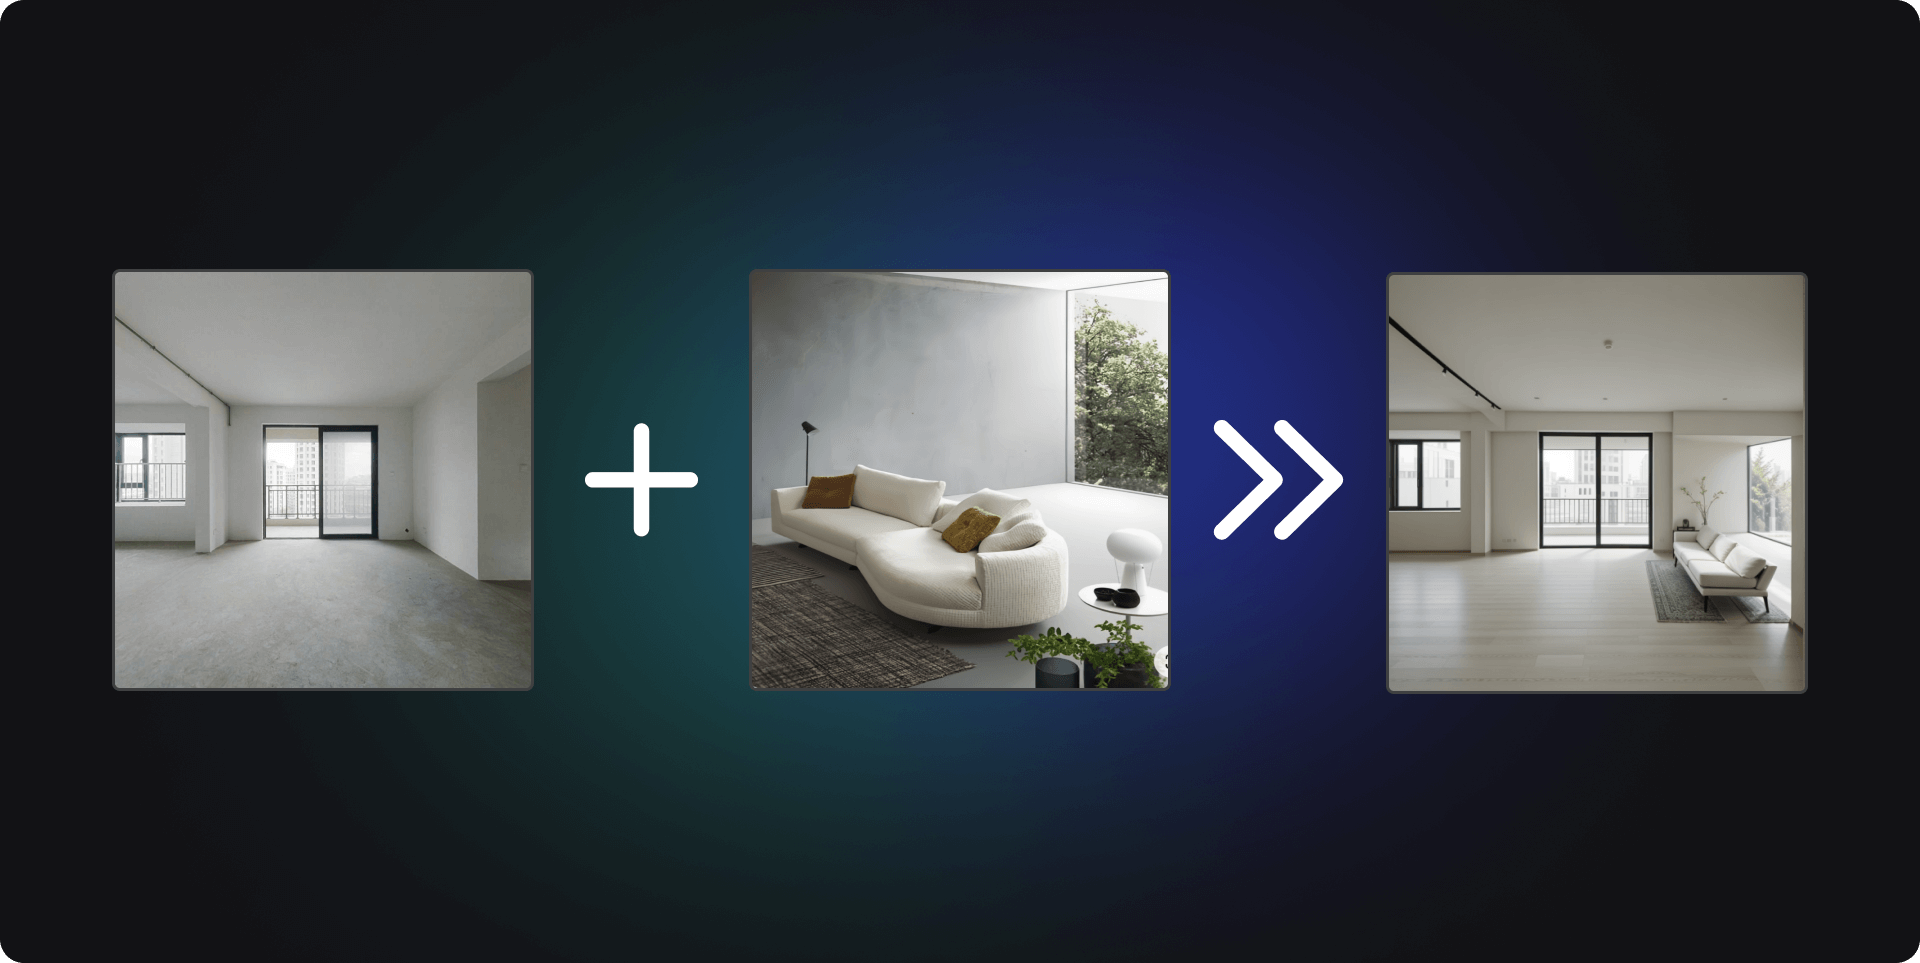
To visually demonstrate the effects of Krita, I simply copied and pasted the furniture picture of a sofa into a bare room, and a harmonious effect picture was already generated.
For specific steps, refer to the following:
- First, drag in a bare room picture on the left and create a new layer; press T to select while Ctrl + T for scaling transformations; real-time effect pictures are generated on the right, and by changing the weights, you can alter the picture's generation. Dragging to the left makes it closer to our input image; to the right, the divergence effect is stronger.
- Find some furniture model materials from websites like Pinterest, screenshot, copy and paste, do quick edits in size, and you can see the effect picture on the right in real time.
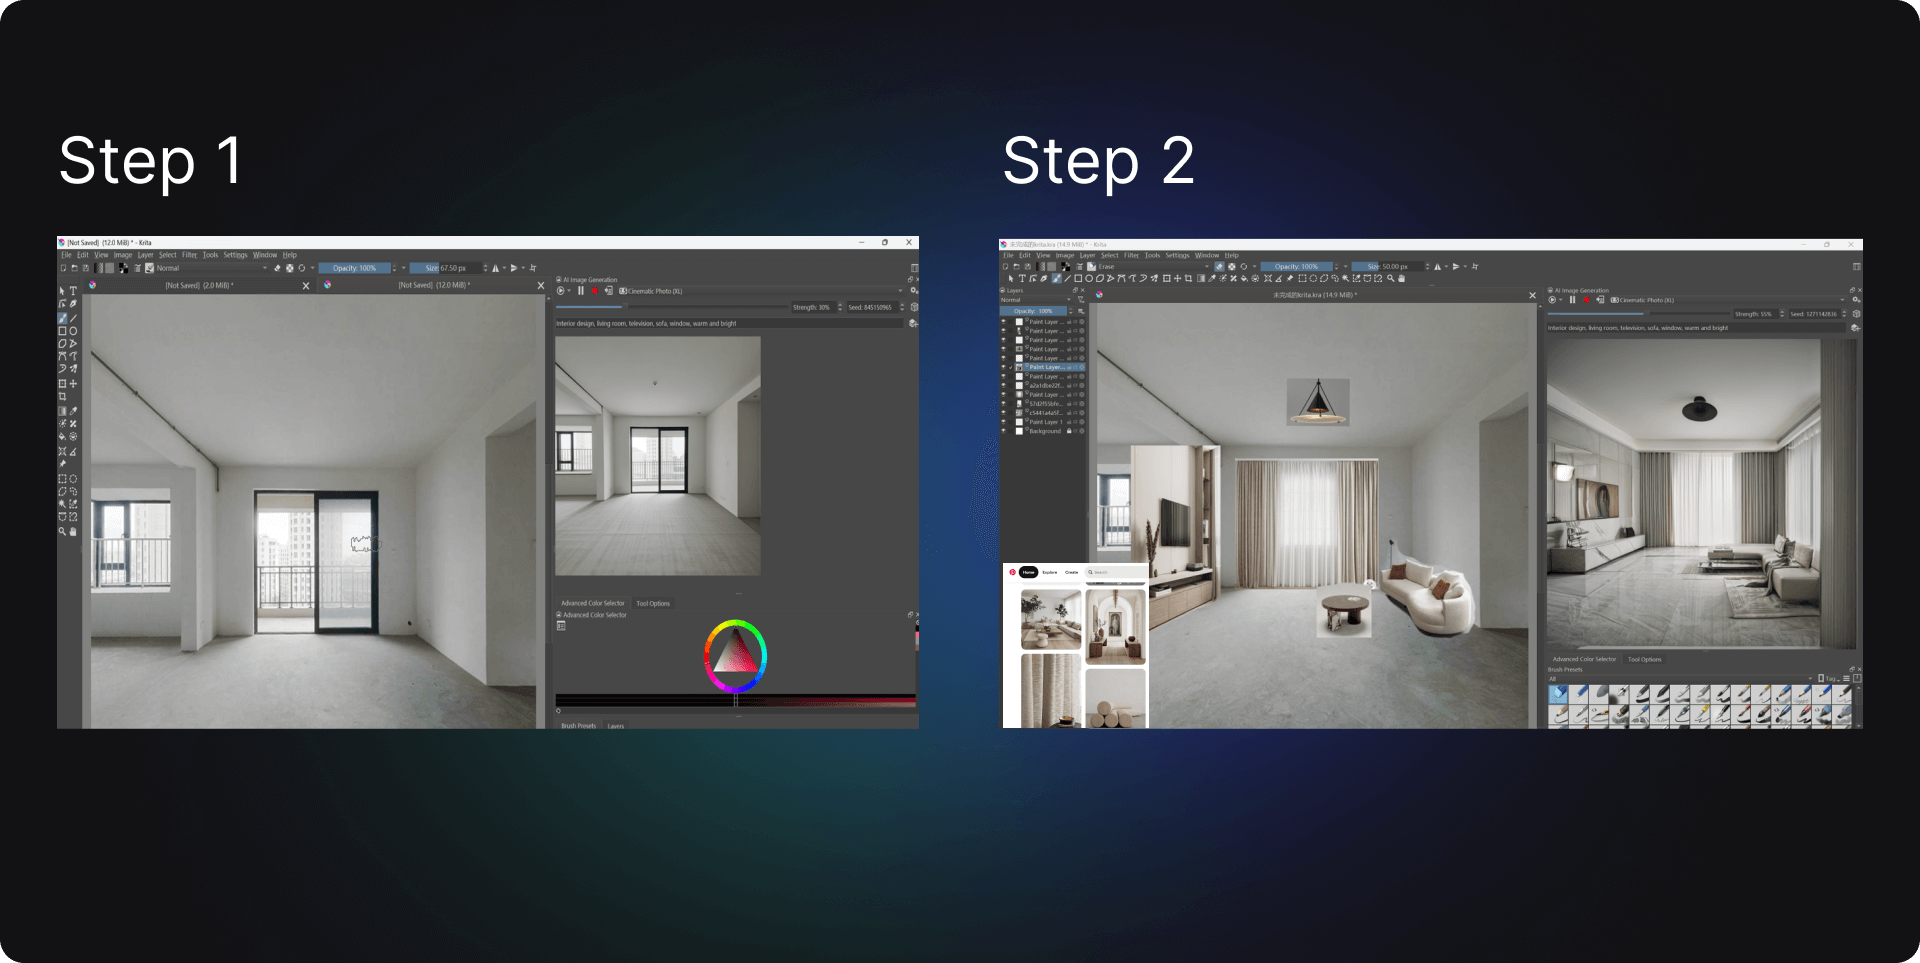
- To achieve better results, the images pasted into the workspace need to have the excess parts removed and adjusted to fit the spatial perspective and realistic size ratios. You can change the image's opacity and layers — for example, making curtains more translucent, and adjusting the relationship between the carpet, sofa, and table with layer changes.
- Adjusting the Strength value or changing the LoRA model can also facilitate secondary creation on this basis.
Whiteboard Drawing
If you do not have on-site pictures and still want to generate a design effect picture, Krita can create such images from sketches on a working whiteboard. By using the brush tool to paint a space, communicate the design idea with the customer, draw out the items to be placed in the space, and write prompt words. If there are unsatisfactory areas in the generated effect picture, they can be locally corrected with an eraser tool, thus fulfilling the customer's need to "see the effect picture in advance."
If a fixed style is desired, you can also add LoRA models under style. In our previous issue of How can ComfyUI be applied to interior design ①, we introduced several LoRA models suitable for interior design that you can experiment with.
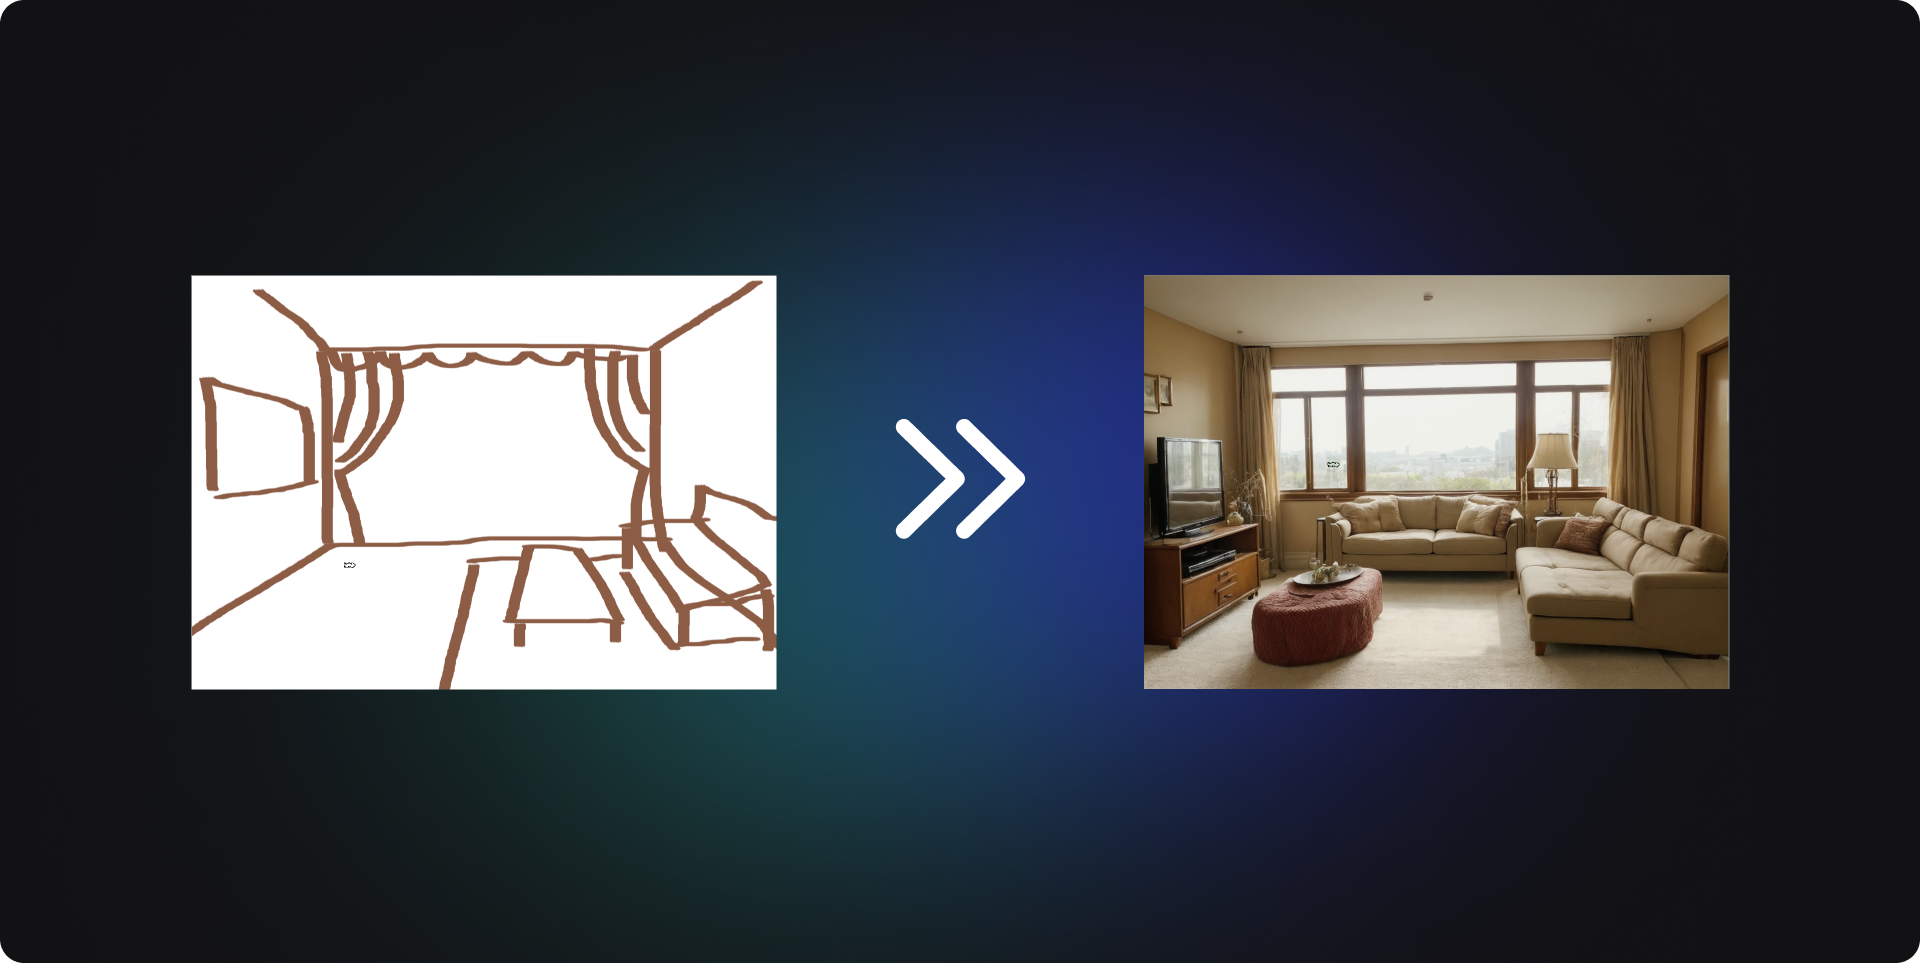
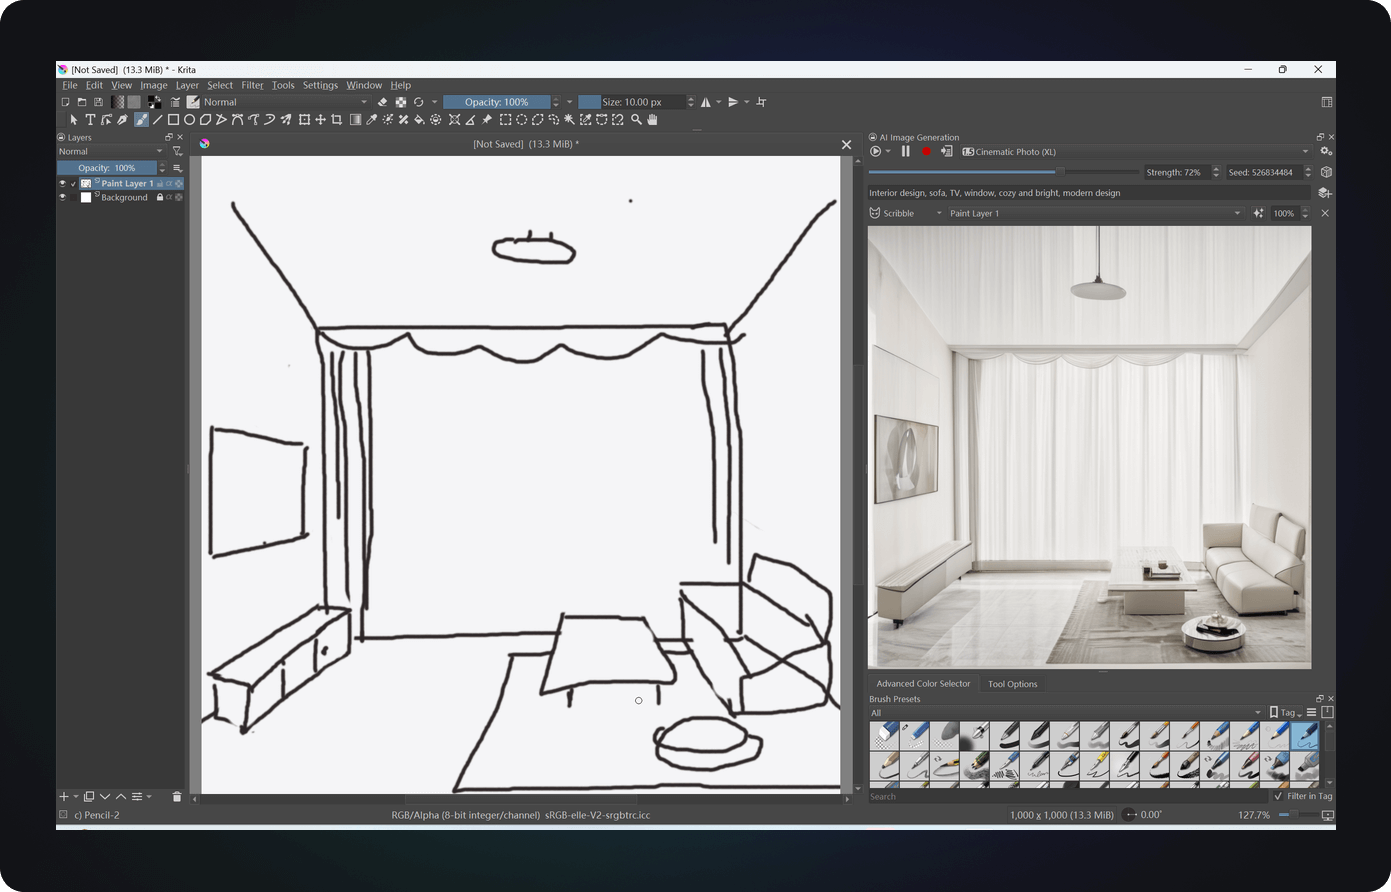
In a simple case, by typing prompt words like interior design, living room, TV, sofa, window, cozy and bright, and including a cream-style LoRA model, on the left panel, I used the brush tool to draw a simple living room scene, and Krita generated a richly detailed effect picture for me.
For specific steps, refer to the following:
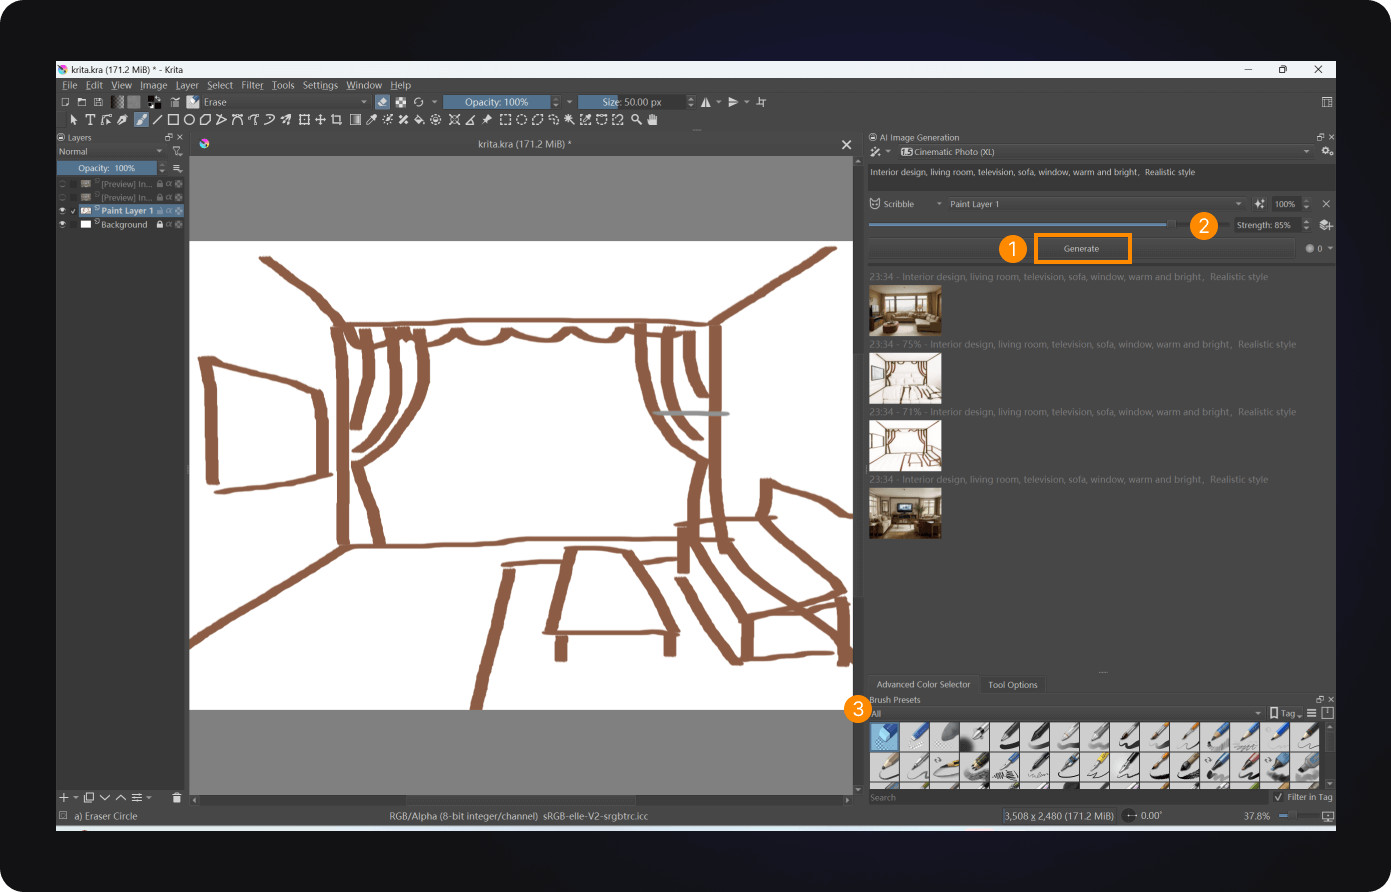
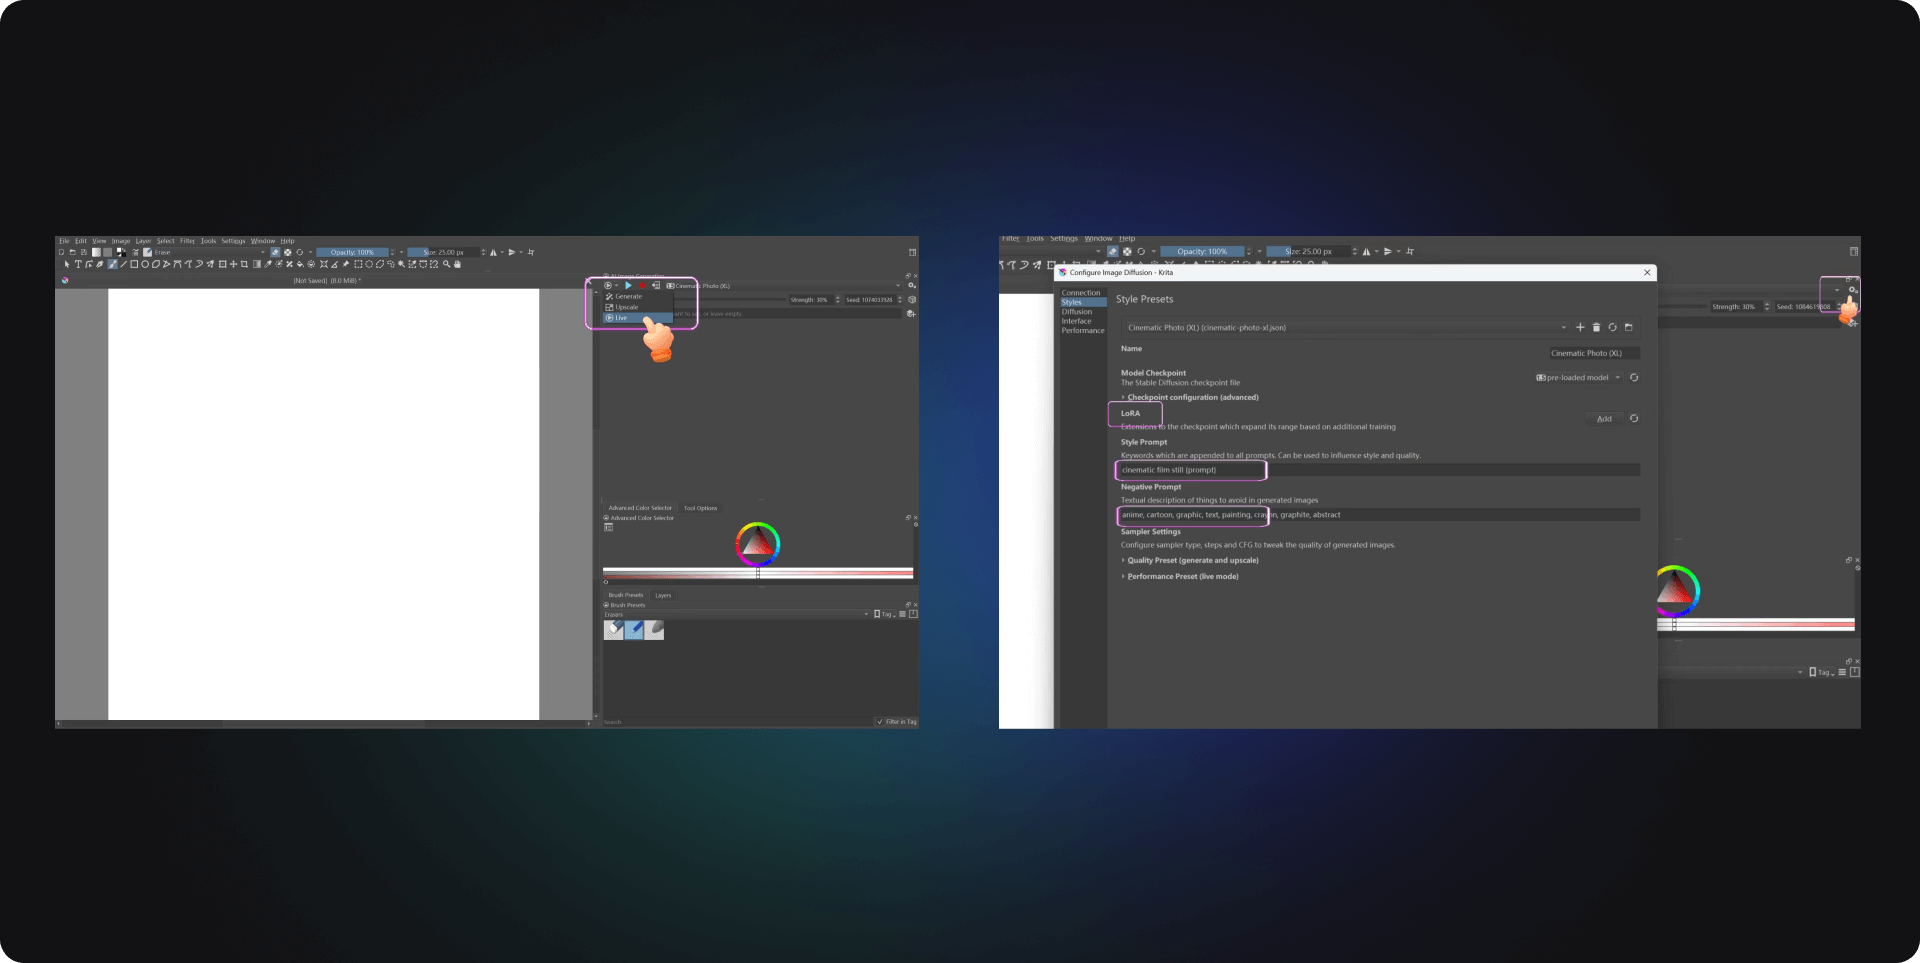
- Draw a rough sketch of the overall space on the left panel, then click Generate on the right (indicated as 1 in the image) to generate the effect picture, and adjust the Strength value (indicated as 2).
- If some parts are unsatisfactory, use the eraser (indicated as 3) to redraw and regenerate.
- Besides, you can switch the mode to Live, and a triangle symbol indicates a successful switch. Click the run triangle symbol, enter prompt words, change the model to scribble, and start drawing.
- Click the dice in the top right corner to refresh the image, and click the gear above the dice to open the settings. In style, you can set default positive and negative prompt words as well as LoRA, VAE, etc. After setting these, you can enjoy live drawing.
In interior design, simple lines represent the interior space, and generated windows, TVs, and curtains have high material quality and realism; the overall color is also harmonious. However, it's important to pay attention to size ratios when drawing furniture to ensure the generated effect picture is more in line with real-life scenarios.
Potential Issues
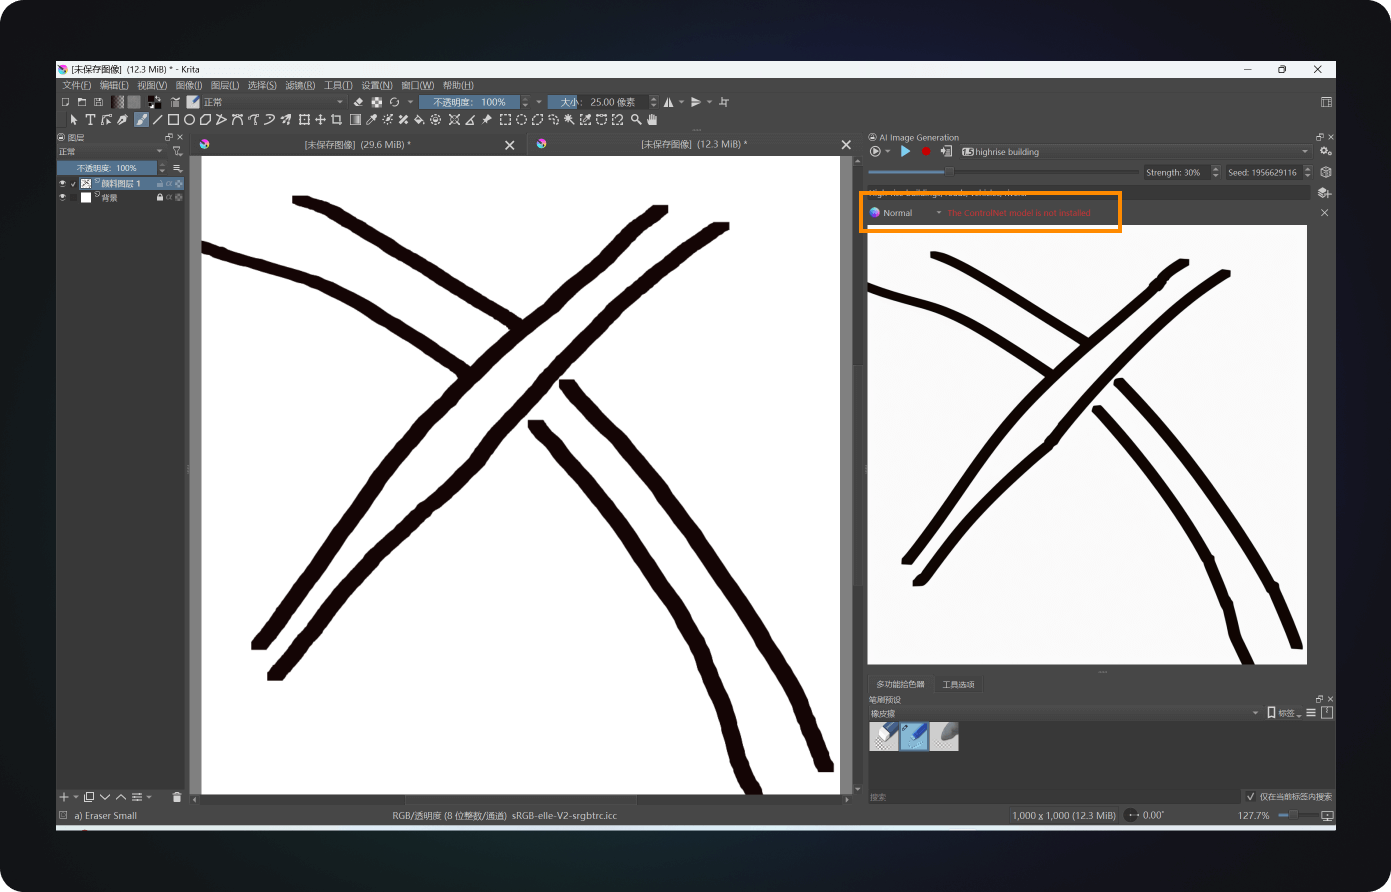
- If the effect picture is not generated on the right while drawing scribbles, you need to set the selected part to scribble. Krita will prompt the absence of a ControlNet model. Click here (opens in a new tab) to download it. Then place it in the ComfyUI\models\controlnet folder.
- Remember to rename the downloaded model file to a name Krita can run: control_v11p_sd15_scribble, restart ComfyUI and Krita after placing it in the folder, then scribble can be used within Krita.
Conclusion
ComfyUI's application and potential in the field of interior design are far from limited. If you are interested, experience how it can revolutionize the design process by visiting Comflowy (opens in a new tab). There you will find more application cases and detailed guides on using ComfyUI.