LoRA
Before you officially start this chapter, please download the following models and put the model files in their corresponding folders:
- Anime Lineart LoRA (opens in a new tab): Put it in the models/loras folder in ComfyUI.
- AnythingElse V4 (opens in a new tab): Put it in the models/checkpoints folder in ComfyUI.
- OrangeMixs (opens in a new tab): Put it in the models/vae folder in ComfyUI.
- LCM-LoRA (opens in a new tab): Put it in the models/loras folder in ComfyUI.
Theory Introduction
Before discussing how to use it, as usual, let's talk about the principle of LoRA. In the basic part of Stable Diffusion, I mentioned that the entire image generation process is like denoising, but at that time there was one thing I did not elaborate on — "Noise Predictor":
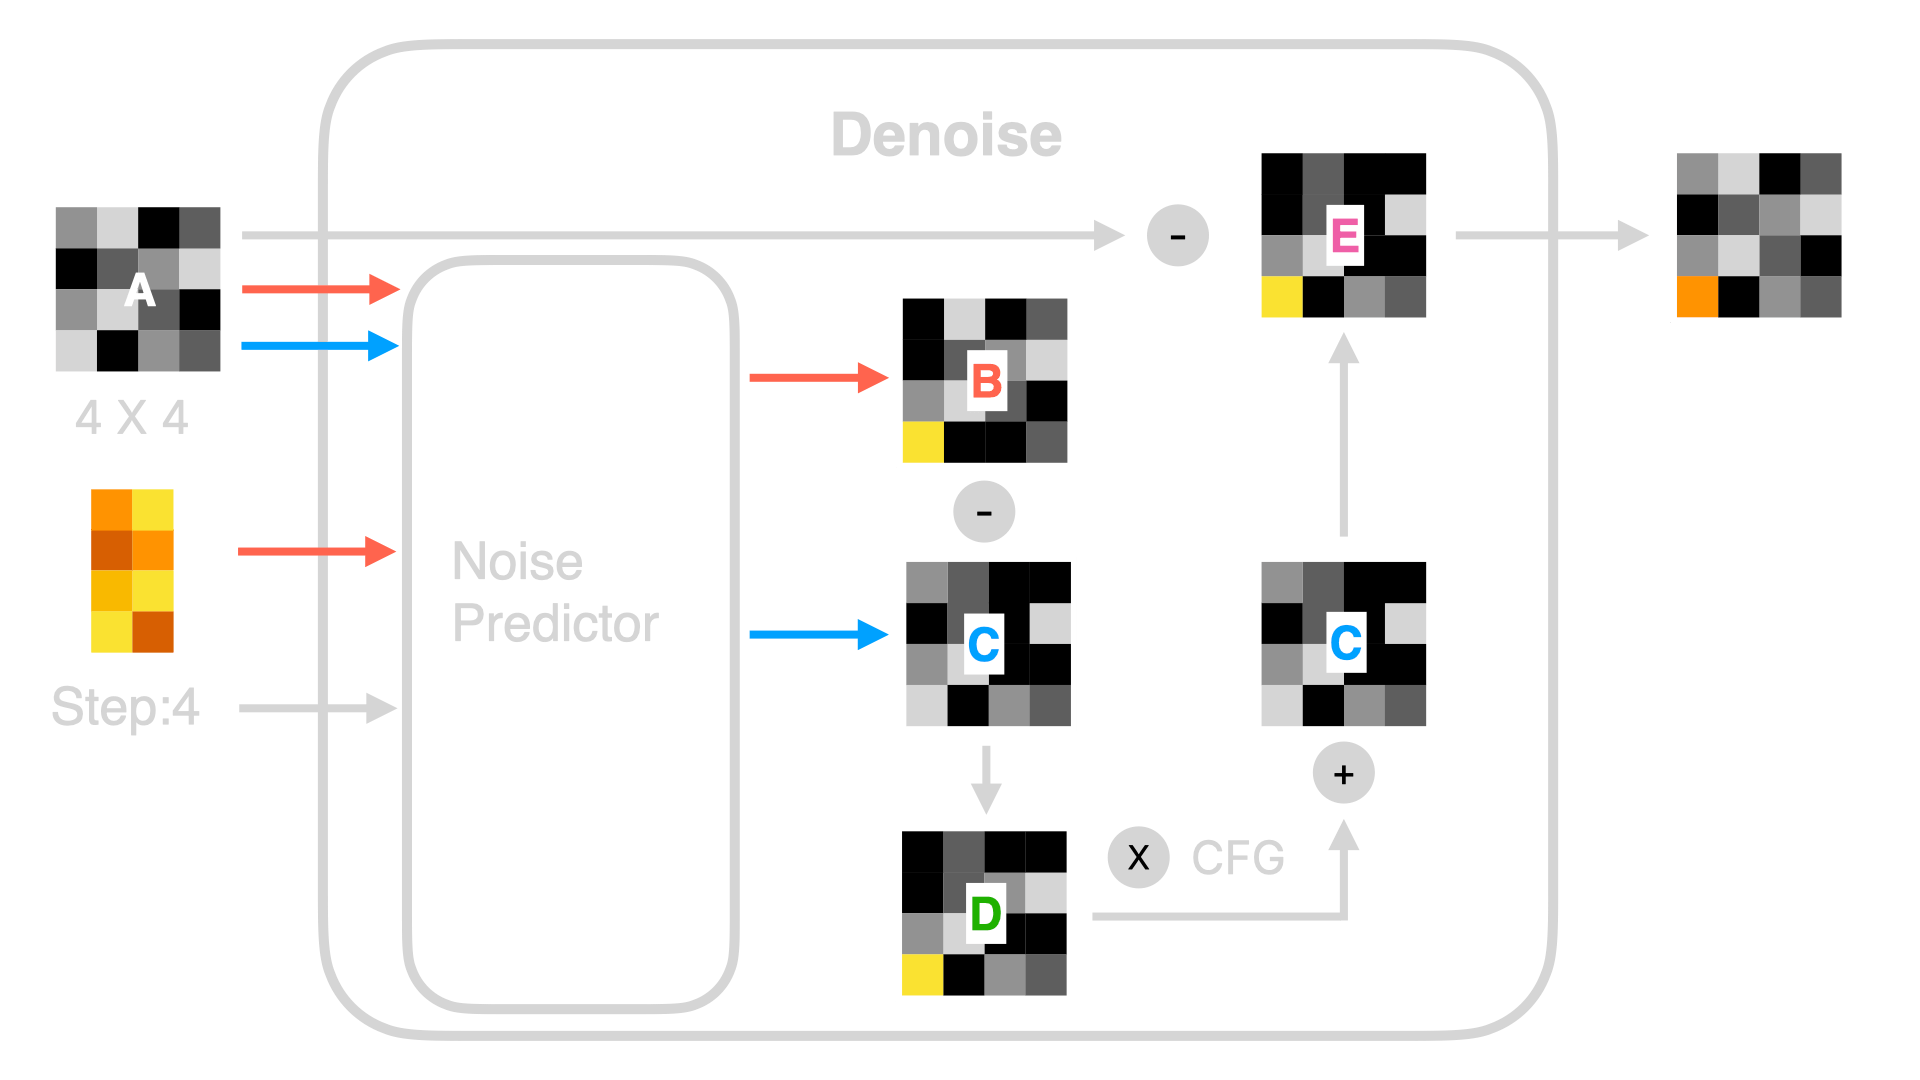
How does the Noise Predictor work? In simple terms, it involves a series of computations, and the algorithm used in the computation is called the UNet algorithm. I will elaborate on this algorithm in subsequent advanced tutorials. For now, you just need to understand that the UNet algorithm is roughly as follows:
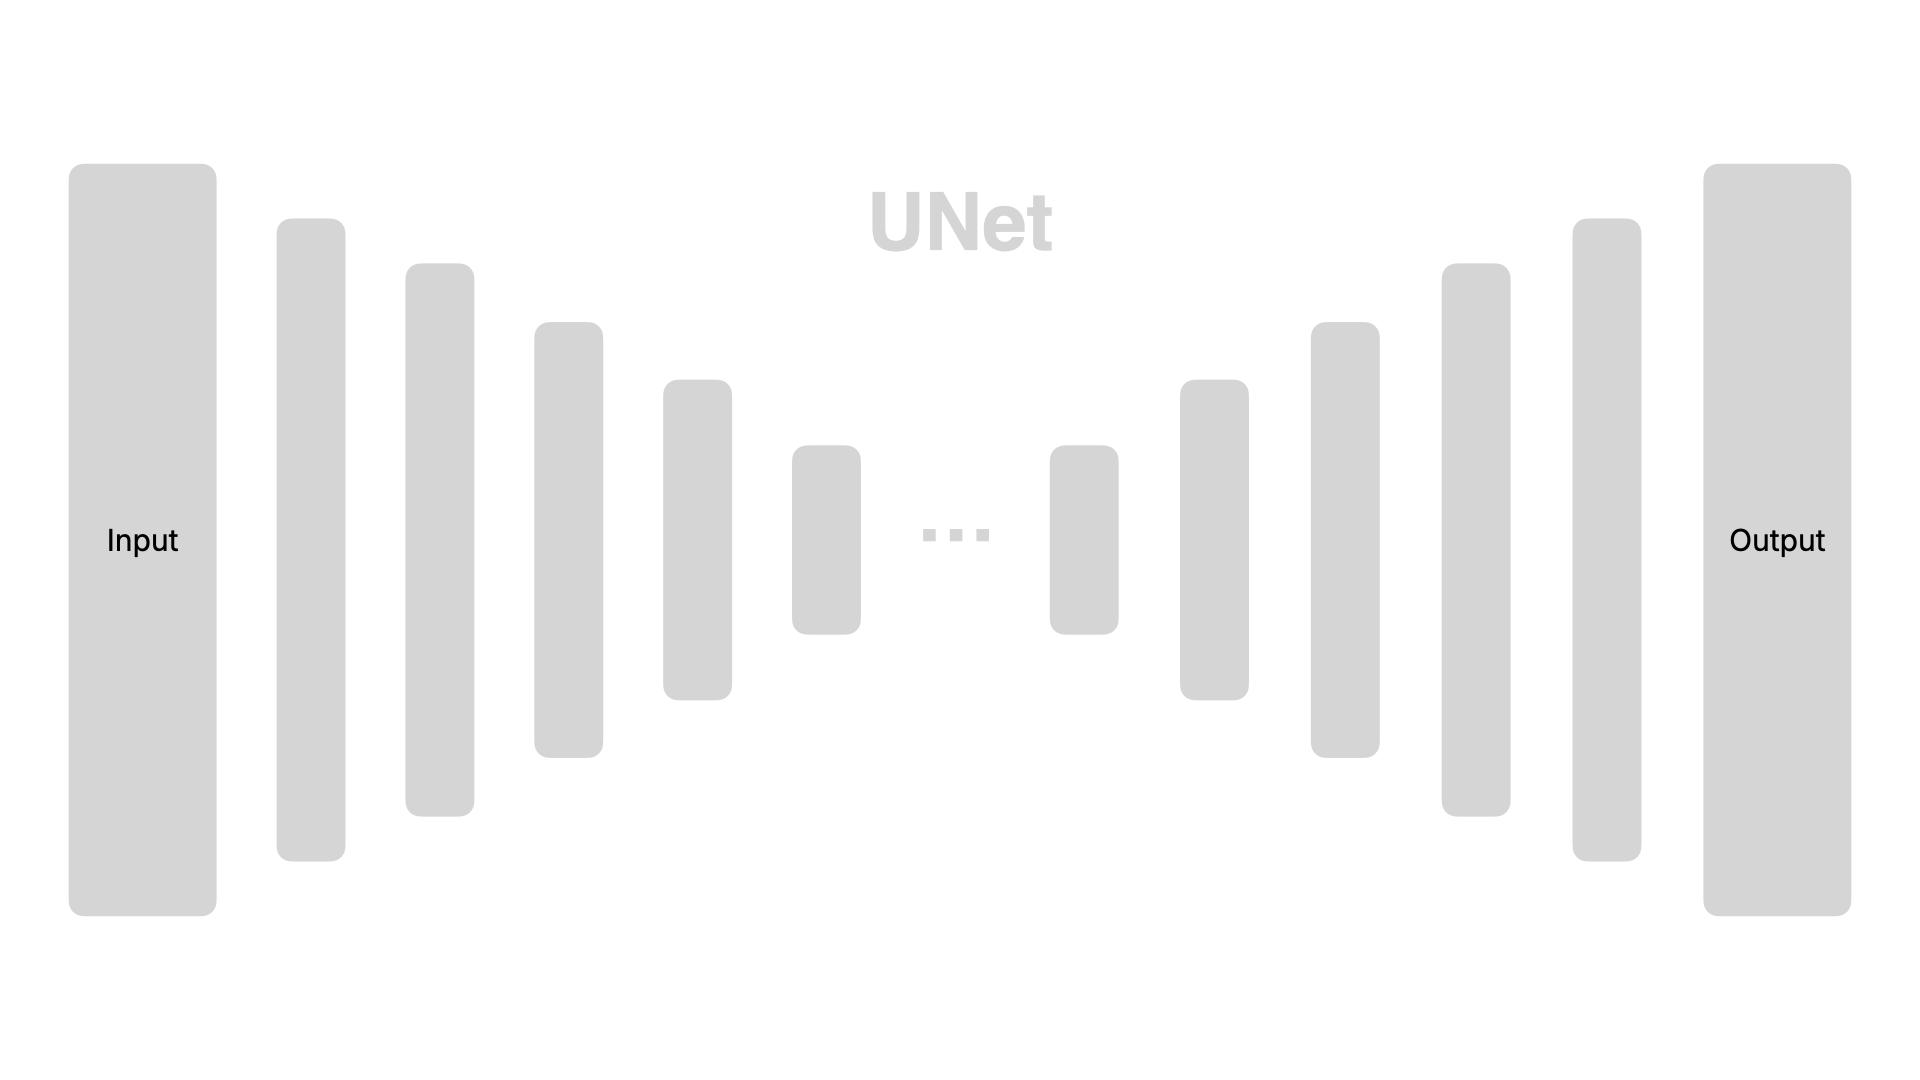
The left side is the input, the right side is the output, and the data is subjected to a series of computations after being input. The long bars in the picture represent each step of the computation. We can change the output results by adjusting the parameter weights inside the pillars, ultimately changing the effect of generated images. However, changing the result inside each pillar is relatively complex.
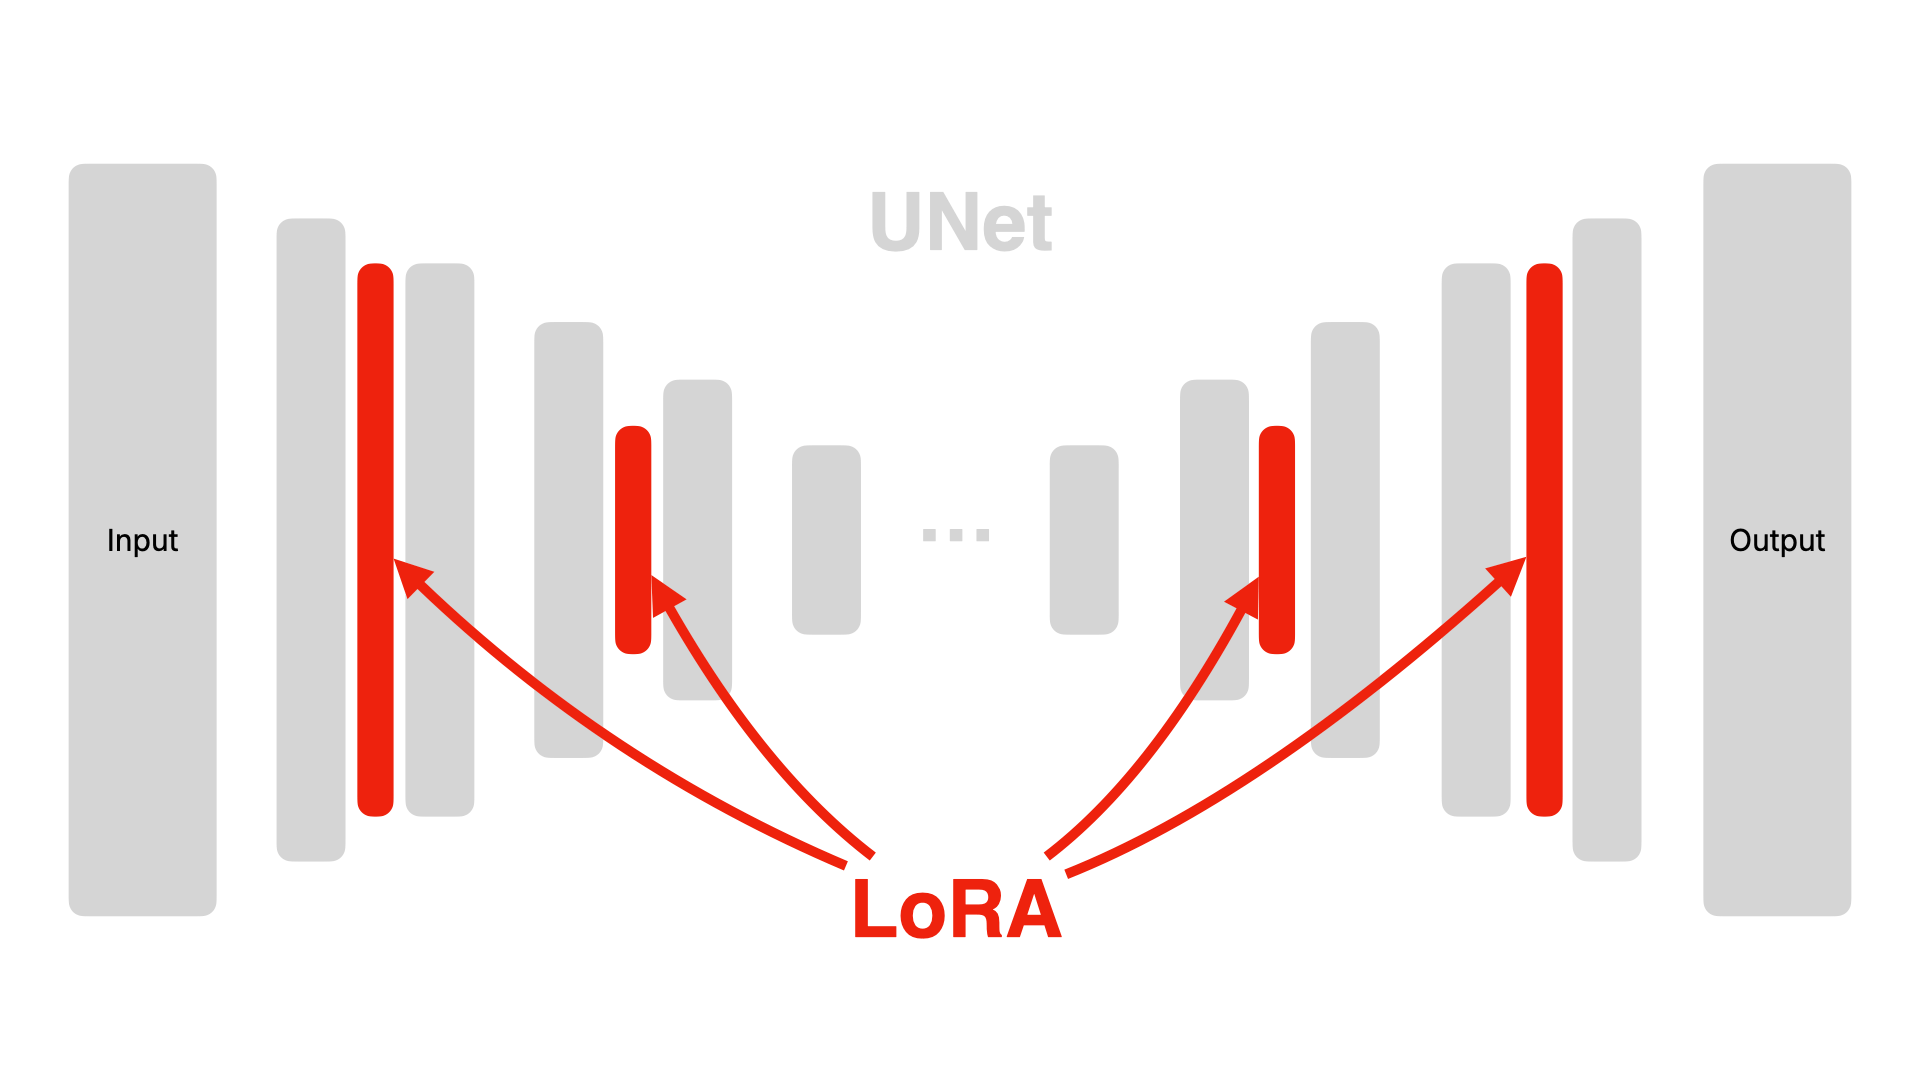
As a result, researchers began to look for a simpler method, and they found that if parameters are injected into each function layer, the effect of changing the image can also be achieved. This method is called LoRA (Low-Rank Adaptation).
LoRA allows parameters to be injected into each existing layer without disrupting any single function. The advantage of this is that it doesn't damage the original model, it's plug-and-play, and the model size is also relatively small. The visualization effect is as follows:
To understand by analogy, LoRA can be considered similar to a camera "filter". The two images below are generated using the same model, Prompt and Seed. The image on the left is without the effect of LoRA, while the one on the right has the effect of sketch-style LoRA added. The image with sketch-style LoRA appears more like comic line art, and doesn't it look a bit like a filter has been added to the image on the left?
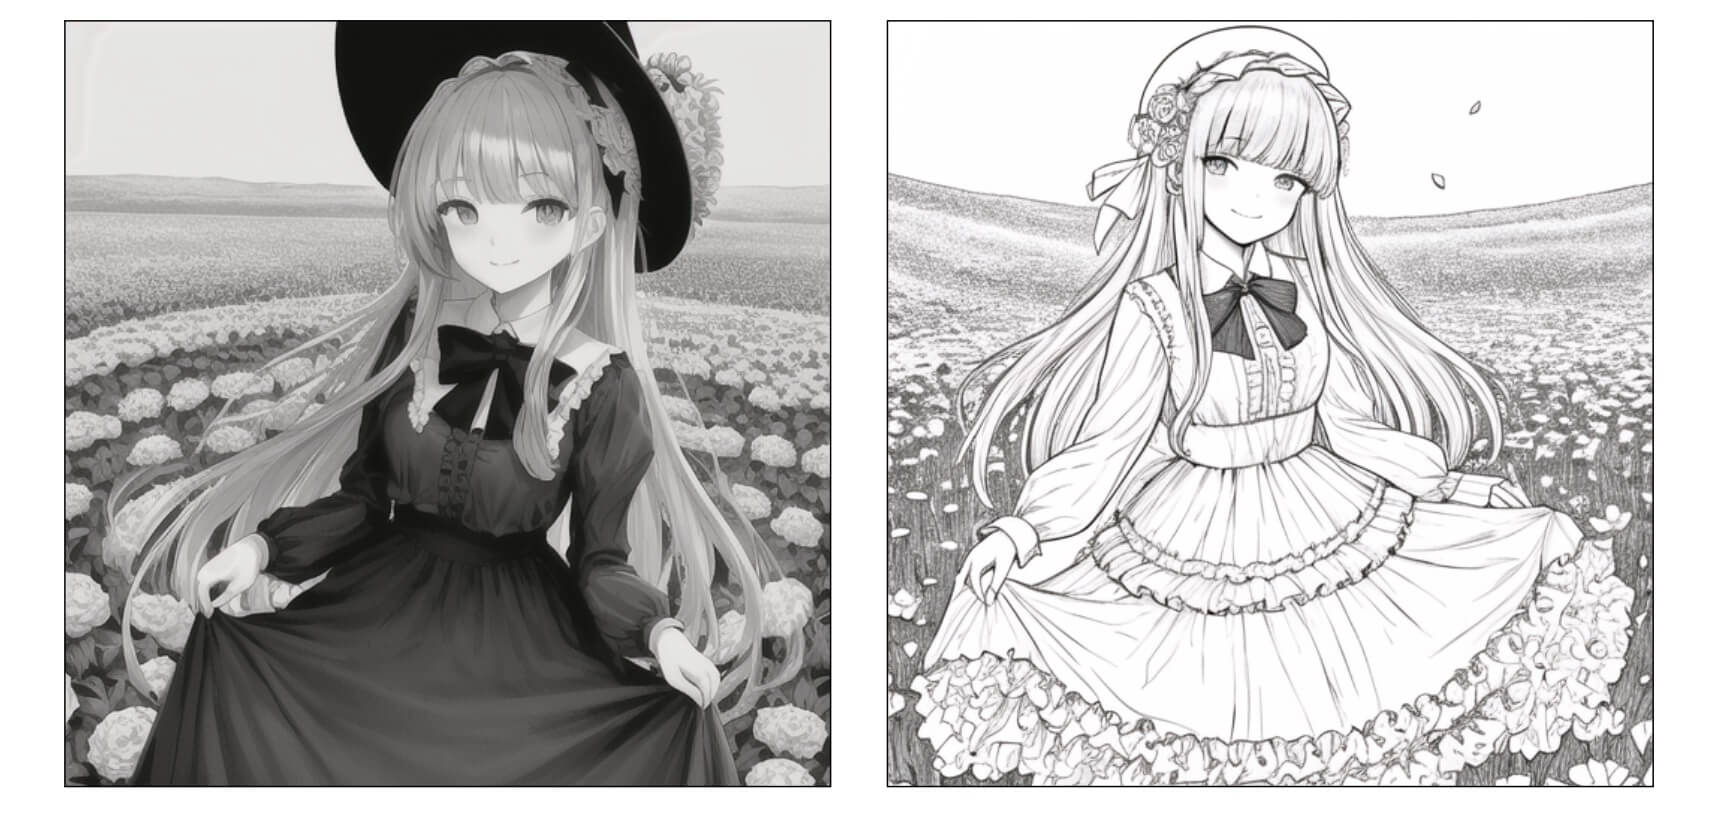
This is the effect of adding LoRA. If you think the regular Stable Diffusion model is not attractive enough, or if the style isn't to your liking, why not try adding some LoRA?
LoRA workflow
Alright, after briefly introducing the principle of LoRA, let's have a look at how to use LoRA in ComfyUI. Actually, having seen the principle introduced earlier, you should be able to guess how to add LoRA nodes:
Adding LoRA Nodes
Simply right-click → All node → loaders → Load LoRA to add a LoRA node.
Connecting Nodes
Connect the left side of the node to the Checkpoint model, and the right side to CLIP and KSampler.
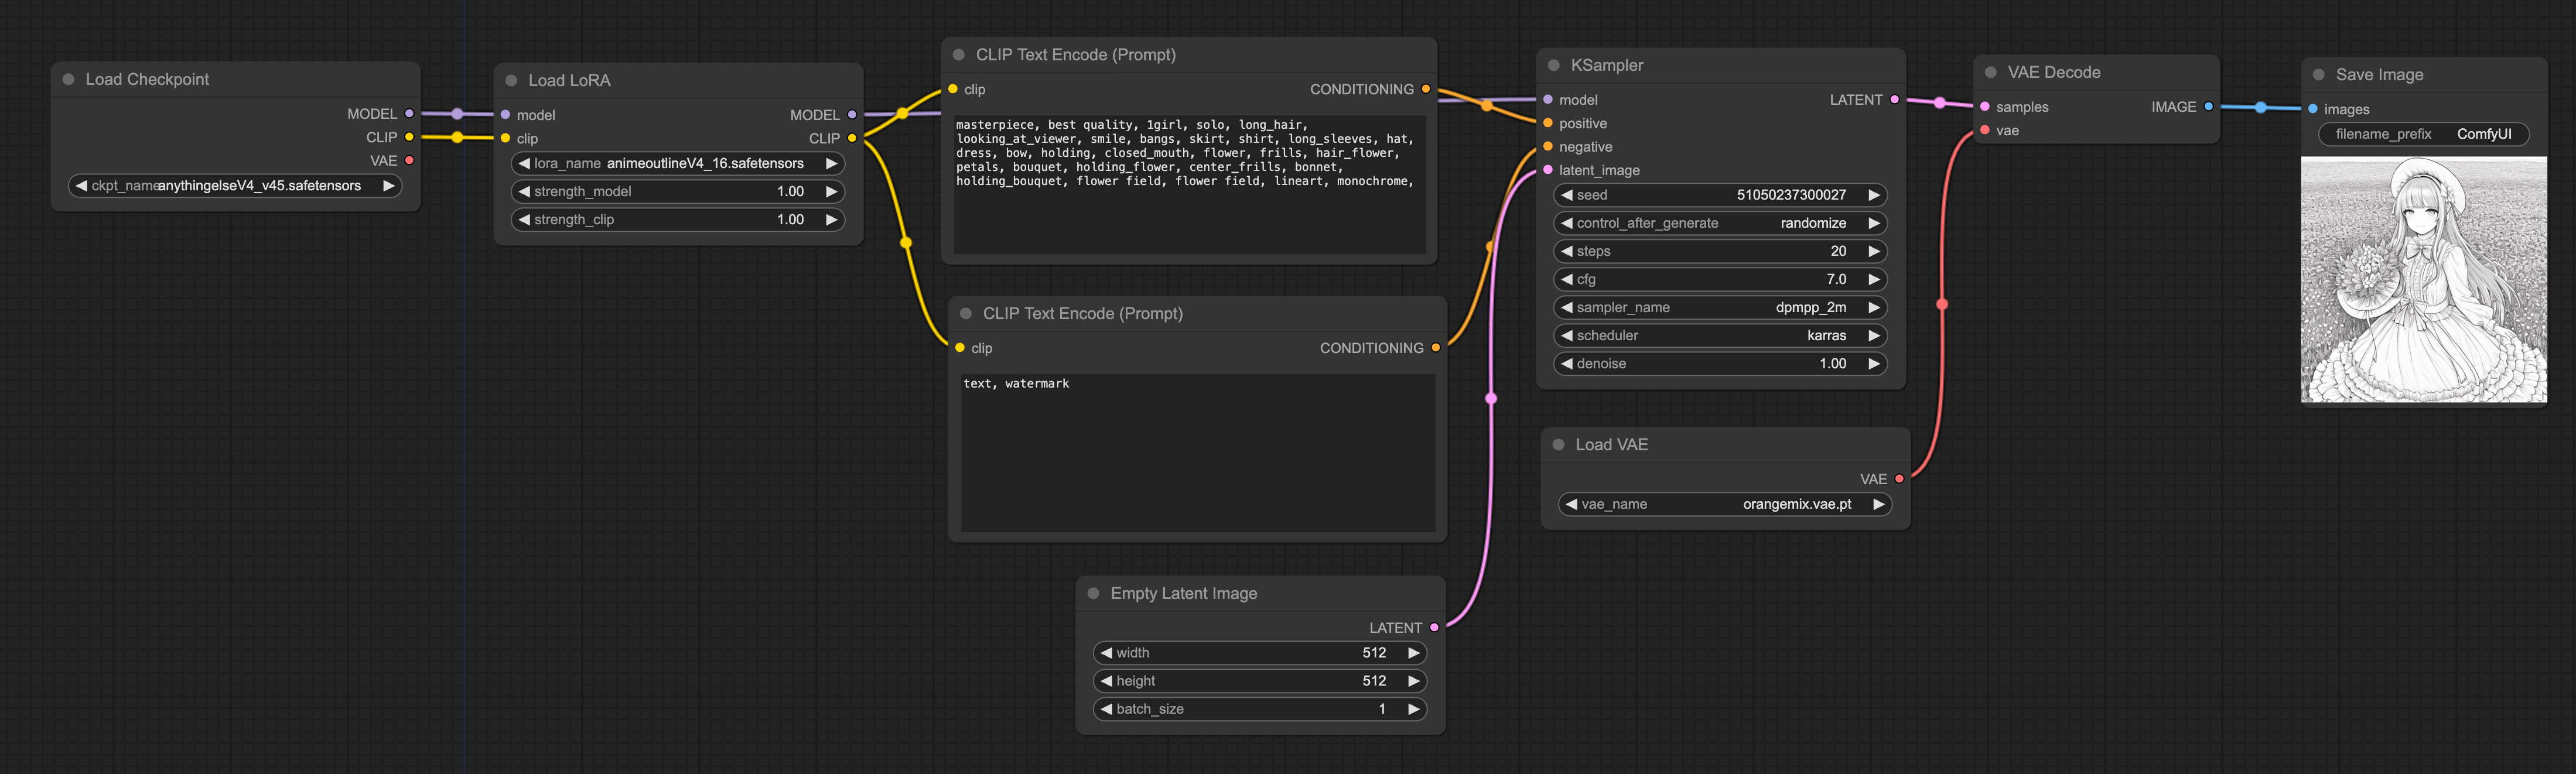
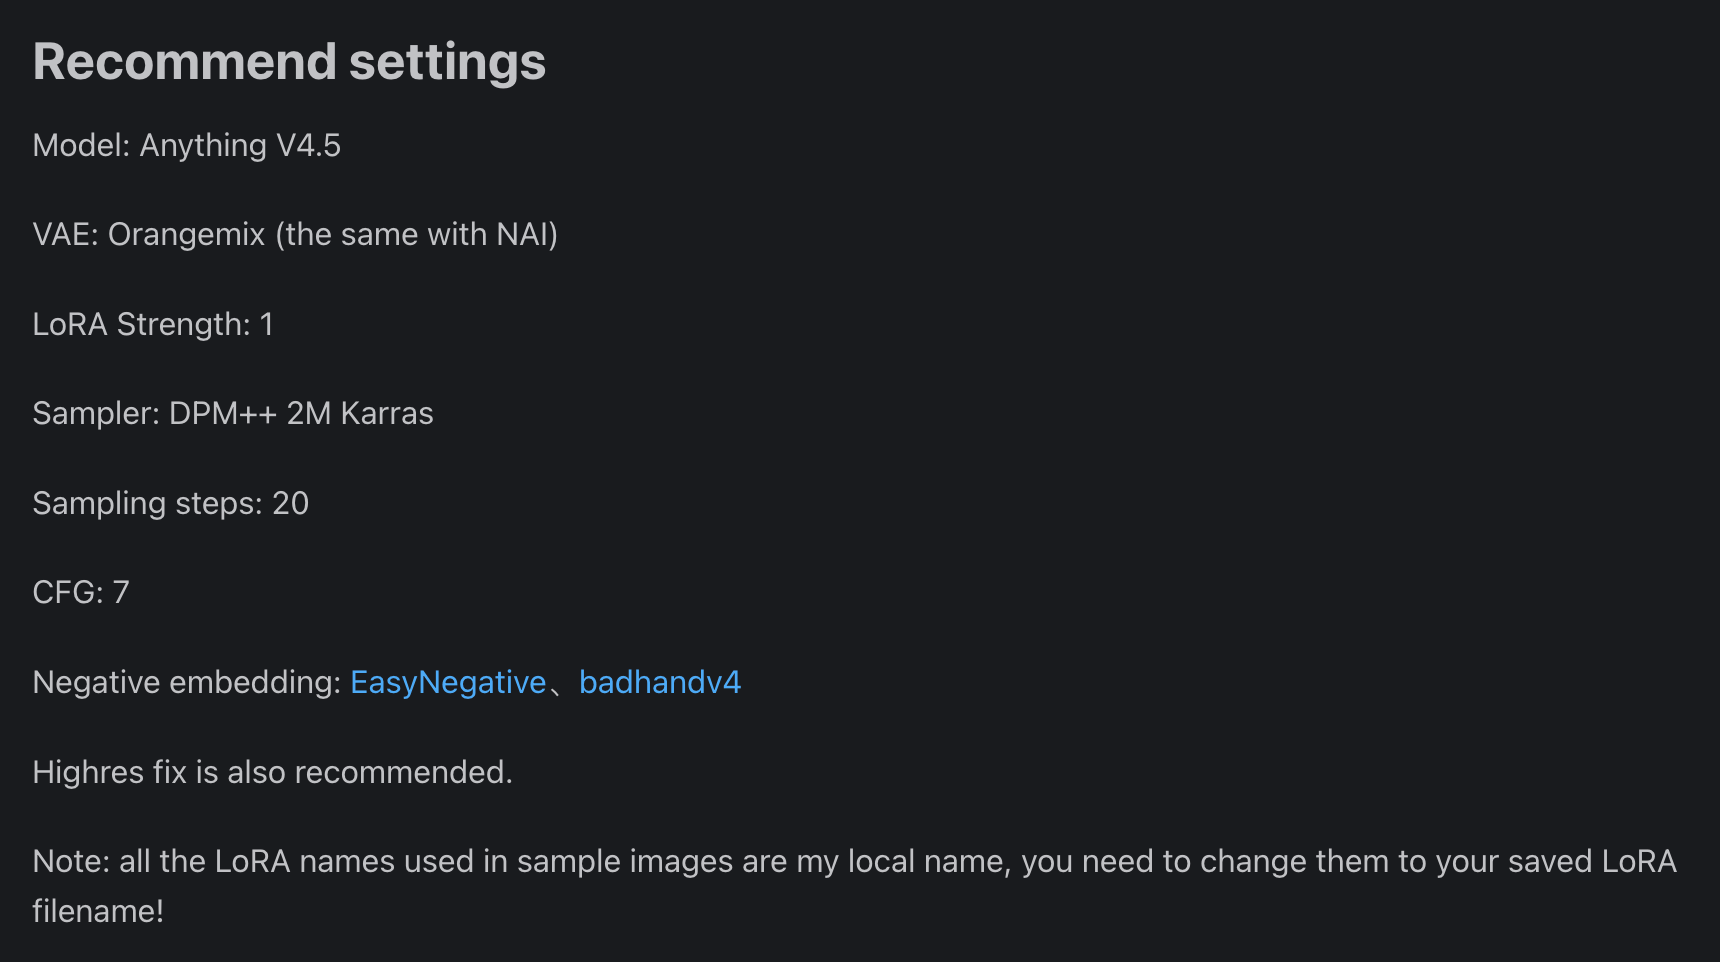
Moreover, if you look closely at my workflow, you will find that I did not directly use the VAE of the checkpoint, but added an extra VAE. This is because the entire denoising process is conducted in Latent Space, so certain LoRAs may perform better under certain VAE algorithms. Whichever VAE and Sampler algorithm to use would generally be announced by those sharing LoRA, as in the case of the Anime Lineart LoRA that I used, which has the following recommended configuration:
Finally, if you are interested in LoRA, you can refer to the chapter LoRA Recommendations in the Basic Electives to learn more about LoRA models.
LCM-LoRA workflow
In addition to affecting the style of the output image, the latest LCM-LoRA can also improve the efficiency of image generation. Although the generation speed of SDXL Turbo is quite fast now, from various comparison tests, LCM-LoRA has the following advantages over Turbo:
-
LCM-LoRA supports generating 1024X1024 images, while Turbo can only support up to 512X512.
-
Generally speaking, images generated using LCM-LoRA have better results. Below are comparison samples (source Stable Diffusion Art (opens in a new tab)), LCM-LoRA is on the left, and Turbo is on the right:

However, in terms of generation speed, Turbo still comes out on top. Turbo generally only requires 1 step, while LCM-LoRA usually needs at least 4 steps. So everyone can decide which method to use.
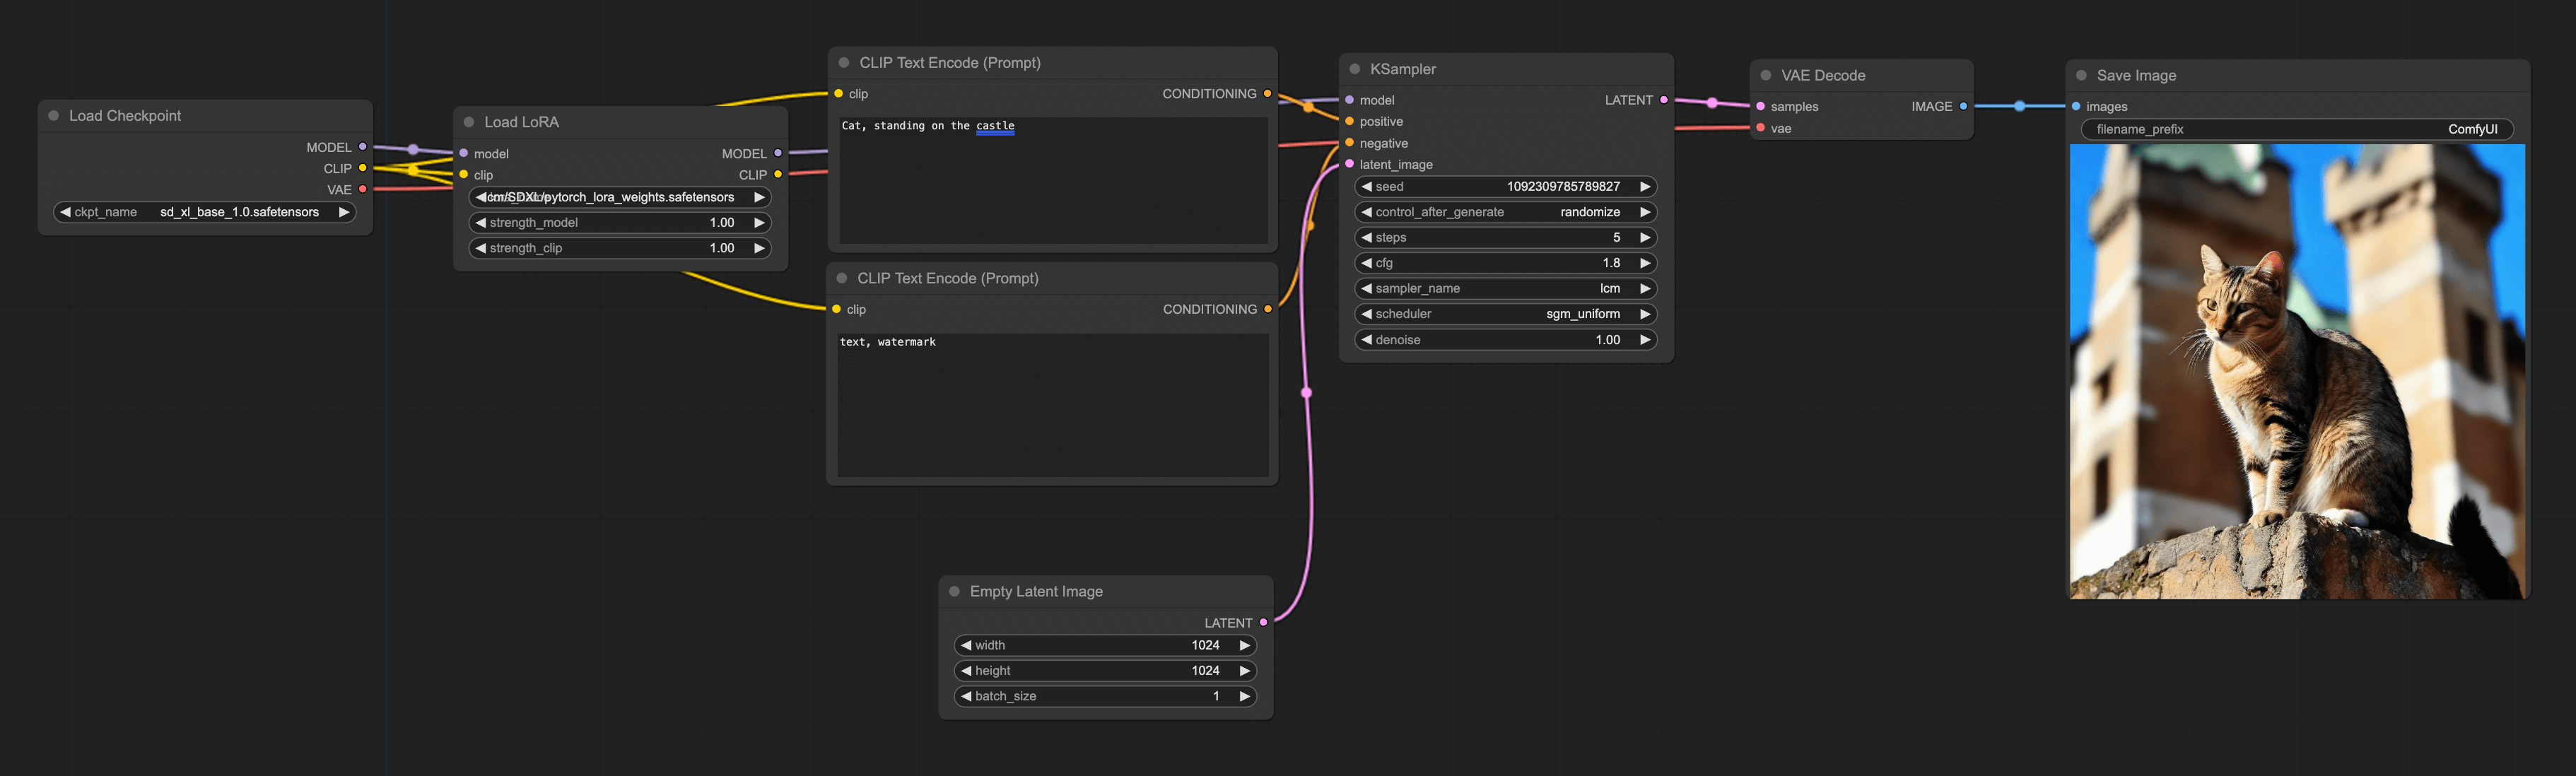
Let's discuss how to configure LCM-LoRA on ComfyUI. The connection method is the same as above, but some adjustments need to be made to the node configuration:
Setting Load LoRA
Continue using the LoRA workflow, firstly, switch the model in Load LoRA to LCM-LoRA. It should be noted that you need to select a LoRA that matches your checkpoint. For instance, if I am using the checkpoint sdxl, I should use sdxl LCM-LoRA.
Setting KSample
- step = 5 (Usually more than 4 is fine)
- cfg = 1.8 (Generally more than 1.5 works)
- sampler_name = LCM
- scheduler = sgm_uniform
Setting Empty Latent Image
Set the aspect ratio to 1024 * 1024. Larger than 1024 is also fine.