Text-to-image
Before starting this chapter, please make sure that you have completed the installation of ComfyUI , and have downloaded the Stable Diffusion v1.5 or Stable Diffusion XL model. Also, ensure that the model files are placed in the appropriate folder.
If you want to use the workflow from this chapter, you can either download and use the Comflowy local version or sign up and use the Comflowy cloud version (opens in a new tab), both of which have the chapter's workflow built-in. Additionally, if you're using the cloud version, you can directly use our built-in models without needing to download anything.
In the last chapter, we introduced the basic principles of Stable Diffusion and how to use it to generate images. In this chapter, we will cover the basic operations of ComfyUI and how to use ComfyUI to generate images.
Default Workflow
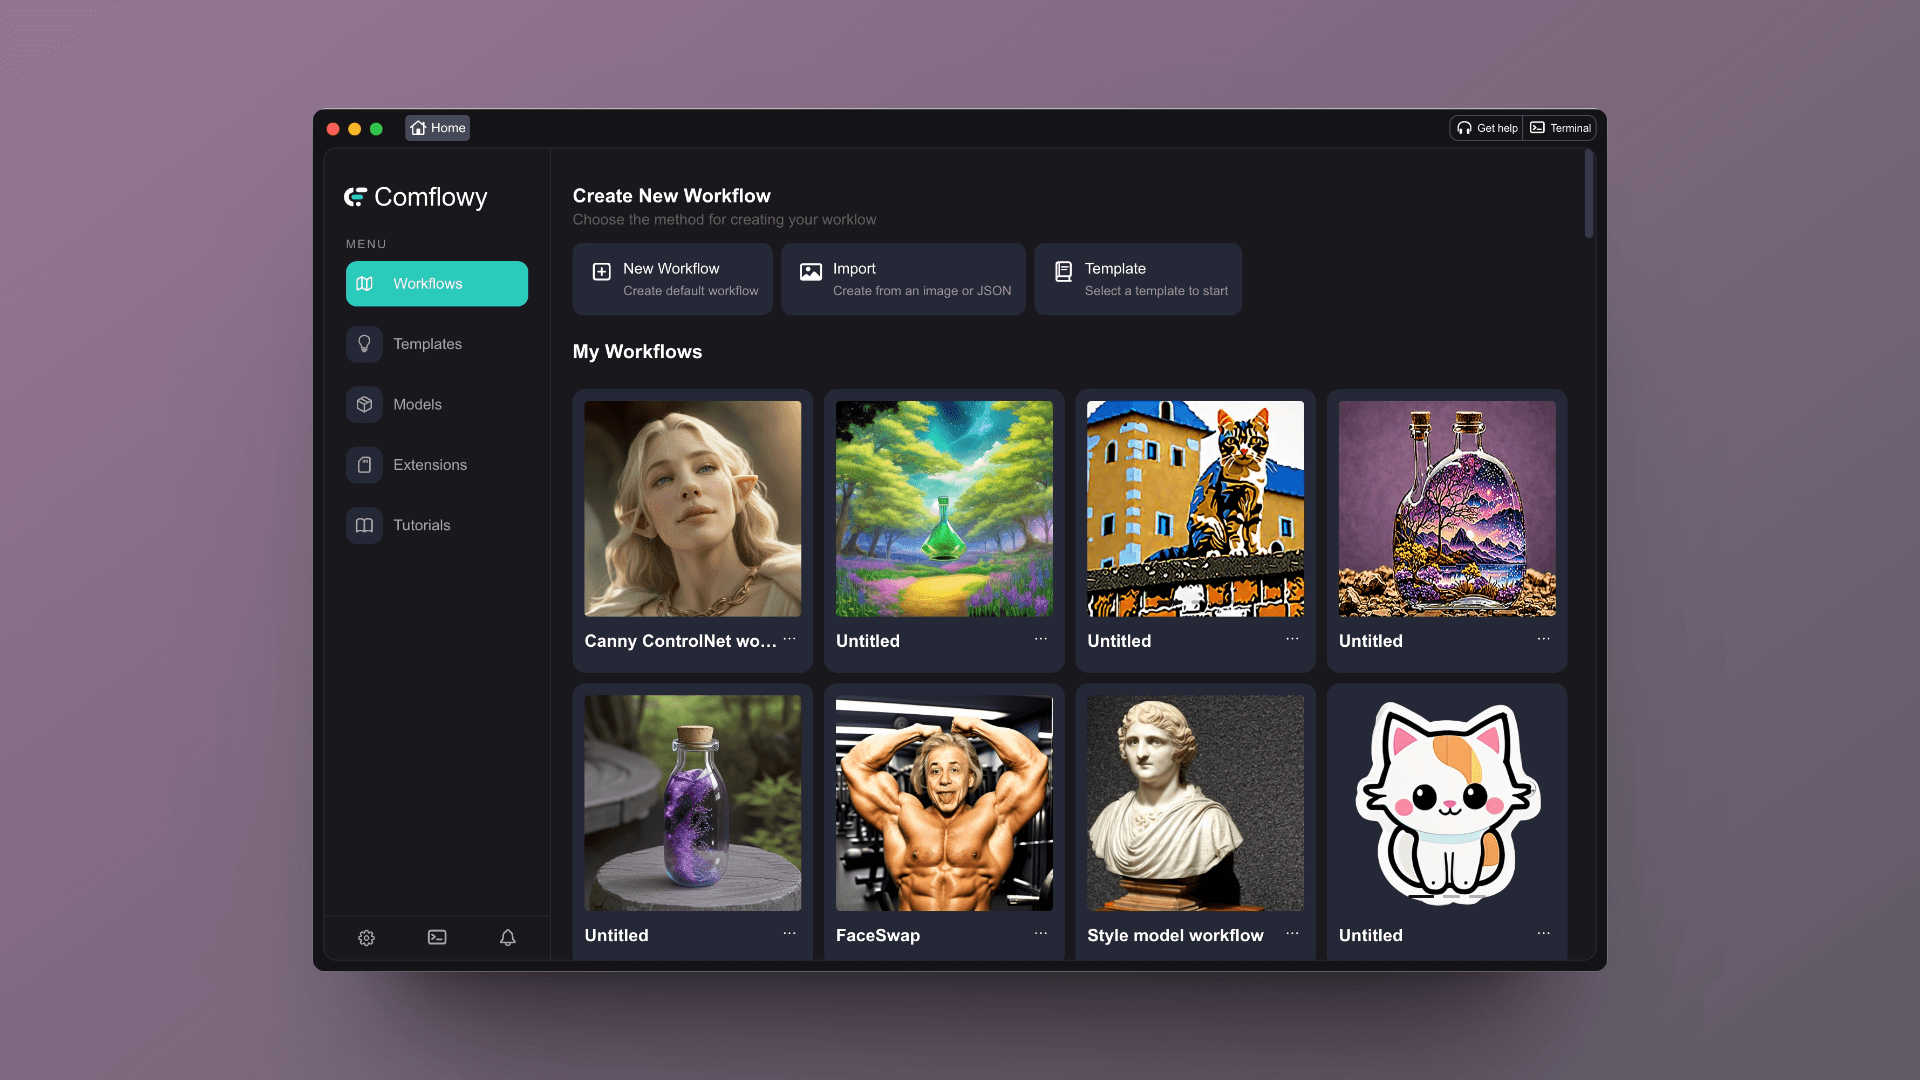
If you are using Comflowy, when you open the application, you will be greeted with an interface like this one. If you're using our cloud version, you should see a similar interface.
Click on the "New workflow" button at the top, and you will see an interface like this:
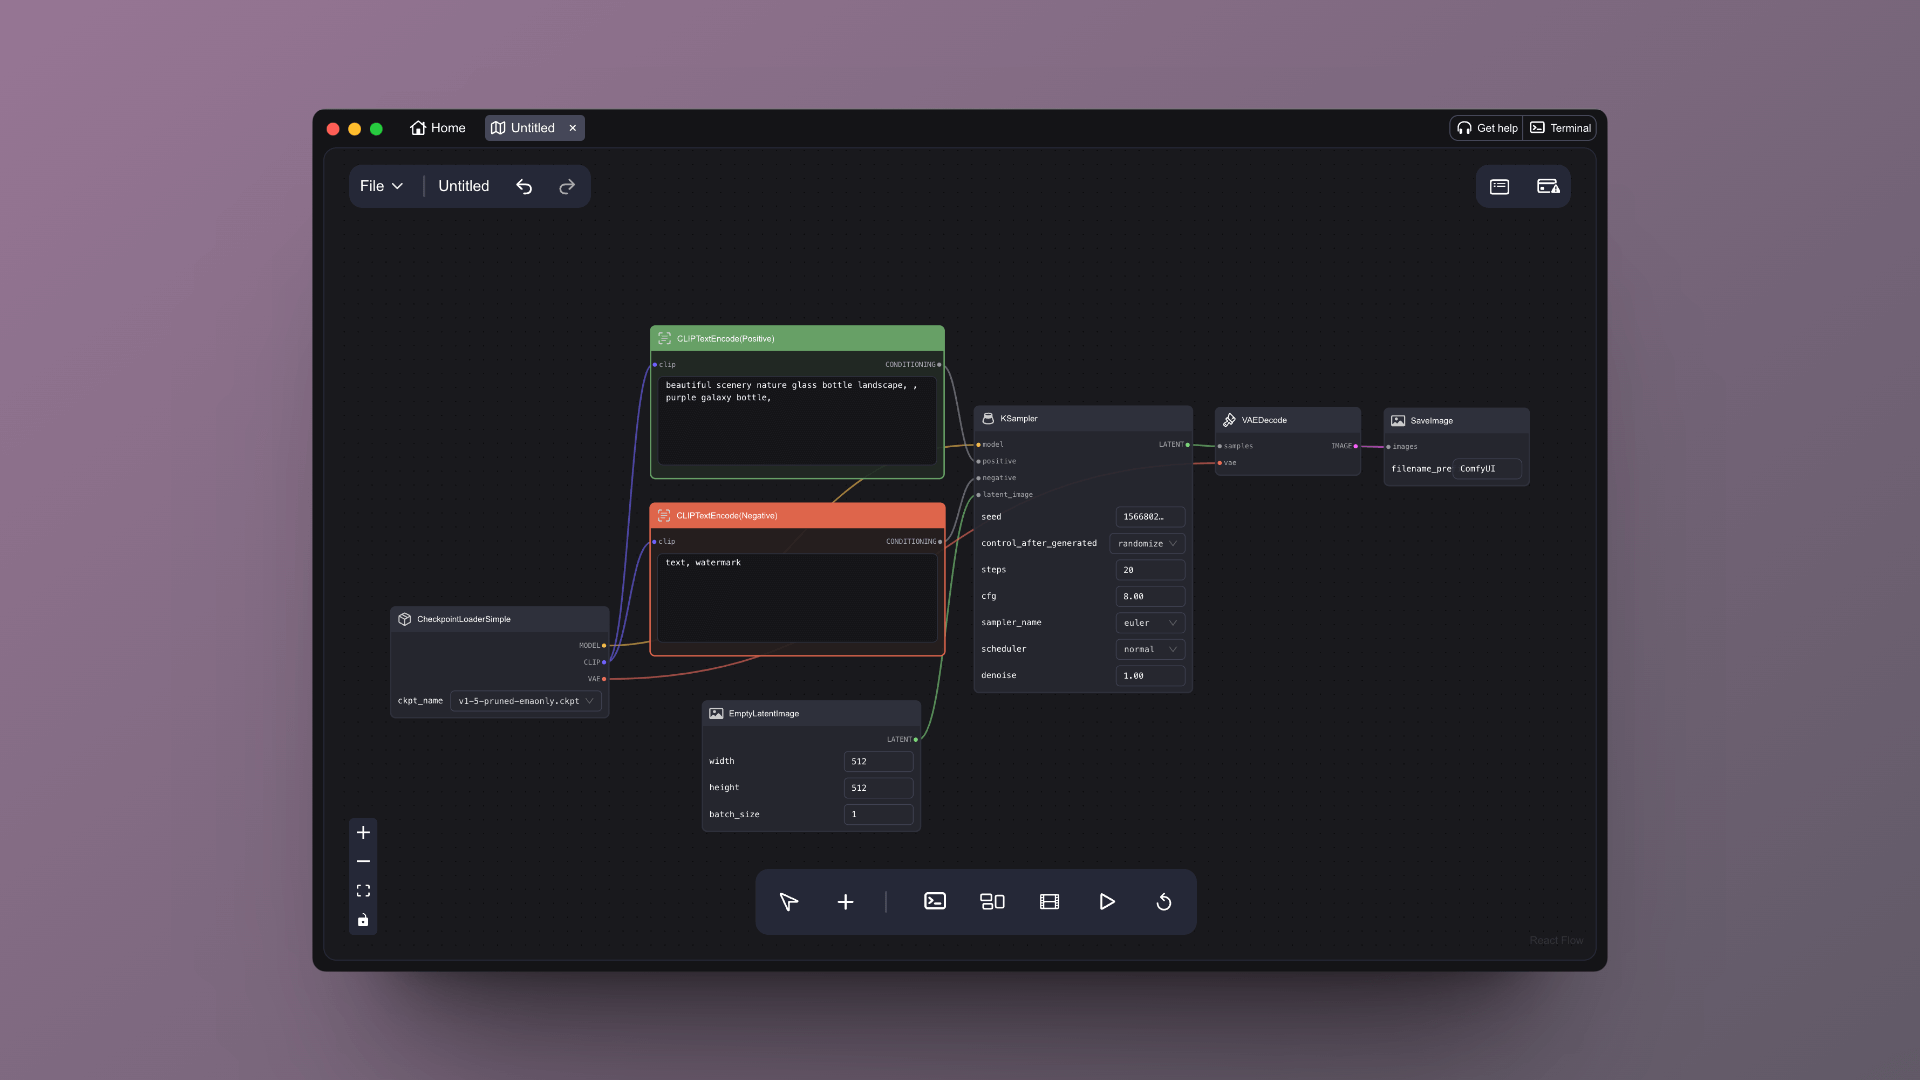
You can click the "Run" button (the play button at the bottom panel) to operate AI text-to-image generation. Ultimately, you will see the generated image on the far right under "Save Image."
After trying the text-to-image generation, you might be wondering what all these blocks and lines represent.
For easier explanation later, let me first briefly introduce the individual boxes. I will refer to these boxes as Nodes in the future, with the left end being the Input end and the right end being the Output end. There will also be some configuration items in the nodes, which I will refer to as Parameters:

Looking back at these nodes, all of them were mentioned in the last chapter. If I slightly adjust the order, you should find them quite familiar (image can be clicked to enlarge👇):
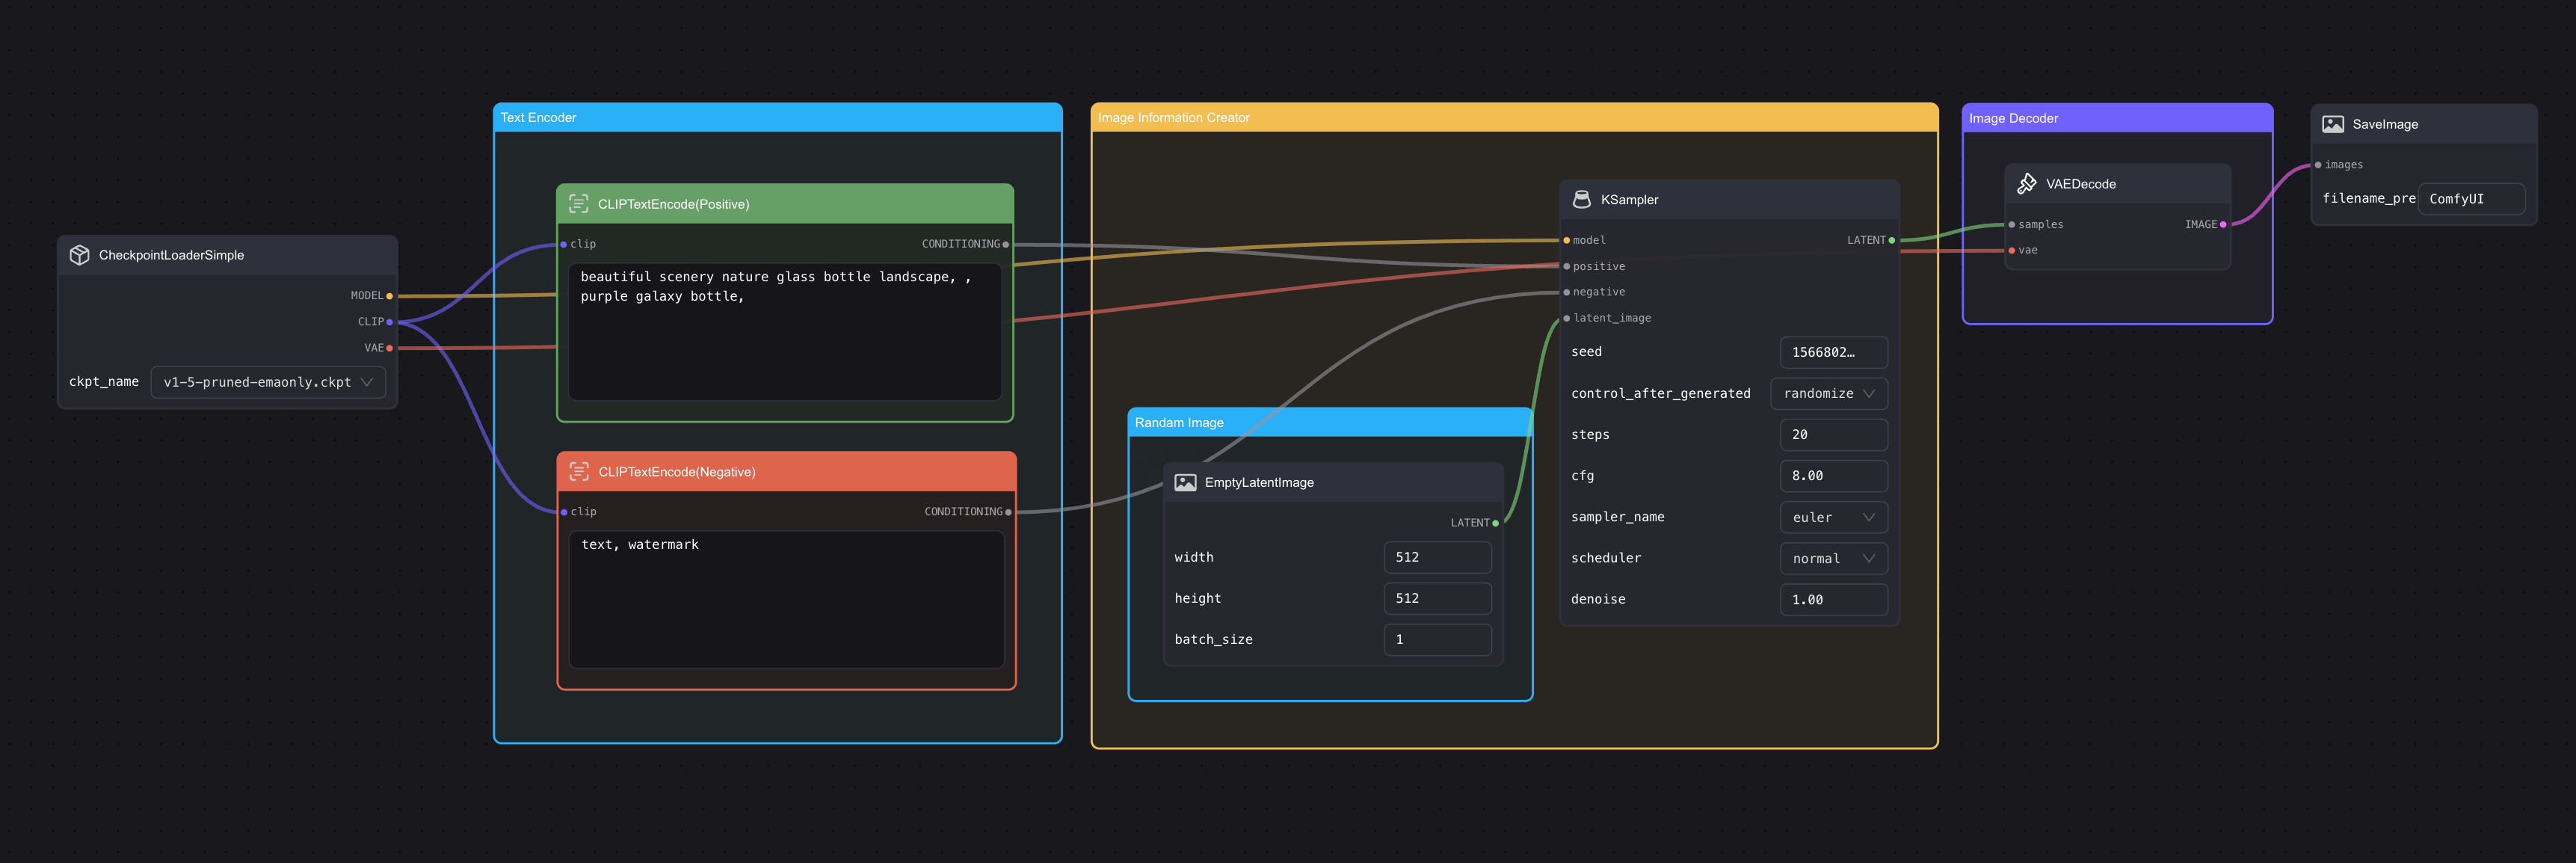
Does it all look familiar now? The blocks on the initial Workflow (which I will refer to as "nodes" later) represent the three main components mentioned in the previous chapter on Stable Diffusion, they just have different names in ComfyUI:
| Node Name in ComfyUI | Corresponding Name in SD Model | Explanation |
|---|---|---|
| CLIP Text Encode | Text Encoder | Remember in the last chapter, we mentioned that the Text Encoder used in Stable Diffusion is the Text Encoder from CLIP? In fact, this component and the Text Encoder mentioned in the last chapter are the same thing. It's just that there are two here, but if you follow the output connections downwards, you will see that the two nodes connect to the positive and negative ends, signifying one is for positive prompt and the other for negative prompt. |
| KSmapler | Image Information Creator | This corresponds to the core part of the model generating images. In ComfyUI, the names are quite different and there are many configuration items, which I will explain in detail in later chapters. |
| Empty Latent Image | Image Information Creator | As we mentioned in the last chapter, the entire image creation process takes place in Latent Space, so this node in ComfyUI is called Empty Latent Image. |
| VAE Decoder | Image Decoder | The whole generation process happens in Latent Space, and as I mentioned before, the full name for the process is Variational Auto Encoder (VAE), hence why it's called VAE Decoder in ComfyUI. |
Both ends also have items that were not mentioned in the last chapter:
- Save Image: As the name suggests, this is to save the image after output.
- Load Checkpoint: This can be understood as an image model loader. For example, Stable Diffusion has versions like 1.5, XL, XL-Turbo, etc. To switch or load different models, this node is necessary.
Node Introduction
After viewing the entire workflow, let's discuss in detail the configuration of each node. We start from the left and introduce each node.
Load Checkpoint
The first one is Load Checkpoint. From the output node on the right, we can see that the Checkpoint consists of three parts: model, CLIP and VAE. These three parts are the three key steps of the Stable Diffusion model we introduced earlier. This node serves as the starting point of all workflows.
Clicking on the selection button in the node allows you to switch models, but only to those you have already downloaded. Refer to the relevant chapter for information on how to download models.
Speaking of models, I'd like to emphasize again that you generally see two types of model extensions:
- safetensors: Models with this extension are typically saved in numpy format, meaning only tensor data is saved, no code at all, hence loading these files would be safer and faster.
- ckpt: This type of file is serialized, implying they could contain some malicious code, thus posing a potential security risk when such models are loaded.
I would recommend prioritizing the downloading and usage of model files with the safetensors extension.
In addition, you may see some models marked as fp16 in their name. What does that mean?
It stands for half-precision floating-point format. Compared with the standard 32-bit floating point, this format requires less storage space and performs calculations faster. However, the precision and diversity of the images it produces might be slightly inferior compared to the full version. Therefore, if you want quicker results, you might want to consider the fp16 version of the model.
CLIP Text Encode(Prompt)
Next up is the CLIP Text Encode node (the full name of CLIP is Contrastive Language-Image Pre-training) which primarily inputs prompts. Typically, there will be two such nodes; one for positive Prompt detailing what you would like to see in the image; and the other for negative Prompt listing what you do not want to appear in the image.
Generally, there are a few principles to follow when writing Stable Diffusion prompts:
- The length of the Prompt is not necessarily better; try to keep it within 75 tokens (or about 60 words).
- Use commas to separate. Stable Diffusion doesn't understand grammar, so you need to list the keywords that you want in the image and separate them with commas.
- Place the more important words in the front. If you want to generate a beautiful landscape picture, you can put 'beautiful scenery nature' at the very front.
Furthermore, there's a little trick where you can input (keyword:weight) to control the weight of keywords. For example, (high building: 1.2 ) means that the weight for 'high building' increases. If the weight number is less than 1, it means that the relevance of this word decreases in the generated image.
Empty Latent Image
Following is the empty subspace image node. If you need to adjust the size of the final image produced, you would need to adjust the values of width and height. The batch_size is the number of images produced each time the model runs. If you set this to 4, it means four images will be generated each time.
If you're using the SD v1.5 model, the optimal size is 512x512. Some fine-tuned versions based on SD v1.5 also support 768x768. Therefore, some common aspects ratios include:
- 1:1 (Square): 512x512, 768x768
- 3:2 (Horizontal): 768x512
- 2:3 (Vertical): 512x768
- 4:3 (Horizontal): 768x576
- 3:4 (Vertical): 576x768
- 16:9 (Widescreen): 912x512
- 9:16 (Portrait): 512x912
If you're using the SDXL model, the optimal size is 1024x1024, with common aspect ratios including:
- 1:1 (Square): 1024x1024, 768x768
- 3:2 (Horizontal): 1152x768
- 2:3 (Vertical): 768x1152
- 4:3 (Horizontal): 1152x864
- 3:4 (Vertical): 864x1152
- 16:9 (Widescreen): 1360x768
- 9:16 (Portrait): 768x1360
Lastly, it should be noted that both width and height must be divisible by 8.
You might wonder why some models, when set to an image size of 512X512, produce very bizarre results, such as two heads in one image, while some models, like SDXL, have a default size of 1024x1024. The main reason is that these models were trained on images of different sizes during their training phase. For instance, SDXL was trained on larger images. If we draw a parallel with sculpting, these models can be compared to sculptors who learn to carve marble through training. Some sculptors only practiced on 1024x1024 marbles and didn't learn on 2048x2048 ones, hence they wouldn't do so well on larger marbles.
Save Image
After the image generation is completed, if you right-click on the image, you will see a 'Save Image' option. Clicking this button allows you to download the generated image. The text box in the node is for setting the prefix of the image name. For example, if the default is ComfyUI, it means that the filename of the image you saved will start with ComfyUI, followed by a string of numbers.
KSampler
Finally, there's KSampler. A sampler in English, if you want to know more about the sampler, you can look up related advanced tutorials; the basic tutorial only tells you how to use it. The KSampler contains the following parameters:
- seed: This is a random seed mainly used for controlling the initial noise in the subspace. If you want to generate identical images, you would need to use this random seed. It should be noted that the seed and the Prompt must be the same in order to generate identical images. For example, you could use the default Prompt from the Default Workflow (beautiful scenery nature glass bottle landscape, purple galaxy bottle) to generate an image. Then you can copy this random seed, for example, 156680208700286, change the word purple in the Prompt to green to generate a new image, paste the copied seed 156680208700286 to replace the new seed, then change the Prompt back to the original purple and regenerate the image. You will find that the image produced this time is exactly the same as the one generated the first time.
- control_after_generate: After each image is generated, the seed value will change. This configuration item is for setting the rules for this change: randomize, increment (increase by 1), decrement (decrease by 1), fixed.
- step: Number of sampling steps. Generally, the larger the number of steps, the better the effect, but it also depends on the model and the sampler being used.
- cfg: Full name is Classifier Free Guidance. I introduced it in chapter SD Basics. Generally, setting this value between 6~8 yields good results.
- sampler_name: Sampler name. You can choose the sampler algorithm through this field. If you're interested in it, you can read related advanced tutorials.
- scheduler: The scheduler mainly controls the denoising process in each step. You can choose different scheduling algorithms through it. Some algorithms opt to subtract the same amount of noise in each step, while some strive to remove as much noise as possible in each step.
- denoise: This indicates how much initial noise to add, with 1 representing all. Generally, for creating text to image, you can simply set it to 1 as default.
Best Practices
Among all the configuration items, besides the model affecting the results of the output, the next is the several configurations of the KSampler. The advanced tutorial will share the features of each sampler, and in this section, I will only share the best practices:
| checkpoint | sampler_name | scheduler | step | cfg | |
|---|---|---|---|---|---|
| Very concerned about speed | SDXL Turbo fp16 | dpmpp_2m(some software will call it dpm++2M) | normal | 1-2 | 6-8 |
| Very concerned about image quality and diversity of generated content | SDXL refiner | dpmpp_2m(some software will call it dpm++2M) | karras | 20-30 | 6-8 |
| UniPC(faster than dpmpp_2m) | karras | 20-30 | 6-8 | ||
| Concerned about image quality, not so much about diversity, but want to improve generation speed | SDXL refiner fp16 | dpmpp_sde | karras | 10-15 | 6-8 |
| ddim | normal | 10-15 | 6-8 |
Please note that the configuration of KSampler is strongly related to the model (checkpoint), for example, SDXL-Turbo, because it compresses the image generation process, its optimal cfg should not be too large, it might be best to try 1 or 4. Also, when you download other people's models, the author usually specifies the optimal parameter configuration in the model introduction. You can follow this configuration to set the parameters.
I currently use SDXL Turbo quite often. What model to use also depends on your image creation needs. You need to consider your situation, and try different options.
Connection
After understanding the basic settings, let's take a look at the connections and basic operations.
Don't be troubled by these seemingly cumbersome lines, thinking they are hard to understand. It might even feel like defusing a bomb, unsure whether to cut the red wire or the yellow wire. 😂
In fact, these nodes are like Lego blocks. They can be combined freely while following certain rules. Let's take KSampler, which has the most connection points in the diagram, as an example:
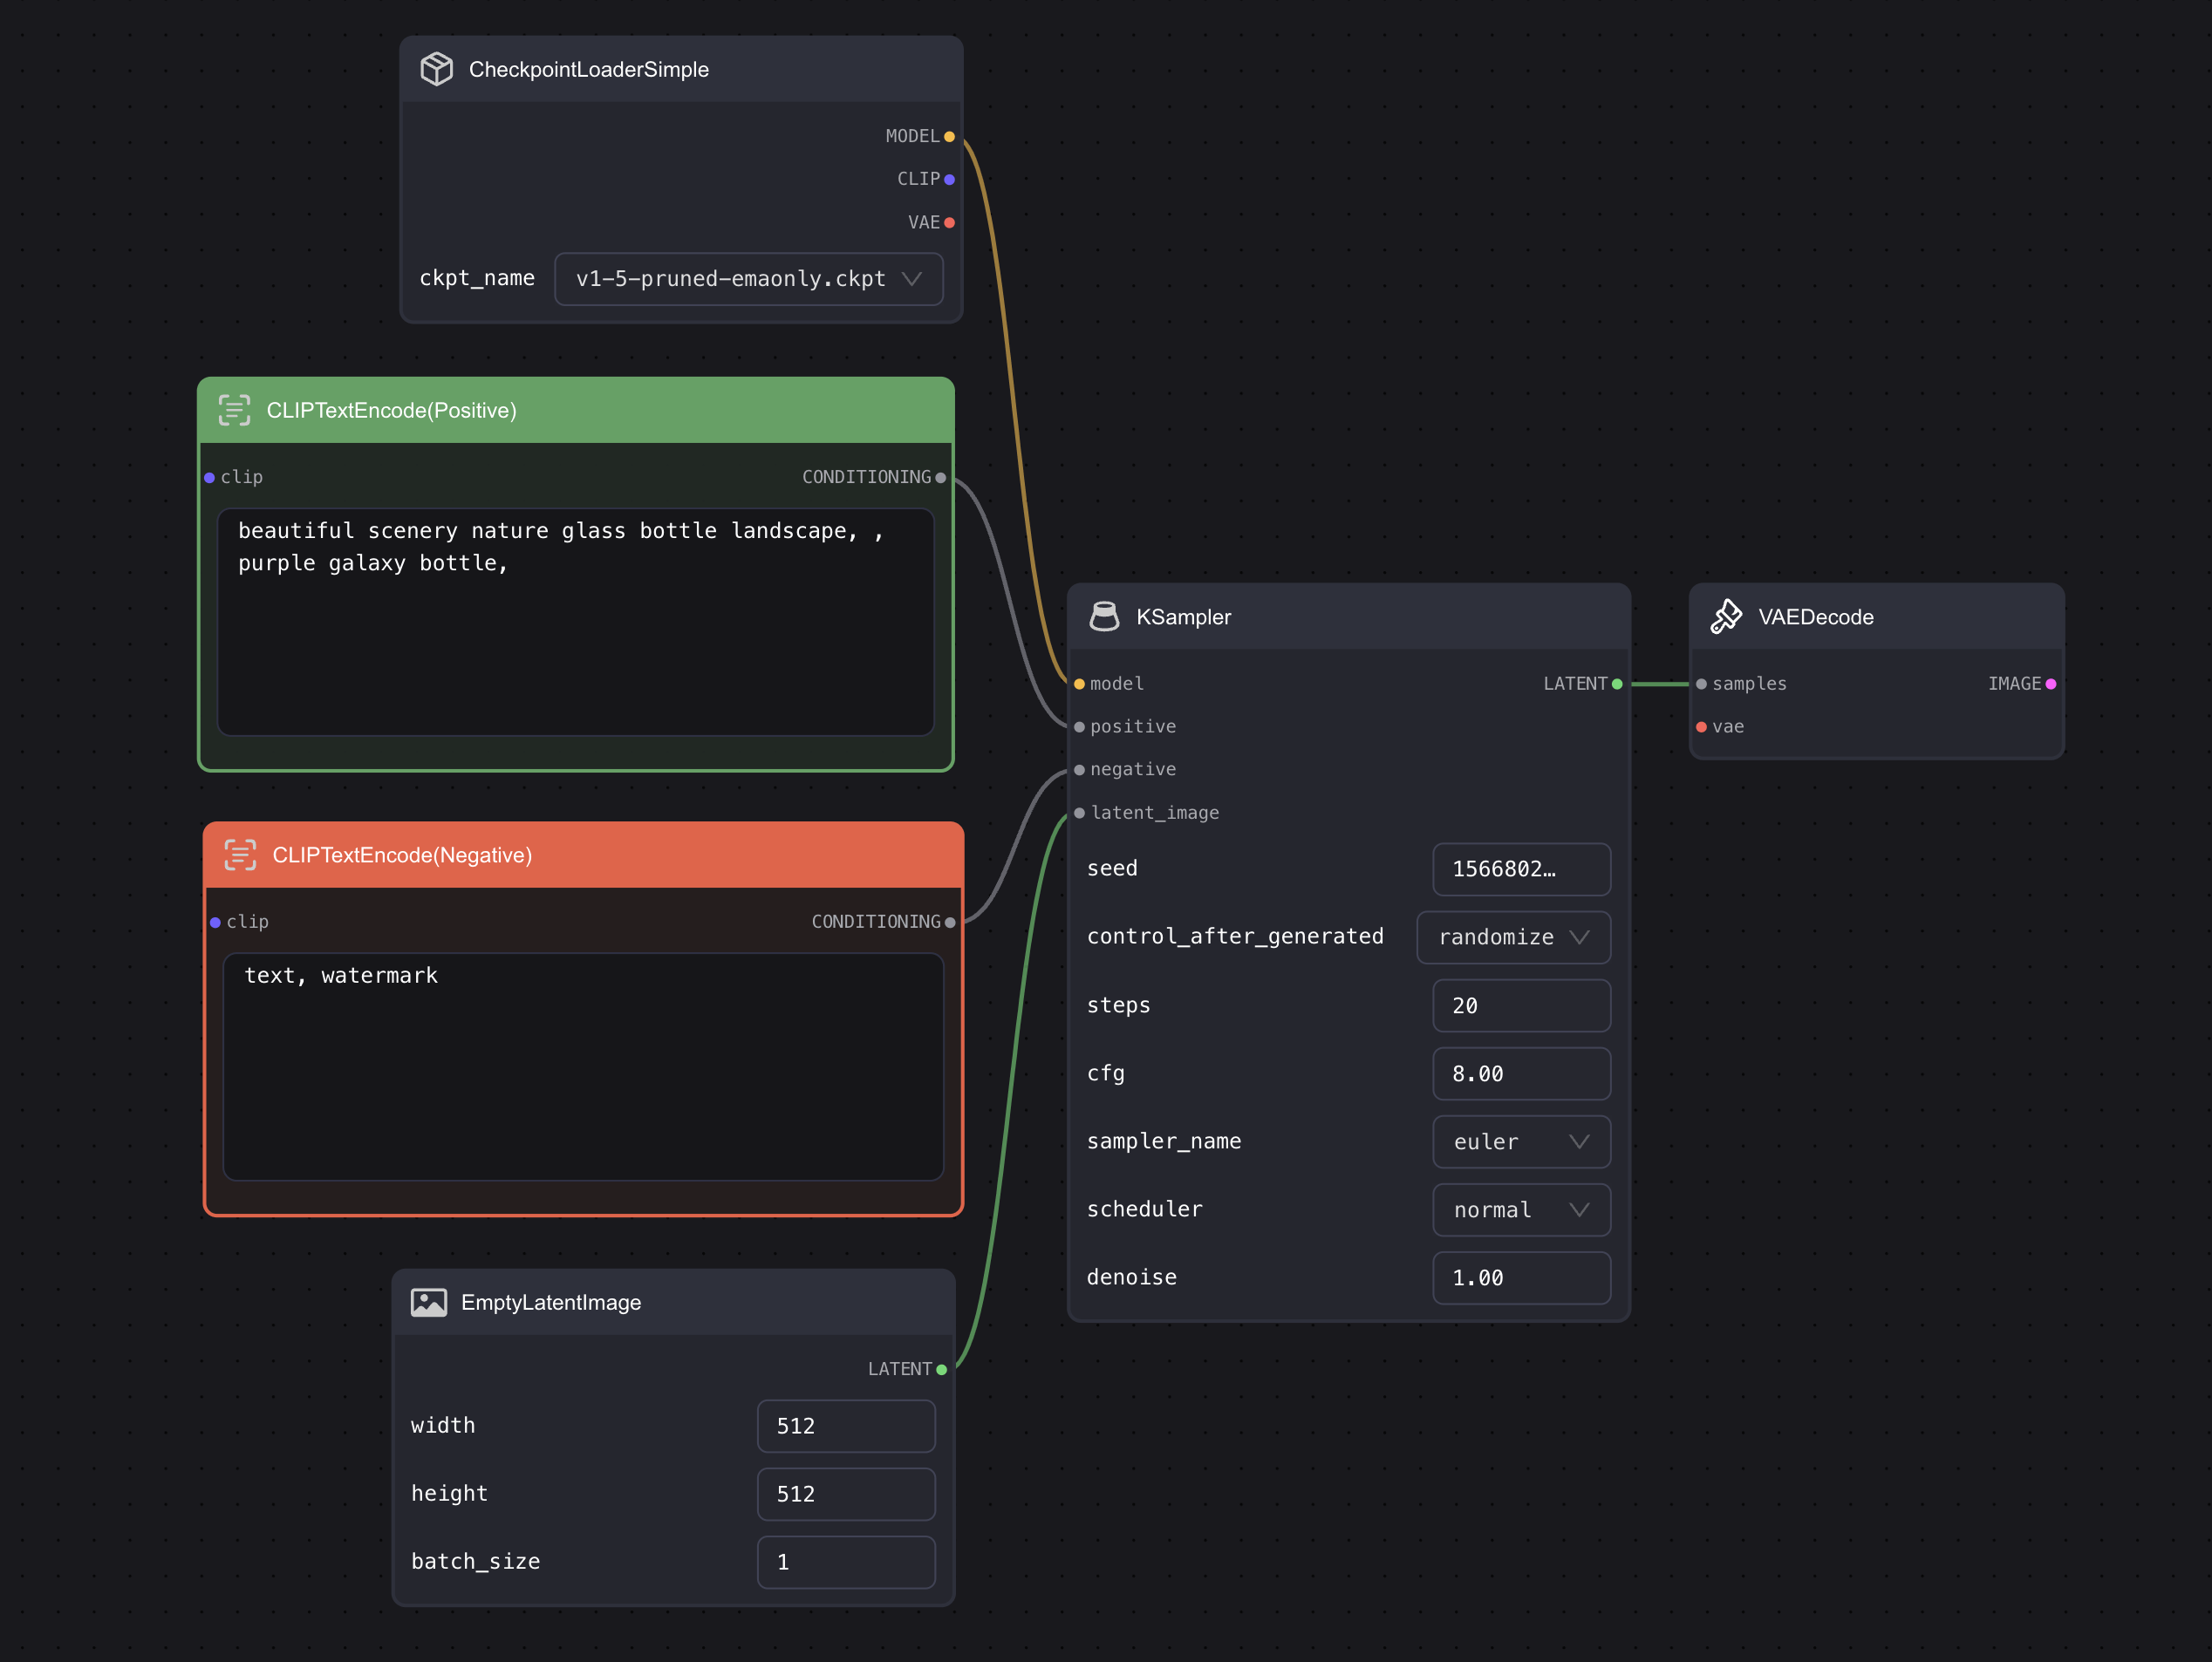
If you look closely at these connections, you will find that these lines and connection points have corresponding colors, and there are also some text explanations. Here's a simple summary of the rules for making connections. Once you understand these rules, you will not have any problems making connections:
-
Like Connects With Like: Only the same types can connect with each other. For example, the "model" endpoint on the left side of KSampler can only connect with another "MODEL" output point. To put it more concretely, only endpoints of the same color can connect. If you try to connect the orange point on the right side of "CLIP Text Encode" to the purple "model" point on KSampler, it will not work because of different types. Orange points can only connect with orange points. A handy trick is that when you click on an endpoint and pull out a line, only those that can connect will be highlighted, and the ones that cannot connect will dim.
-
Input on the Left, Output on the Right: For instance, "model," "positive," "negative," and "latent_image" on the left side of KSampler are all input points, and the output point is "LATENT" on the right. You can understand this as a function where the left side inputs numbers and the right side is the output. This means that you cannot connect an output terminal on the right side of one node to an output terminal on the right side of another node.
-
One Input, Multiple Outputs: One input end can only connect with one output end from another node, and it cannot connect with multiple output nodes simultaneously. For instance, KSampler's "positive" endpoint can only connect with one "CLIP Text Encode", it cannot connect with multiple at the same time. However, one output end can connect with multiple input ends. Using the same example, one "CLIP Text Encode" can connect with multiple "KSamplers". It can connect with "KSampler A's" positive end and "KSampler B's" negative point at the same time, generating two images in the end.
With these rules in mind, you will not be at a loss anymore. As I go through more examples later, you will become more and more familiar with these rules.
Practice
After briefly introducing the basic connection operations, let's do a small exercise to help you integrate the contents of the two chapters.
First, click on the "Clear" button on the right side to clear all Default Workflows.
Then, starting from scratch, accomplish the following objective: Convert an Empty Latent Image into a viewable picture.
If you cannot find the node you want, you can try right-clicking → Add Node → Loader to see if you can find it.
Q&A
What to do when an error occurs while running the basic workflow in KSampler?
Complete error message: Error occurred when executing KSampler: module 'torch' has no attribute 'mps' This issue is from Discord user 123321123.
Answer from Jimmy: This error is likely due to not having the latest version of PyTorch installed. Update the PyTorch version on the computer to resolve this.