Stable Diffusion Advanced
If you want to use the workflow from this chapter, you can either download and use the Comflowy local version or sign up and use the Comflowy cloud version (opens in a new tab), both of which have the chapter's workflow built-in. Additionally, if you're using the cloud version, you can directly use our built-in models without needing to download anything.
In the basic section, we introduced the basic model of Stable Diffusion. In this advanced section, we will introduce Stable Diffusion XL through ComfyUI's workflow.
Model Introduction
Stable Diffusion XL is an advanced version of Stable Diffusion v1.5. Compared with the previous versions, it has the following characteristics:
- It can generate higher quality images
- The images have more detail
- It can understand more complex prompts
- It supports generating larger image sizes
So how is it different from the previous version? Let's visualize it:
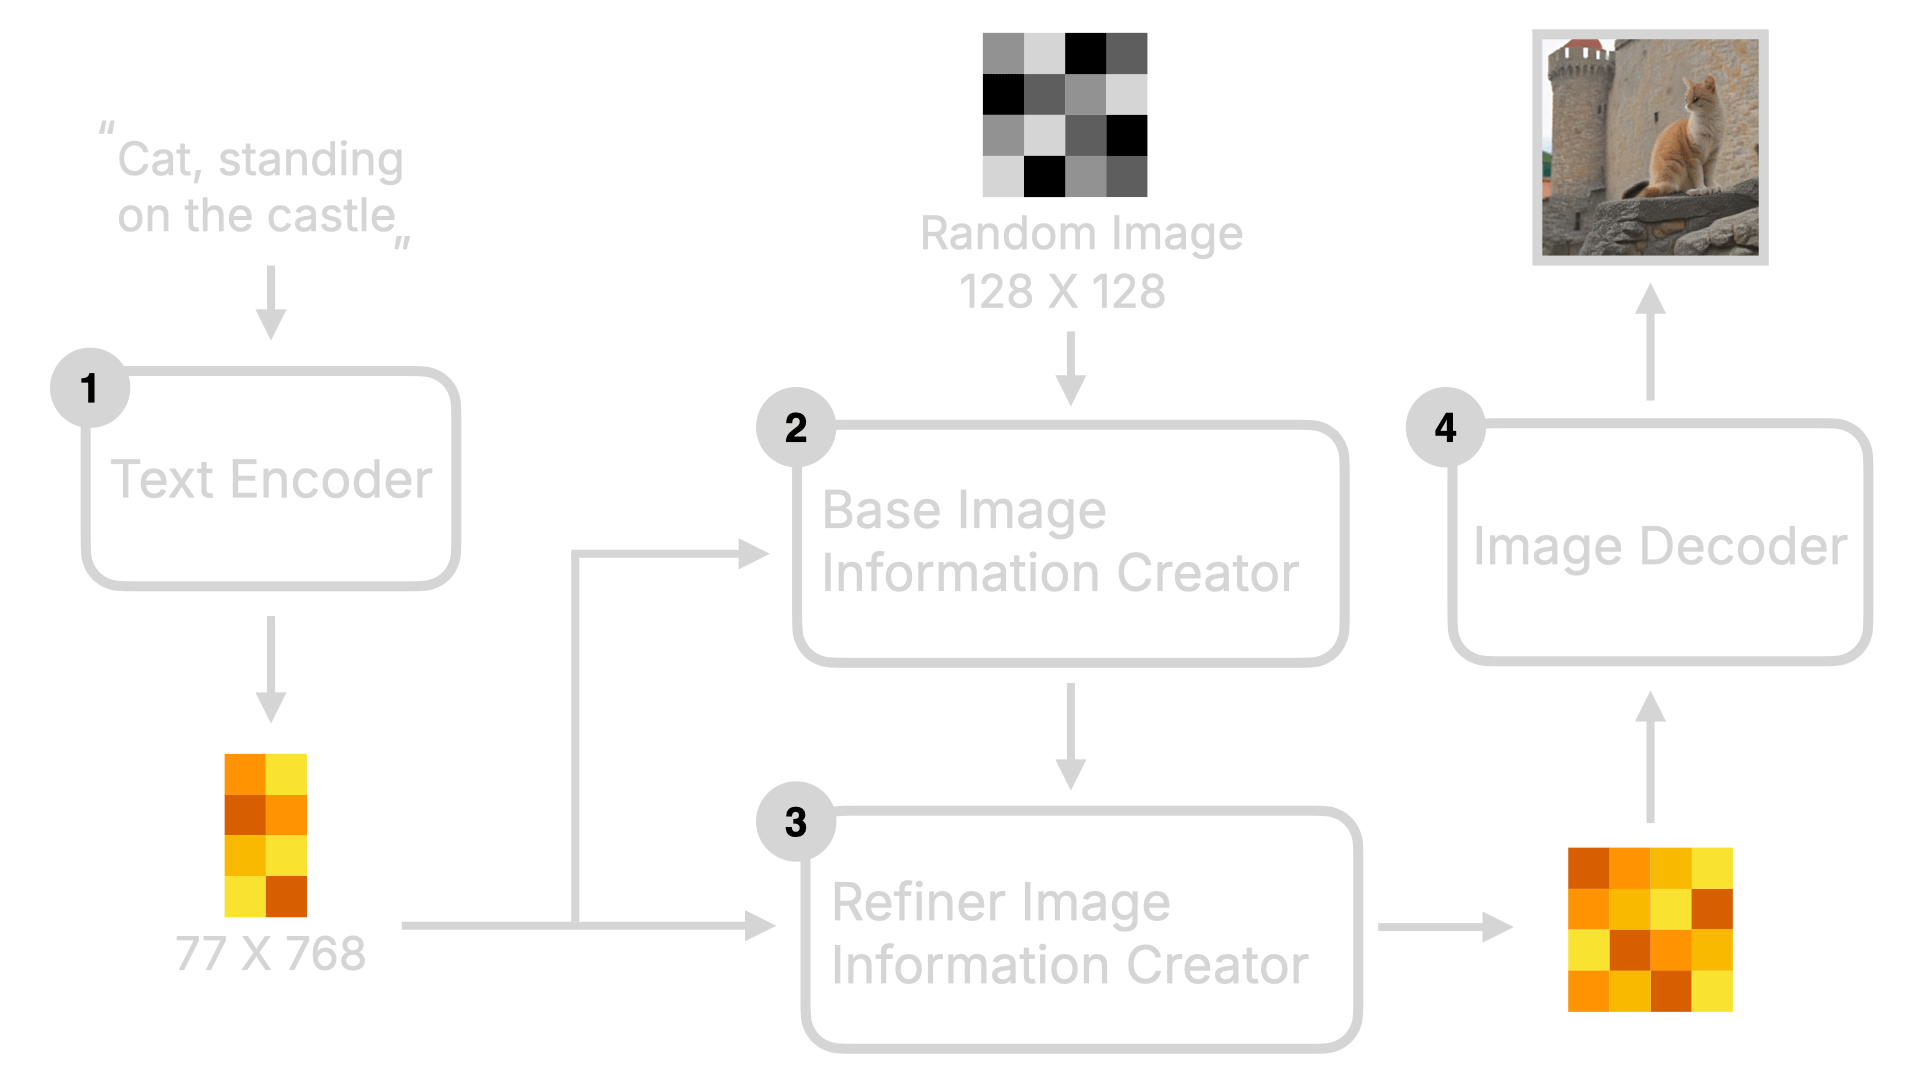
As you can see from the image, compared to SD v1.5, SDXL has two Image Creators. One is the Base model, and the other is the Refined model. This is why you see two models when you download the SDXL model. The Base generates a global composition first, and then the Refined one generates more effectively detailed images based on this global composition.
This is why SDXL can generate higher quality images. Moreover, the CLIP part in SDXL also uses a larger OpenClip model, so it can understand more complex prompts.
Stable Diffusion XL Workflow
After a brief introduction to the model, let's take a look at how to use ComfyUI to construct an SDXL workflow.
You might wonder if it's enough to simply switch the model in the checkpoint node to the SDXL model. Why reconfigure the workflow? If you review the model introduction above, you'll find that SDXL uses two models, while in our previous tutorials, we only encouraged users to generate one. The true and complete model utilises both, hence the need to rebuild the workflow. Of course, if you are not seeking perfection, you can pivot to the base.
Okay, back to the main topic. First, you need to download the SDXL model:
- SDXL 1.0 Base (opens in a new tab): Put it into the models/checkpoints folder in ComfyUI.
- SDXL 1.0 Refiner (opens in a new tab): Also place it in the models/checkpoints folder in ComfyUI.
There are two points to note here:
- SDXL models come in pairs, so you need to download both.
- You will observe a 0.9 vae version in the file name, which includes a better VAE model. I highly recommend downloading this version.
After downloading, open ComfyUI, load the Default workflow, and then we will build the SDXL workflow step by step.
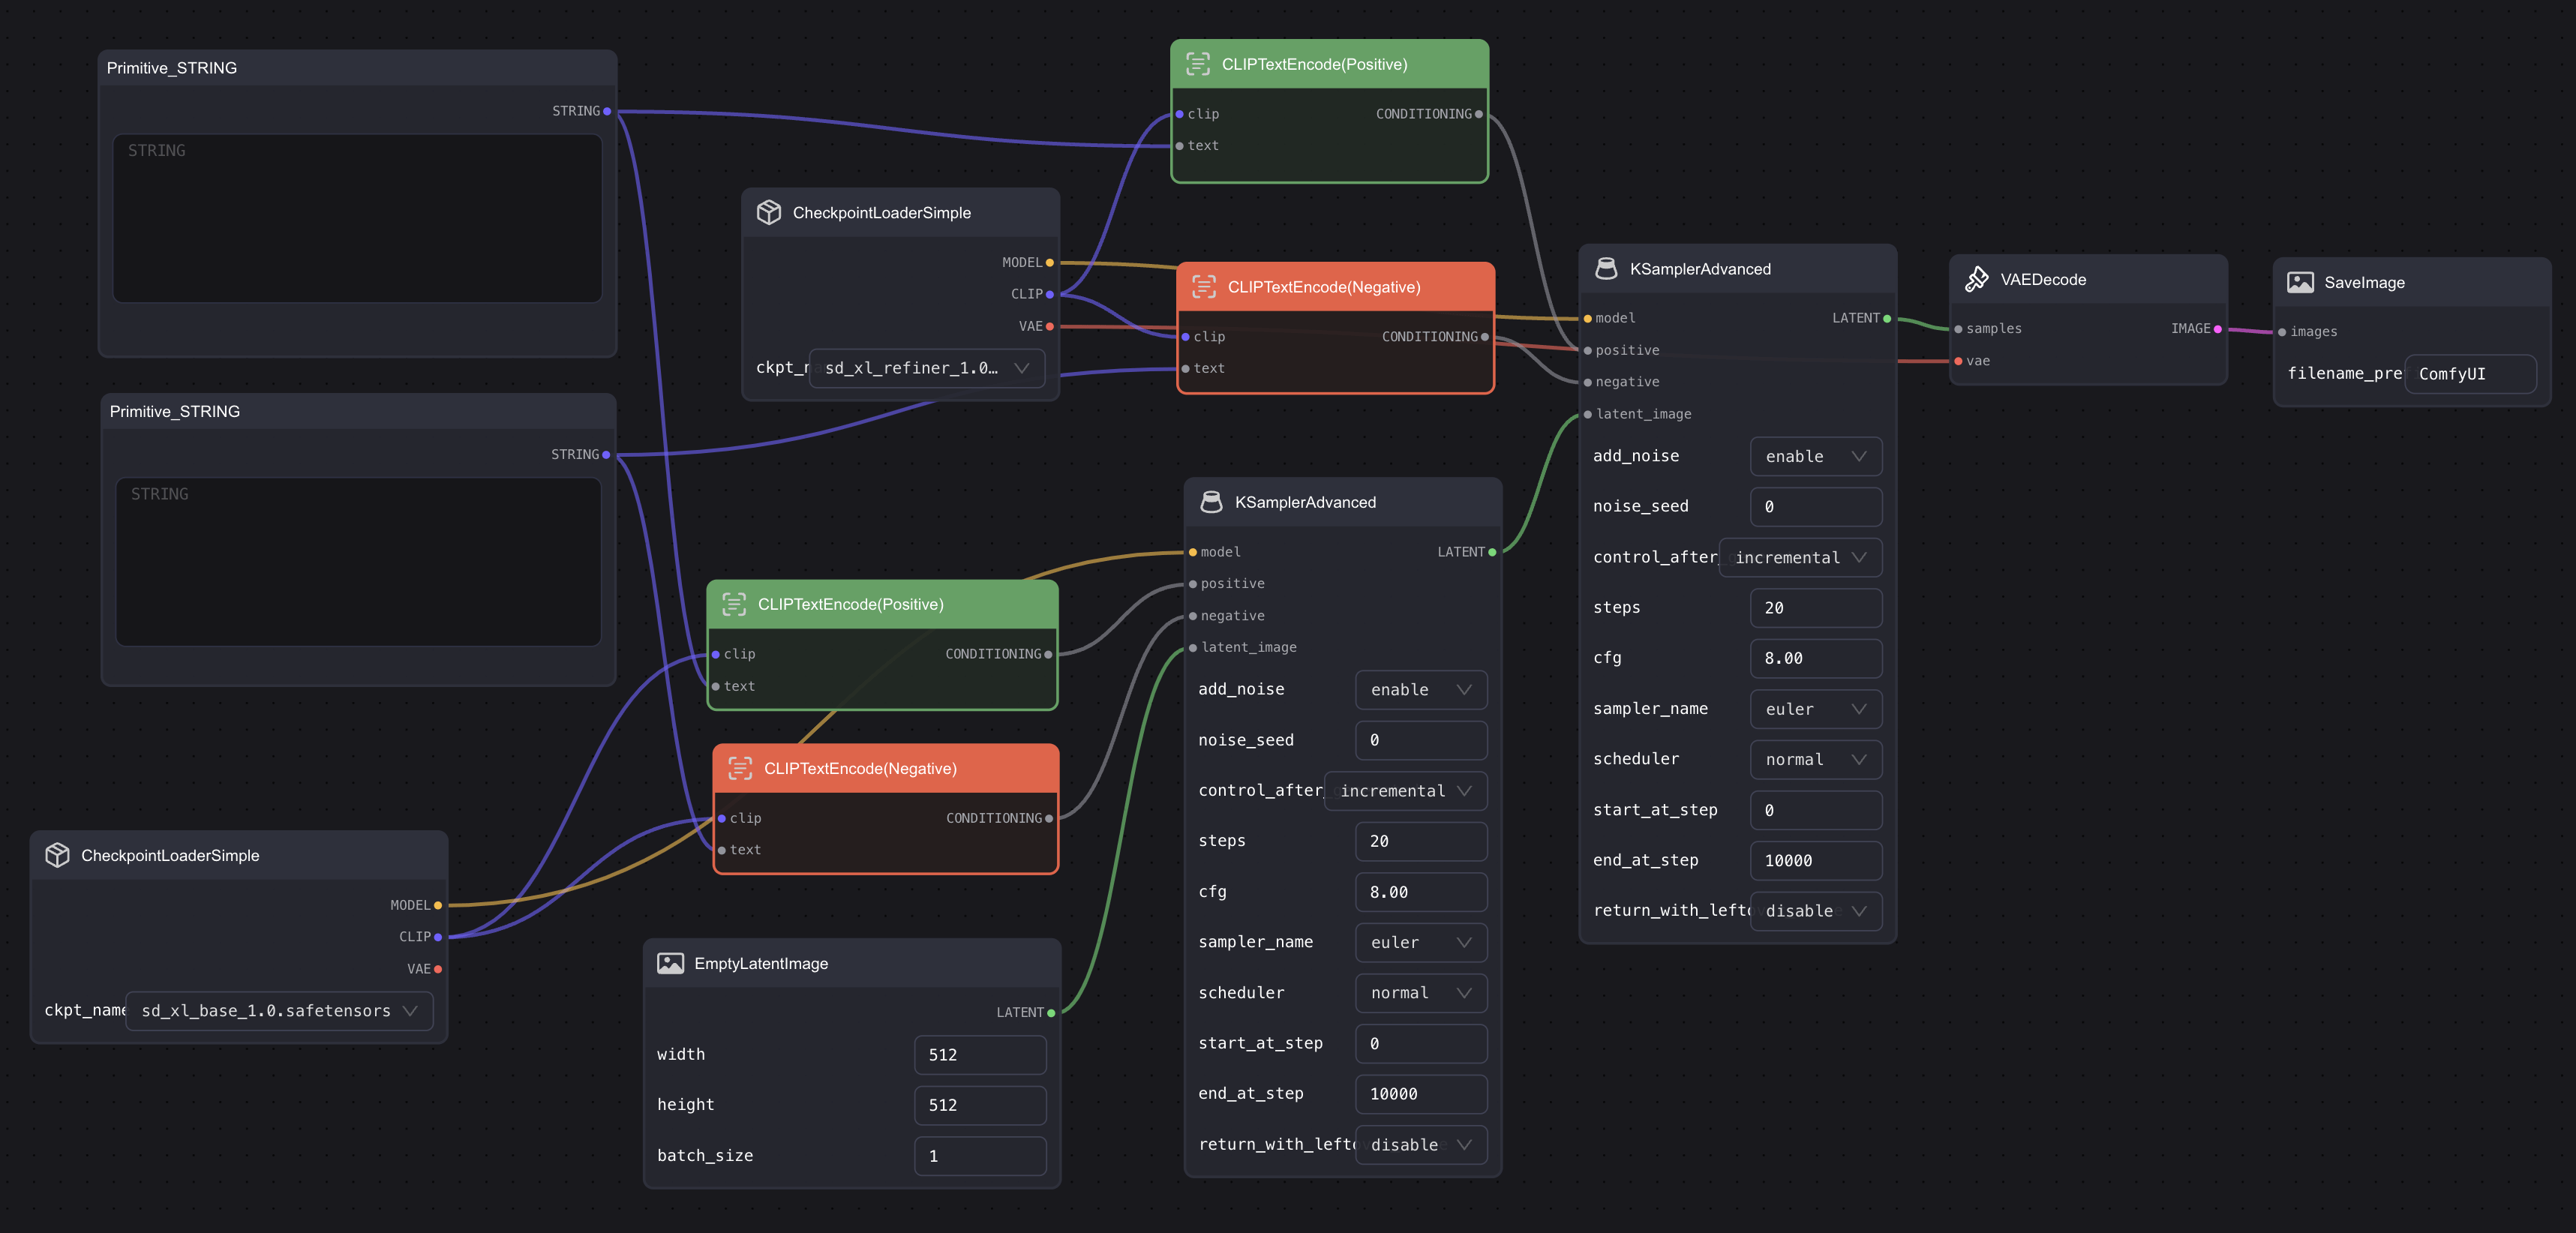
Replace KSampler with KSampler Advanced
First, remove the KSampler in the Default workflow, double-click the blank area, search for KSampler, then select KSampler Advanced and add it to the workflow. Moreover, as mentioned in the previous model introduction, SDXL consists of two models. Therefore, in addition to replacing the first one, you need to add an extra one. Also, since the Base is used before the Refined, we need to link the two KSamplers together. The final result should look similar to this:
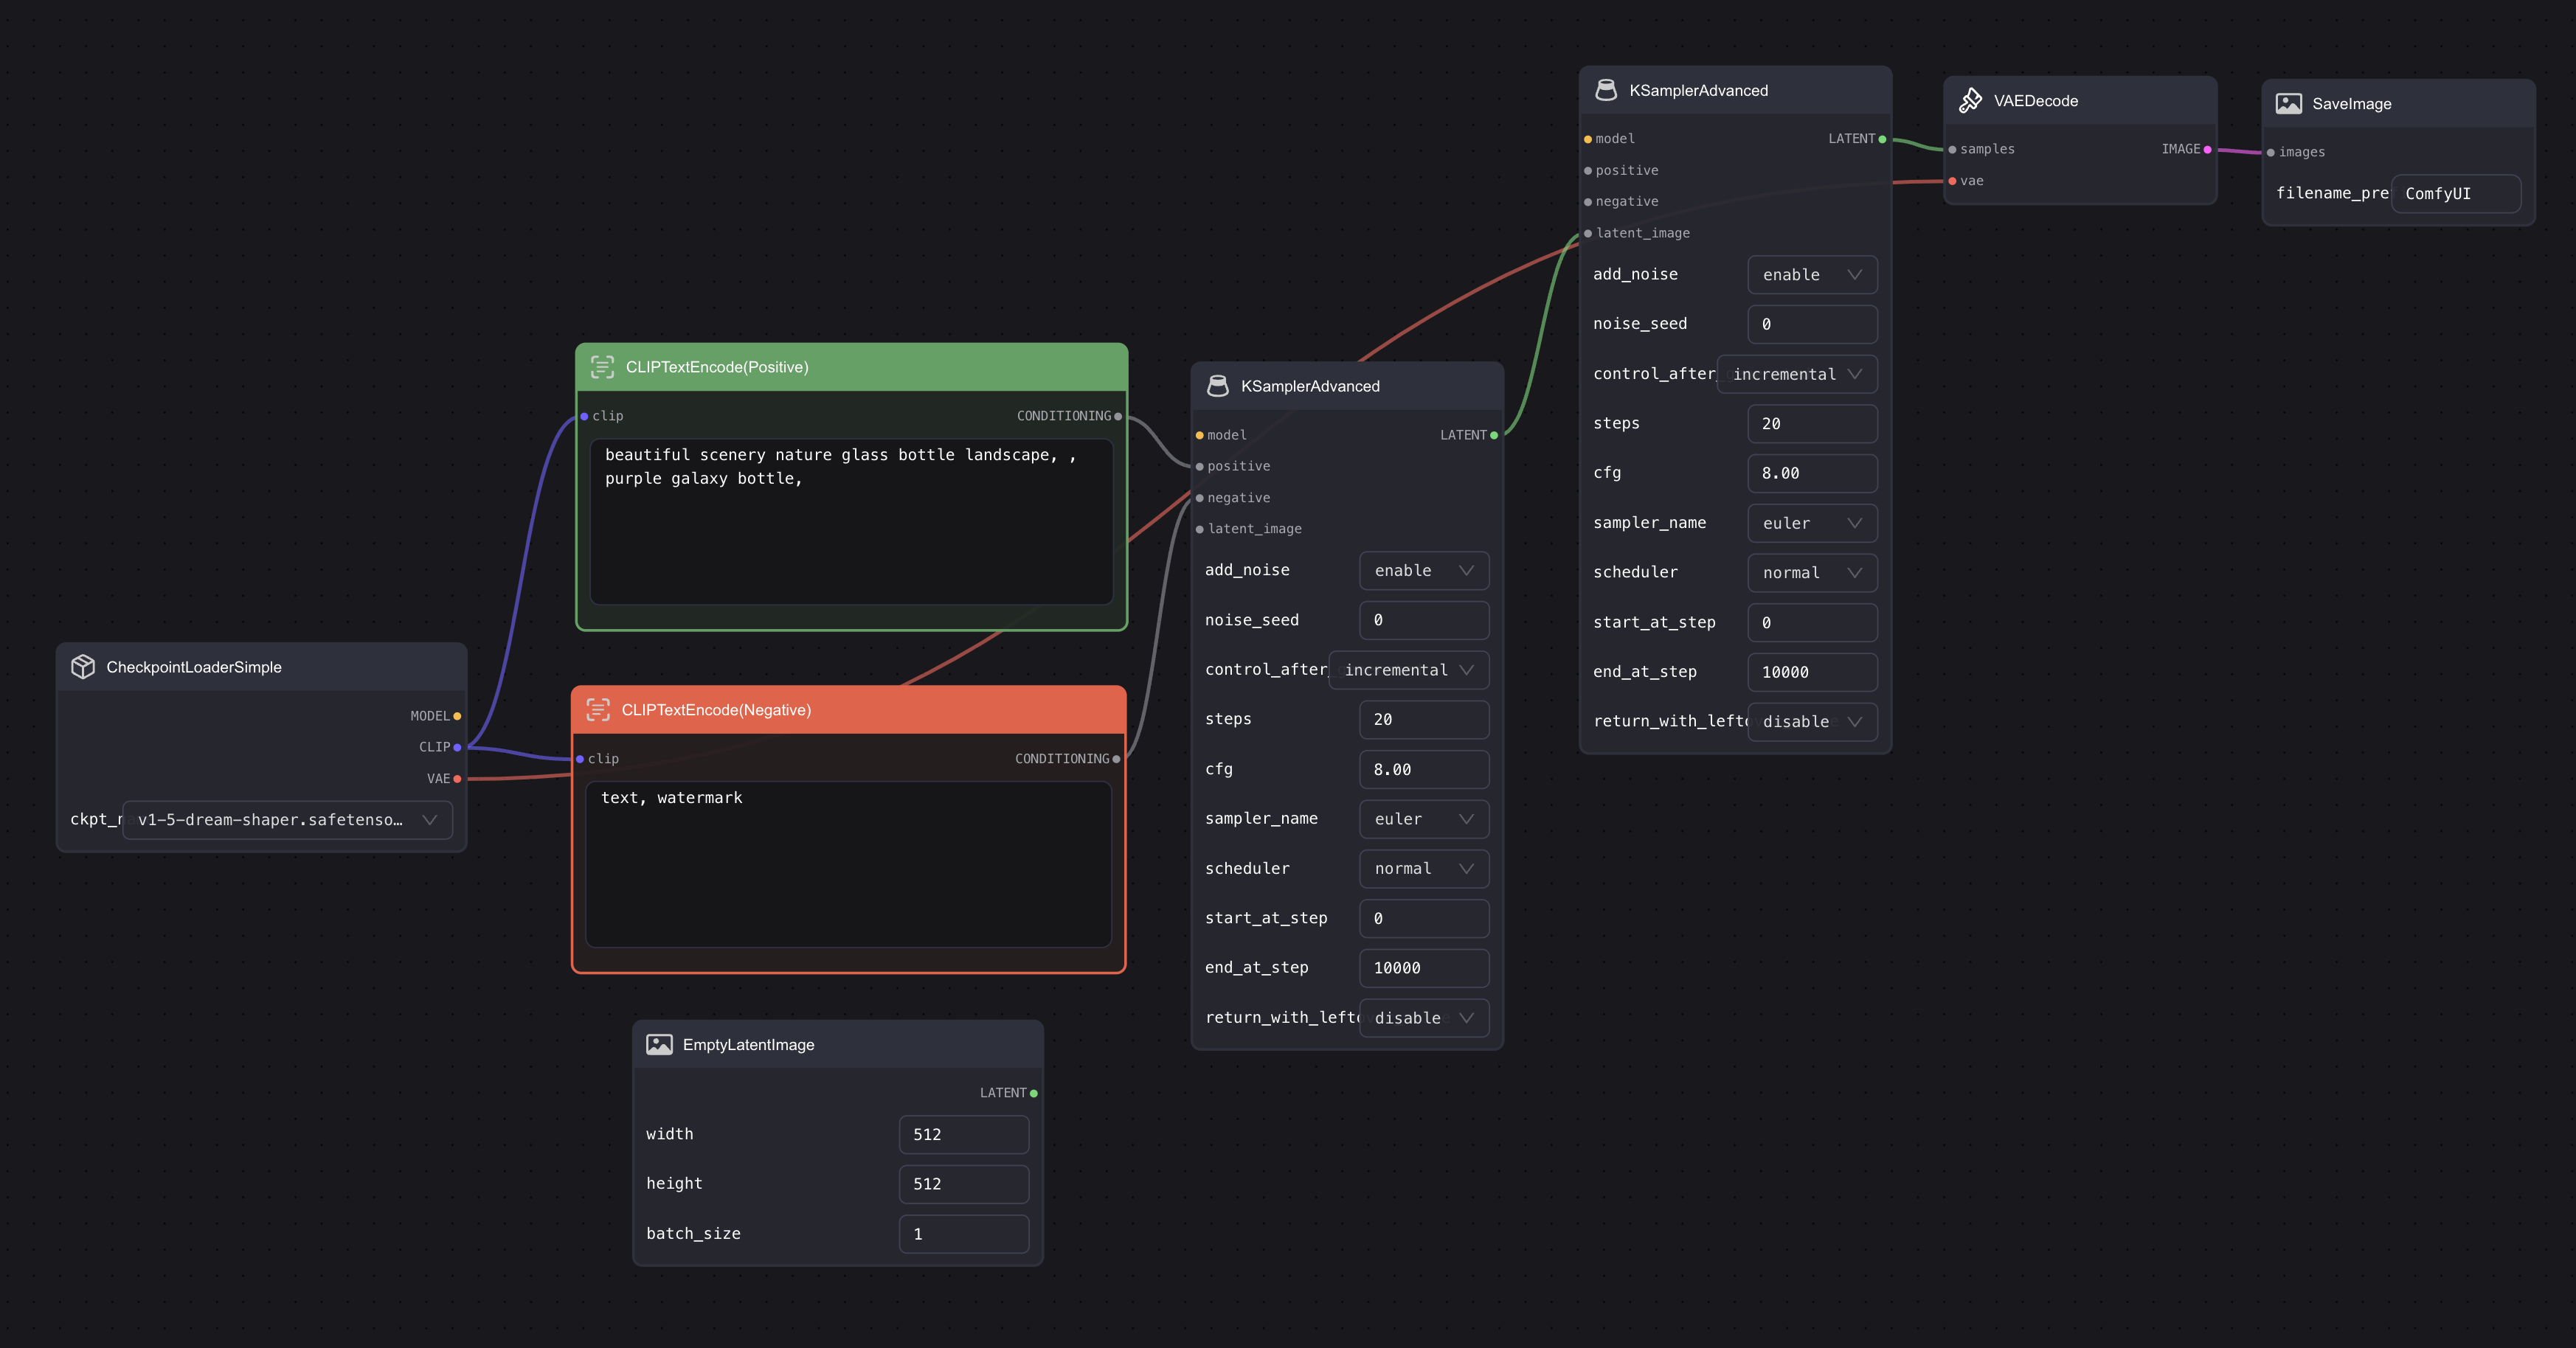
Add a Checkpoint
Then add another Checkpoint node and connect it to the second Ksampler node. Choose "base" for the first Checkpoint and "refiner" for the second. Then connect the VAE of the second Checkpoint with the VAE encode node. The final result should look similar to this:
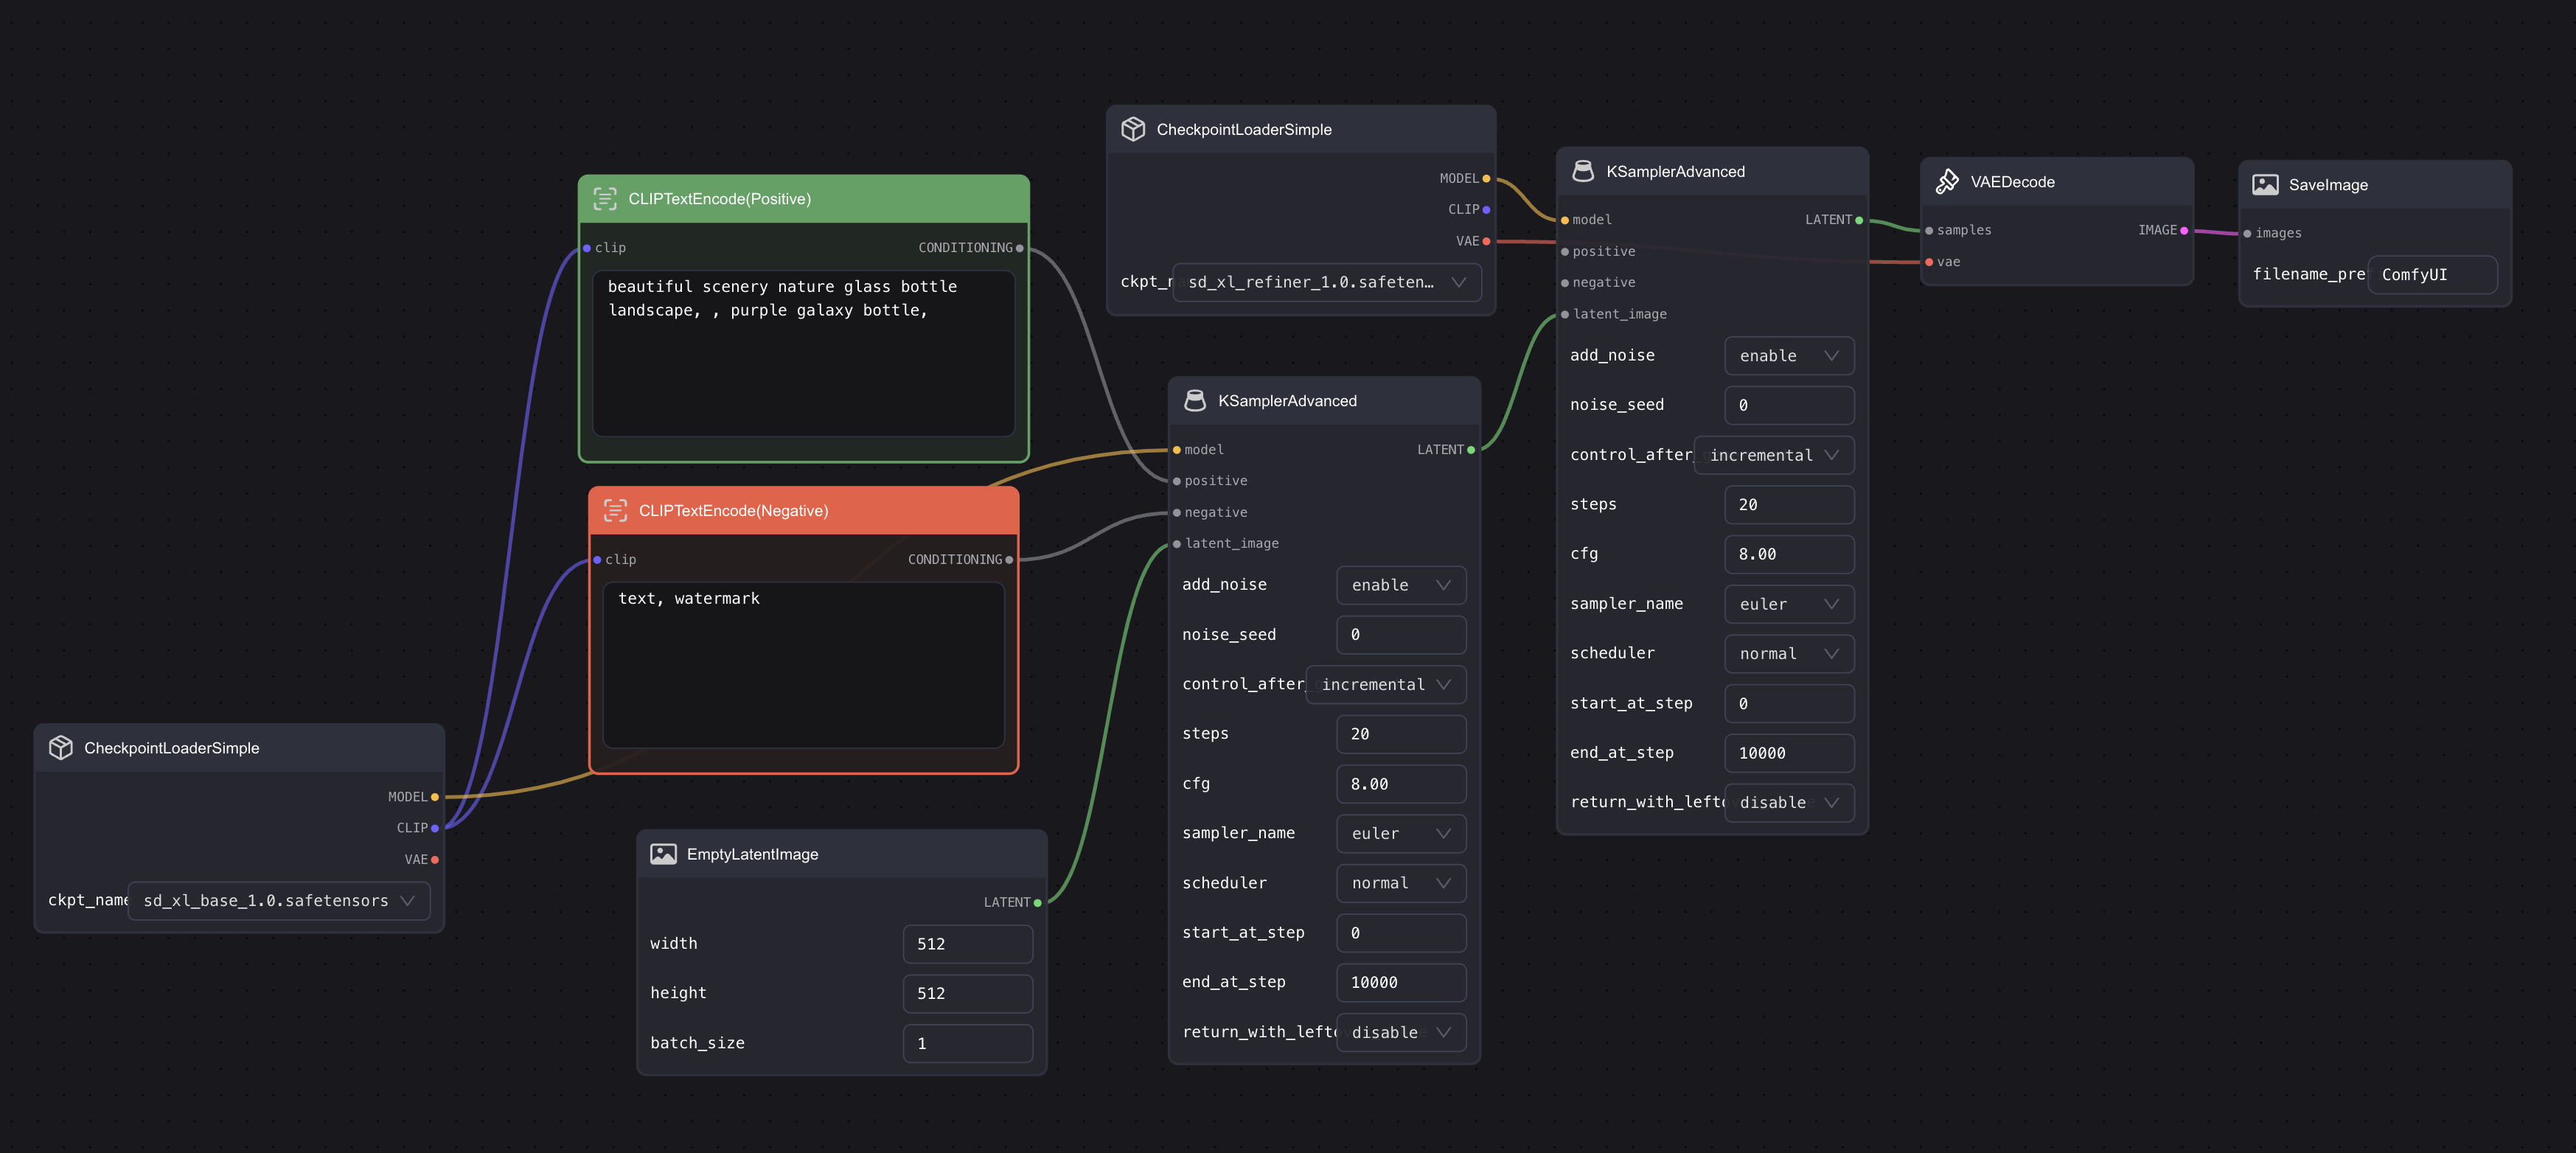
For this step, you can use the model with 0.9vae. Additionally, using the base one is also fine, and it doesn't necessarily have to be connected to the second Checkpoint, like I did.
Connect to CLIP Text Encode Node
Since there are two KSamplers, it means that there need to be two sets of CLIP Text Encode nodes. The simple way to do this is to have two sets of CLIP Text Encode nodes and then connect the output of the two sets of CLIP Text Encode nodes to the positive and negative inputs of the two KSampler nodes.
However, this means that every time you modify the prompt, you have to manually input it twice, which can be quite cumbersome. So, here's a simpler method. We only need one set of Prompt input box.
First, double-click the blank space, search for Primitive STRING, and add it to the workflow. Then right-click on one of the CLIP Text Encode nodes, select Convert text to widget, and the input box of the CLIP Text Encode node will disappear, and an extra Text input will be added to the input end. At this point, connect this Text input to the Primitive STRING we just added.
You need to repeat the above steps. Then add two more CLIP Text Encode nodes, connect them to the second KSampler, and connect them to the previously added Primitive STRING. The final situation should look similar to this:
Adjust KSampler Nodes
Comflowy is currently adapting to Primitive nodes, so if you want to use this workflow, you might need to manually adjust it multiple times yourself. Alternatively, you could switch to using ComfyUI.
In addition to the Prompt being repeated, there are quite a few parameters on the KSampler that require frequent adjustment. Similar to the CLIP Text Encode situation, adjusting one means adjusting both together, which is quite cumbersome. So we can use a similar approach to put the common parameters together.
First, let's set the most commonly adjusted steps. Right-click on KSampler, then select Convert steps to widget. Next, double-click the blank area, search for Primitive, then connect this Primitive to the steps of the two KSamplers. Once you connect the Primitive to the KSampler, the Primitive node will change. This is normal. For convenience in later use, you can rename this Primitive node to Total Steps. Right-click on the Primitive node, then click Title to rename.
Then we use the same method to replace both Sampler and Scheduler with one Primitive each and rename the nodes.
Next, we also need to Convert both the end_at_step of the first KSampler and the start_at_step of the second KSampler to the widget, and connect them to a Primitive (note, the first is end, the second is start). Finally, set add_noise and return_with_leftover_noise of the first KSampler to enable, and set add_noise of the second KSampler to disable. The final result should look similar to this:
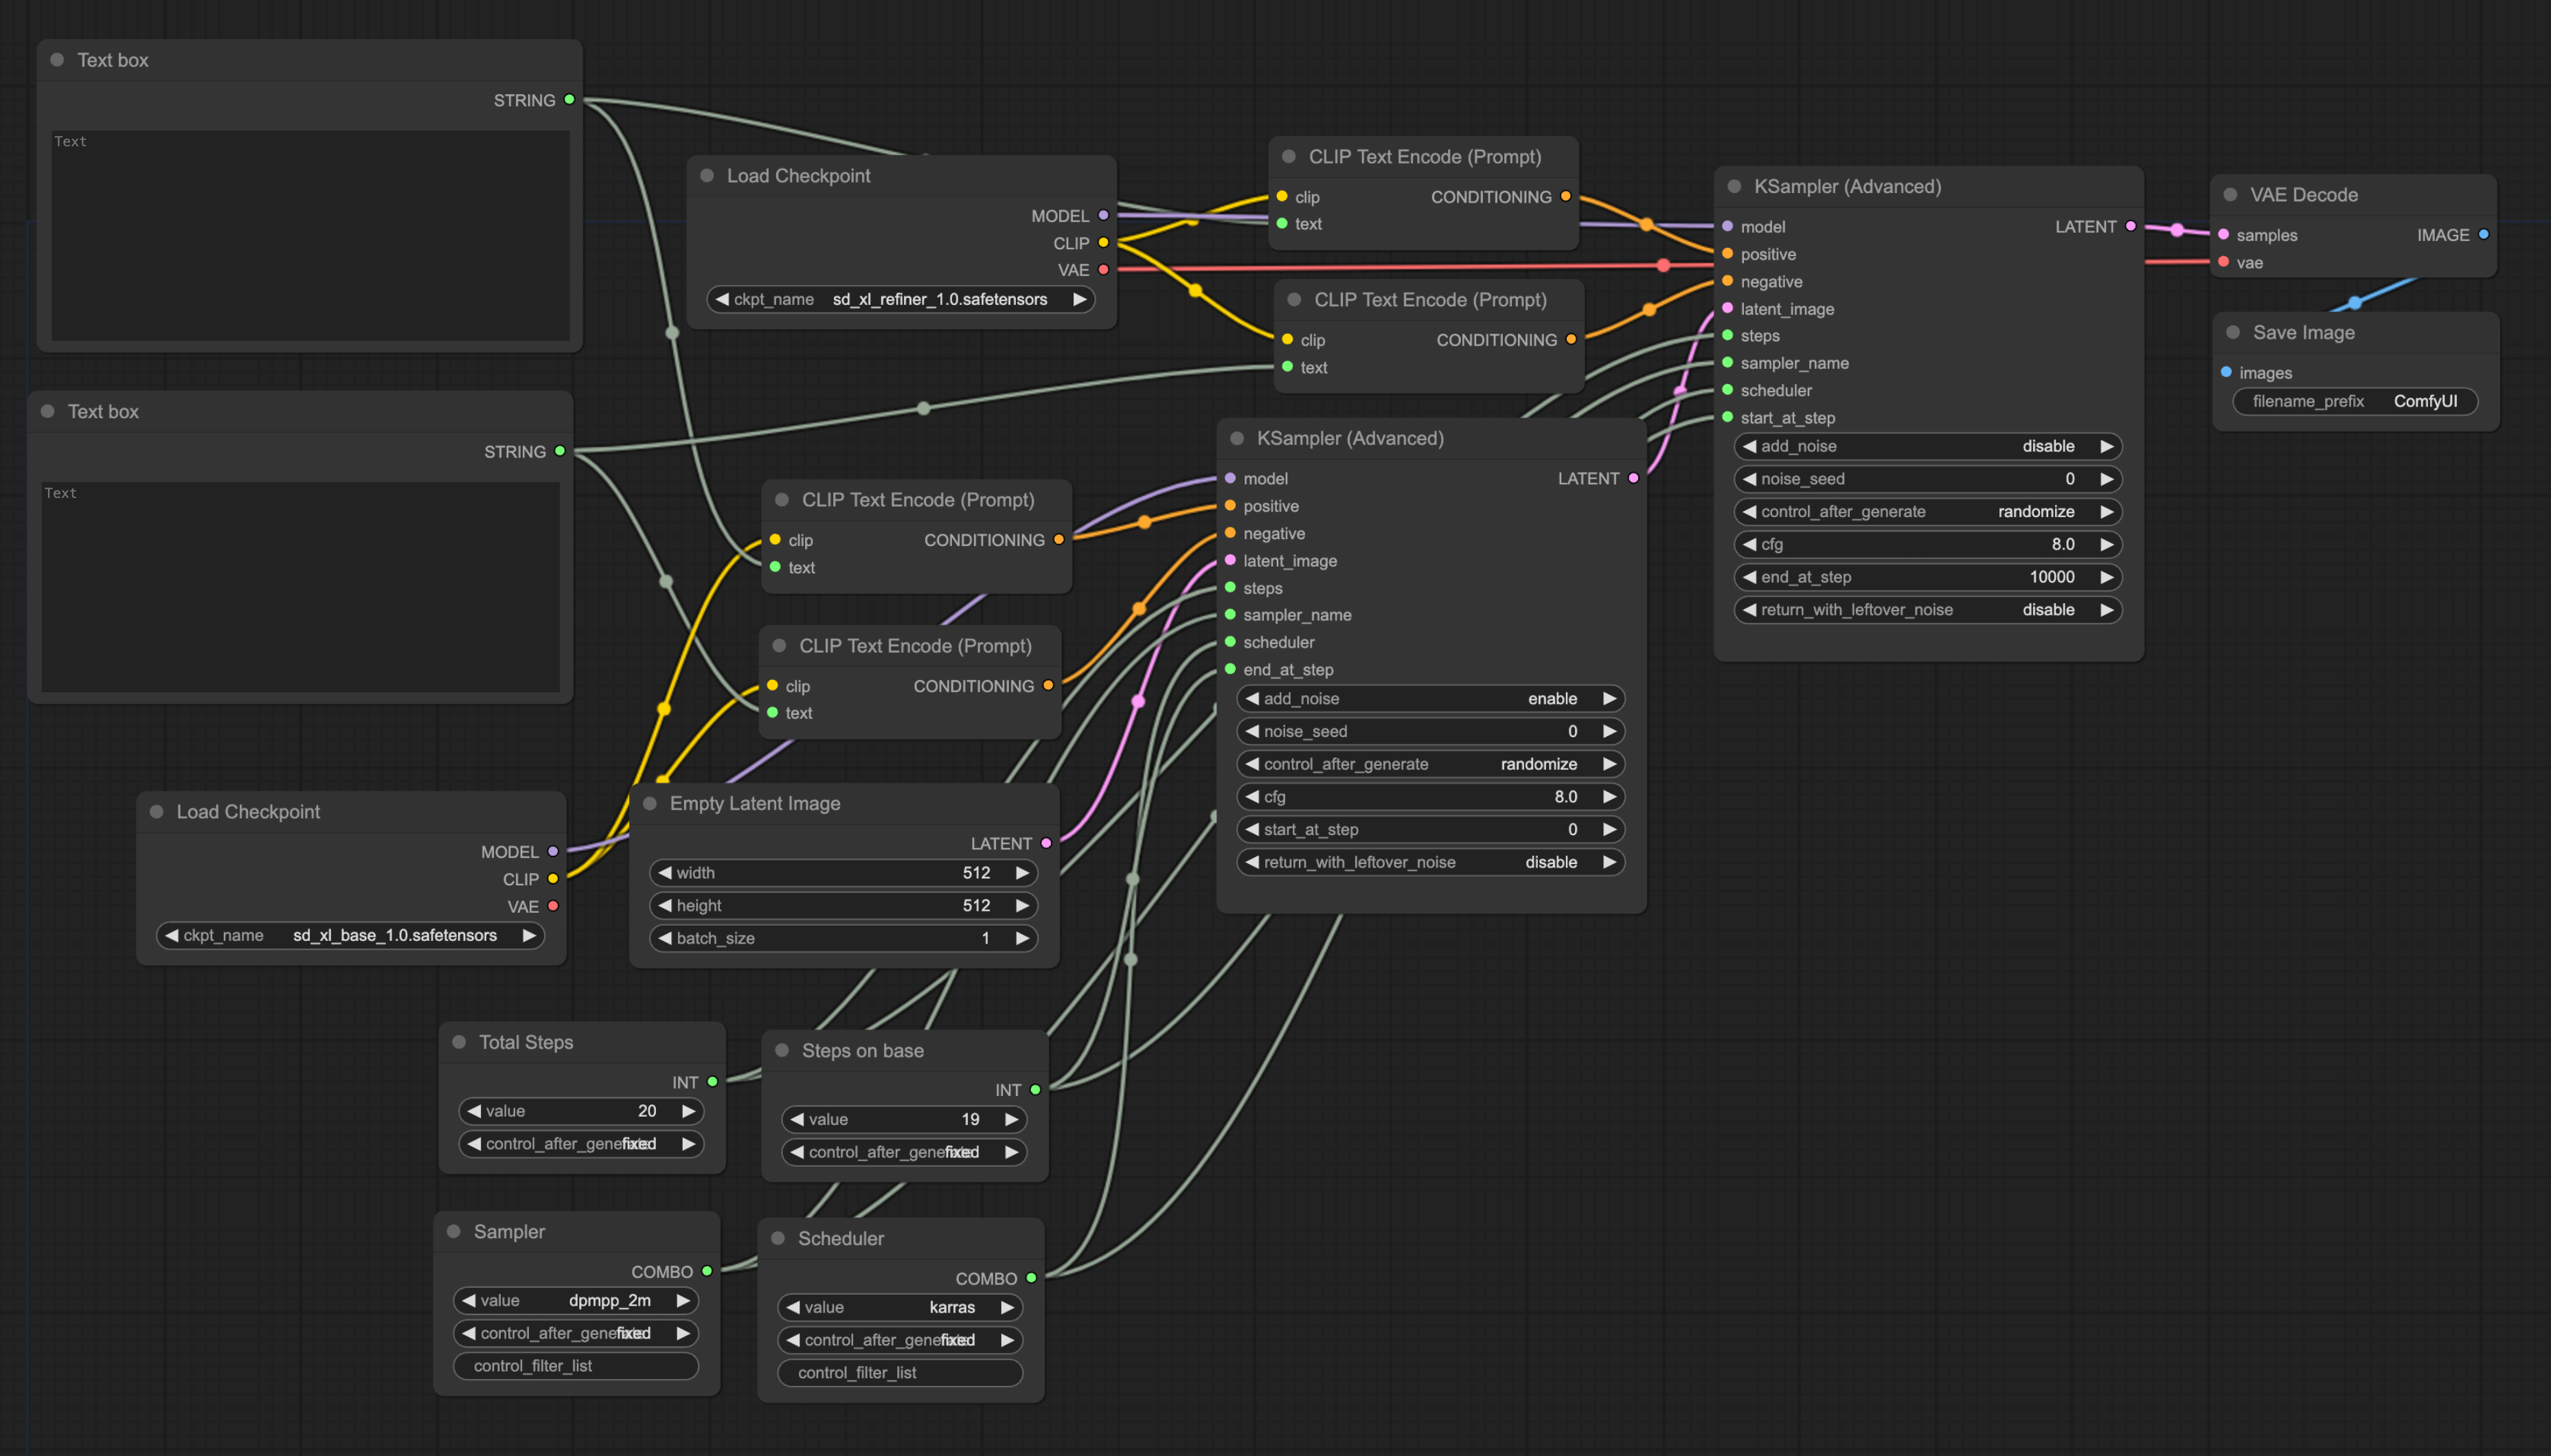
To explain the last two settings, as mentioned in the model introduction at the beginning, SDXL consists of two models and runs a certain number of steps separately. To make the total steps equal to 25, the second KSampler cannot start from 0 but has to continue from the steps of the first KSampler. So we need to set the start_at_step of the second KSampler to be consistent with the end_at_step of the first KSampler.
Additionally, as mentioned in the previous model introduction, the refiner refines based on the image generated by the base, which means that there is no need to add extra noise in the refiner. So all noise settings of the second KSampler are set to disable.
Adjust Empty Latent Image Node
Finally, to get the best image effect, the parameters of the Empty Latent Image node need to be adjusted to 1024X1024.
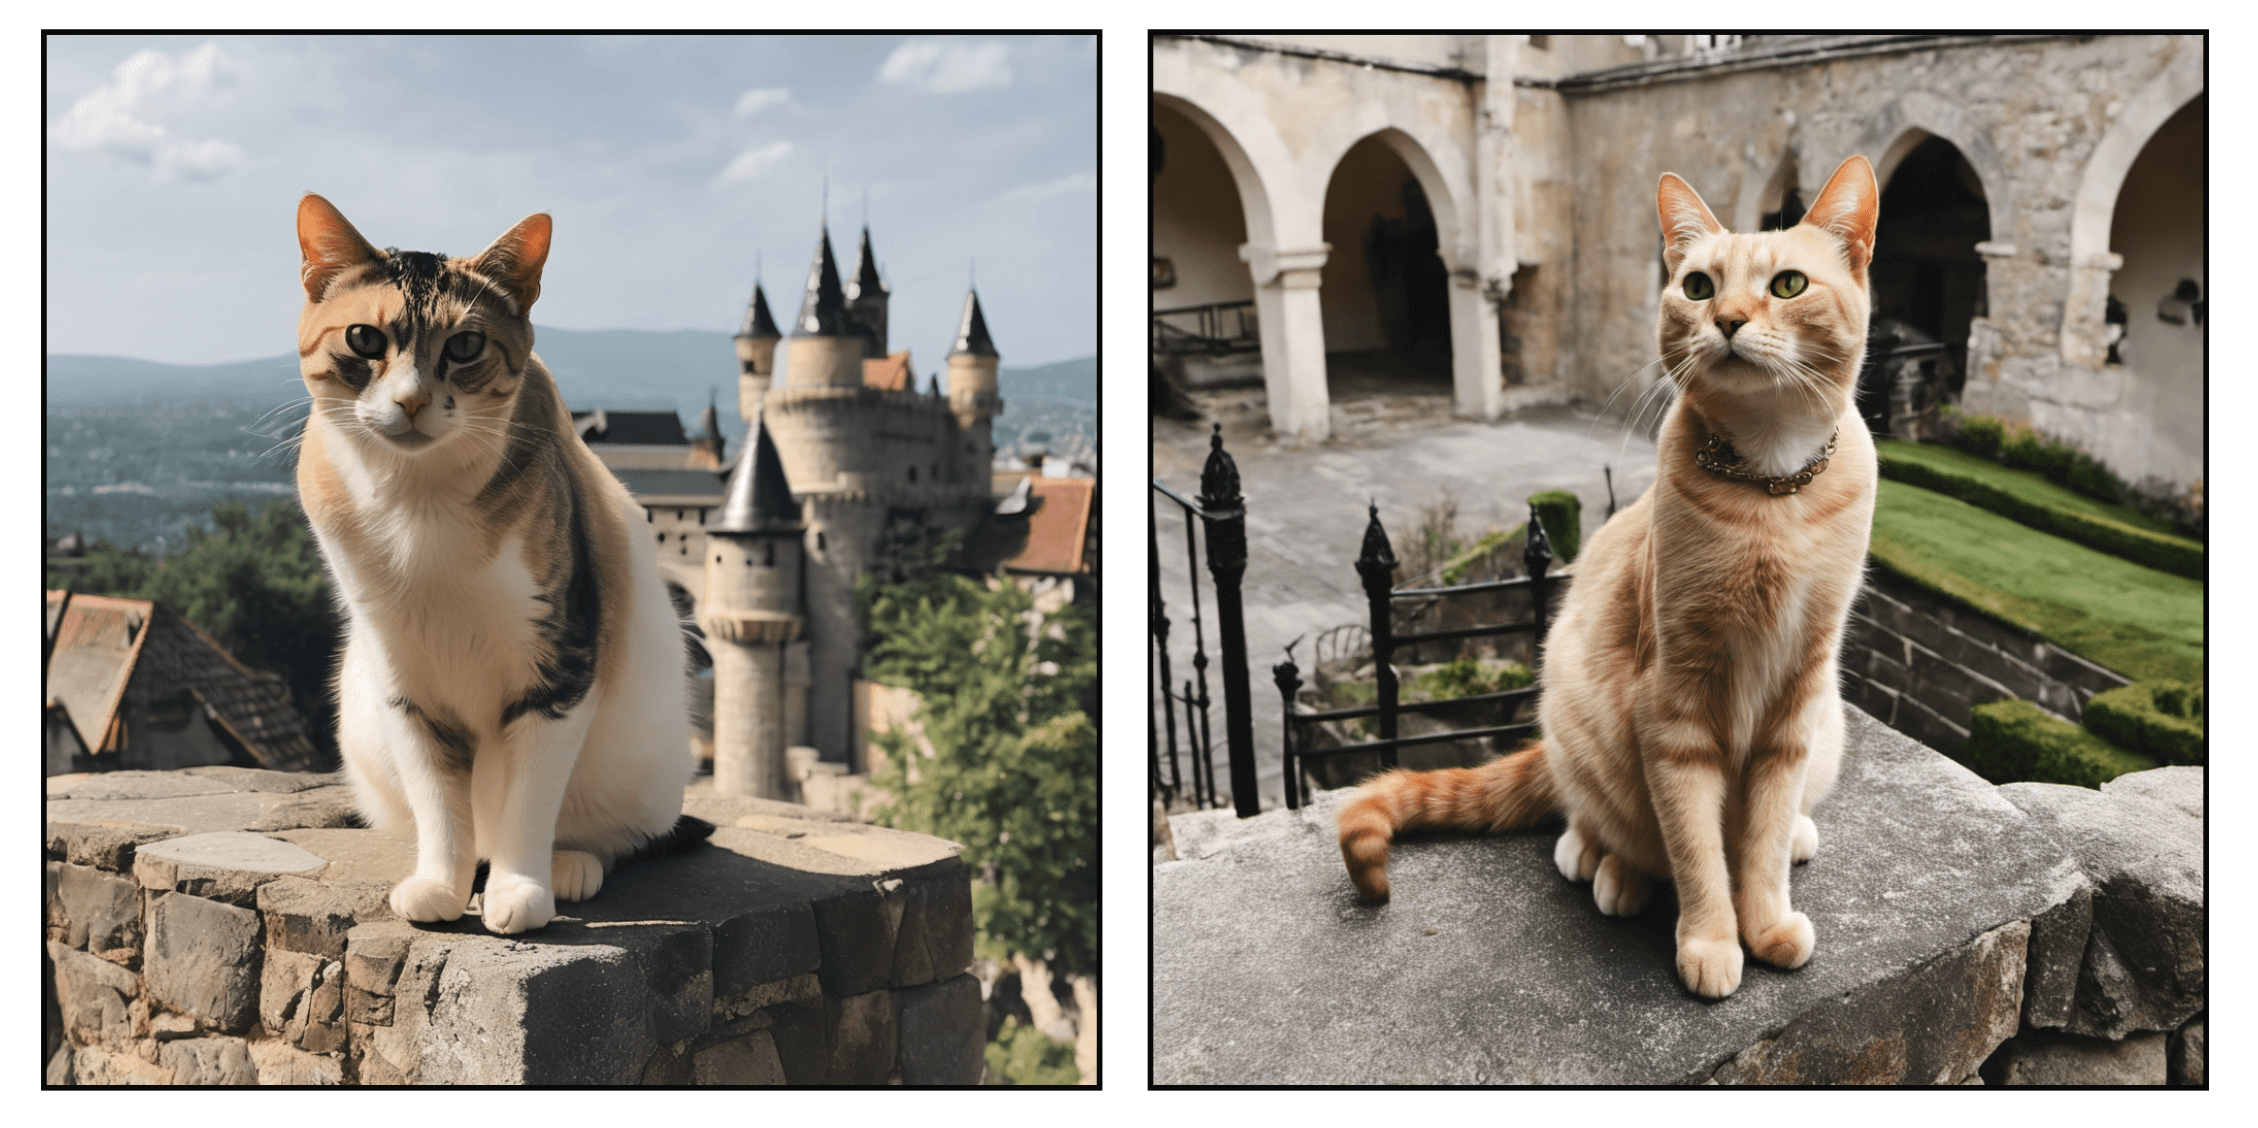
Lastly, let's compare. Under the same prompt, the difference between only base and utilizing both together is clear. The left image is Base, the right image is Base + Refiner. Isn't the right image more natural and more detailed?