Upscale
Before officially starting this chapter, please download the following models and put them into the corresponding folders:
- Real-ESRGAN x2 (opens in a new tab): place it inside the models/upscale_models folder in ComfyUI.
- BSRGAN x2 (opens in a new tab): place it inside the models/upscale_models folder in ComfyUI.
- BSRGAN x4 (opens in a new tab): place it inside the models/upscale_models folder in ComfyUI.
If you want to use the workflow from this chapter, you can either download and use the Comflowy local version or sign up and use the Comflowy cloud version (opens in a new tab), both of which have the chapter's workflow built-in. Additionally, if you're using the cloud version, you can directly use our built-in models without needing to download anything.
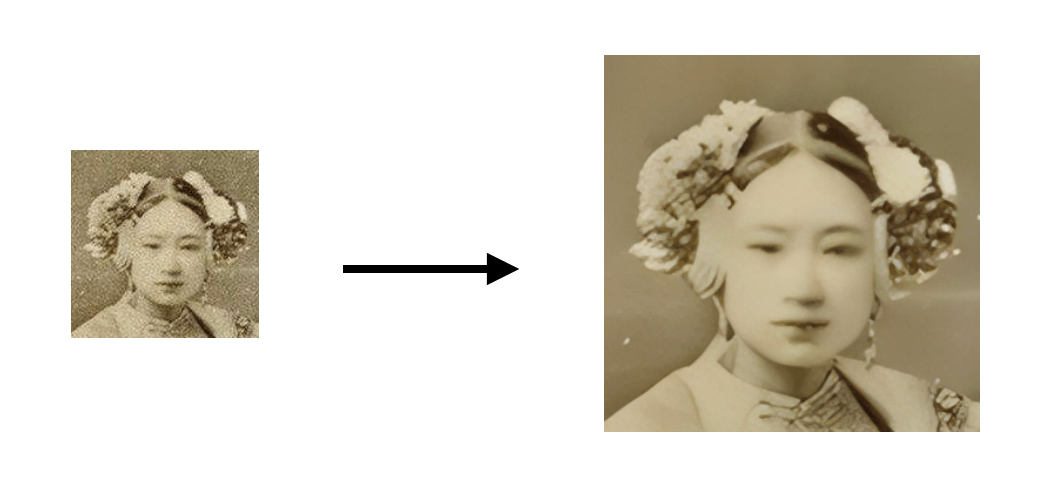
You may not be familiar with the term "Upscale," but you probably have seen some products that claim to "restore old photos" which can transform low-resolution photos into high-definition images.
On the left is a very low-resolution image, and on the right is an image that has been restored and enlarged through technical means. Doesn't it look quite impressive? The technology used behind these types of products is known as Upscale.
Introduction to the Principle
As per convention, let's first briefly discuss the principle of Upscale. At present, there are two mainstream methods of upscale:
- Upscale pixel: The visible image is directly upscaled. In terms of ComfyUI nodes, the input of this node is an image, and the output is the upscaled image.
- Upscale latent: The other upscales the invisible latent space image. In terms of ComfyUI nodes, the input of this node is latent, and the output is the upscaled latent, which needs to be decoded into a visible image.
These two methods have their pros and cons, which I will explain when describing the workflow. Lastly, let's talk about the algorithms of Upscale, the commonly used ones include:
-
Bicubic interpolation algorithm: It simulates the values of new pixels using surrounding pixel values to supplement missing pixel information. This method looks quite natural, but the enlarged image may seem blurry because the algorithm seeks a compromise between pixelation and smoothing.
-
Lanczos interpolation algorithm: It’s a more advanced algorithm that attempts to preserve edges and textures in images. However, they often lack versatility and struggle with different types of images.
-
Models trained based on neural networks: This is an emerging type of Upscale method that uses deep learning technology to train neural networks to understand the textures and objects of images, thus generating more realistic and detailed images when enlarging them.
Next, you'll see these algorithms applied on ComfyUI.
Upscale pixel by algorithm workflow
Let's first introduce the Upscale pixel method, which is quite simple:
- If you want to upscale an image after editing it, you can add an Upscale Image node after the final generated image.
- If you want to upscale an existing photo, you can add an Upscale Image node after loading the image.
However, there are two ways to achieve this:
- The first one is to directly use an algorithm, such as the mentioned bicubic interpolation algorithm. This method generates images fastest, but its effect is somewhat lesser than the model.
- The second one involves using a model, which has a relatively better effect but takes more time.
Let's first look at how to upscale an image using algorithms:
Add Load Image and Save Image Nodes
First, click on the Clear button on the right side to remove all nodes, and then start building from scratch.
As it's related to photos, the first step, of course, is to load two image nodes. These two nodes can be found by right-clicking → All node → image.
Add Upscale Image Pixel by node
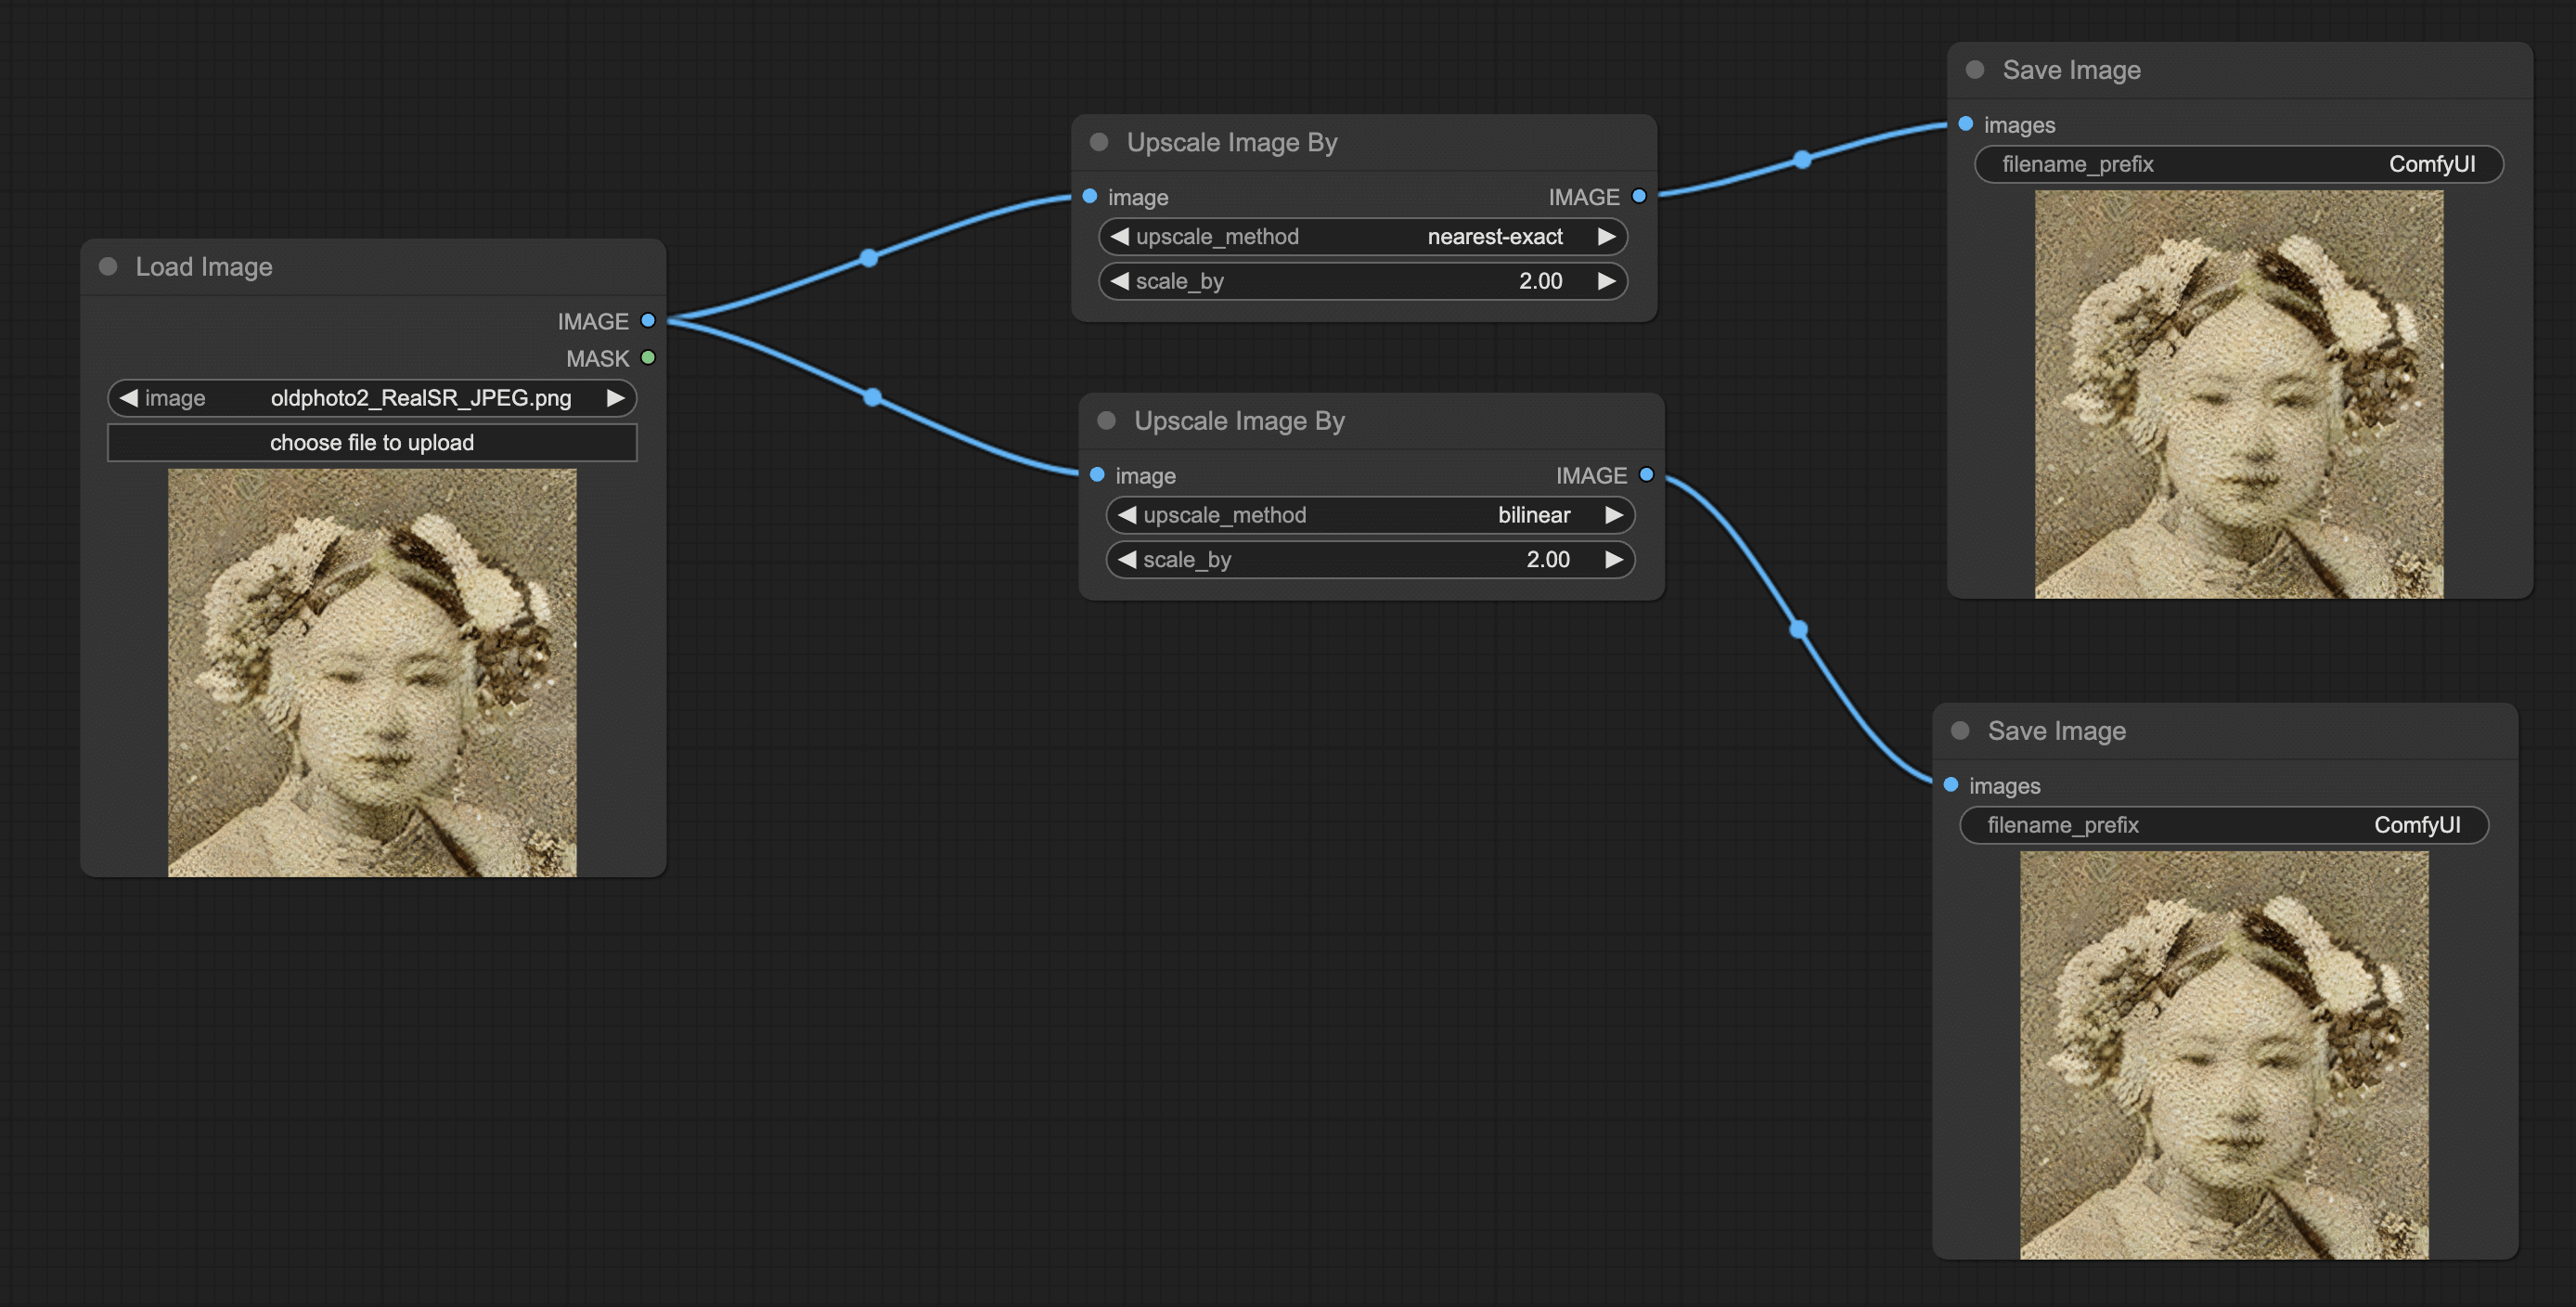
Then we'll add nodes related to Upscale, starting with the Upscale Image by node, which can be found in All node → image → upscaling. You will see two adjustable parameters on this node. The first one is the "method" parameter, which refers to several upscale algorithms mentioned at the beginning of this chapter:
- bicubic: Bicubic interpolation algorithm
- bilinear: Bilinear interpolation algorithm
- nearest-exact: Nearest neighbor algorithm
You can experiment with the effects of each algorithm as I did. The Scale below represents the multiplication of amplification. For example, I entered double amplification. As you can see in the output, I entered a very low-definition photo, but despite the image getting bigger, the resolution is still very poor.
Upscale pixel by model workflow
To resolve the resolution issue, we need to apply a more advanced method, the one using models trained with neural networks which we discussed at the beginning. The following are the ComfyUI workflow connection steps:
Add Upscale Image (using Model) Node
We can continue to use the previous workflow and first delete the Upscale Image By node. Then add the "Upscale Image (using Model)" node, which can be found in All node → image → upscaling.
Add Load Upscale Model Node
You will find that the Upscale Image (using Model) has another model endpoint that needs to be connected. So we need to 'load' a model in front of it, that node is certainly available in the loaders. After adding the nodes, connect the nodes in order as needed.
After having introduced how to set up the workflow, let's talk about the models which we haven't touched upon above. You might see some Upscale models in ComfyUI Manager; I recommend Real-ESRGAN (opens in a new tab), which proves to be quite effective in restoring sceneries. I would recommend a few more that can be downloaded from Github or from OpenModel DB (opens in a new tab):
In the end, you might encounter some uncertainties while downloading and using the Upscale models:
- While downloading models, you will see X2 or X4 in the model title. These represent the magnification multiple, so X2 refers to twice the magnification and so forth.
- Depending on the training set, some models are segmented into many, for instance, the Swin2SR model includes Lightweight and RealWorld etc. I think the key lies in these two. If you care about speed, opt for Lightweight. If you care about the result, opt for RealWorld. If you don't comprehend the meaning of the model names, you can refer to the model introductions; the author generally provides them.
- The results of different models also differ. Some Upscale models are more suitable for optimizing anime-themed images, while some others are better suited for real images. The models I recommended above are more appropriate for real images.
Exercise
In order to better memorize the above-established workflow, I suggest everyone joins me in performing a small exercise:
Build an AI upscale comparison effect workflow. Load only one image, but this image will be passed to 3 different model Upscale nodes, and finally generate 3 Images, so you can see the output effects of different models at the same time.
Here are some recommendations that can enhance efficiency:
- Right-clicking on a node will display a clone option. Clicking on it will duplicate and paste the node in the same spot. This way, you won't need to repeatedly add new nodes by right-clicking.
- You can press and hold the Ctrl key to select multiple nodes.
Hi-res fix latent upscale workflow
Another upscale method is Upscale latent, which is very simple: just connect the VAE Decode node with the Upscale Image node.
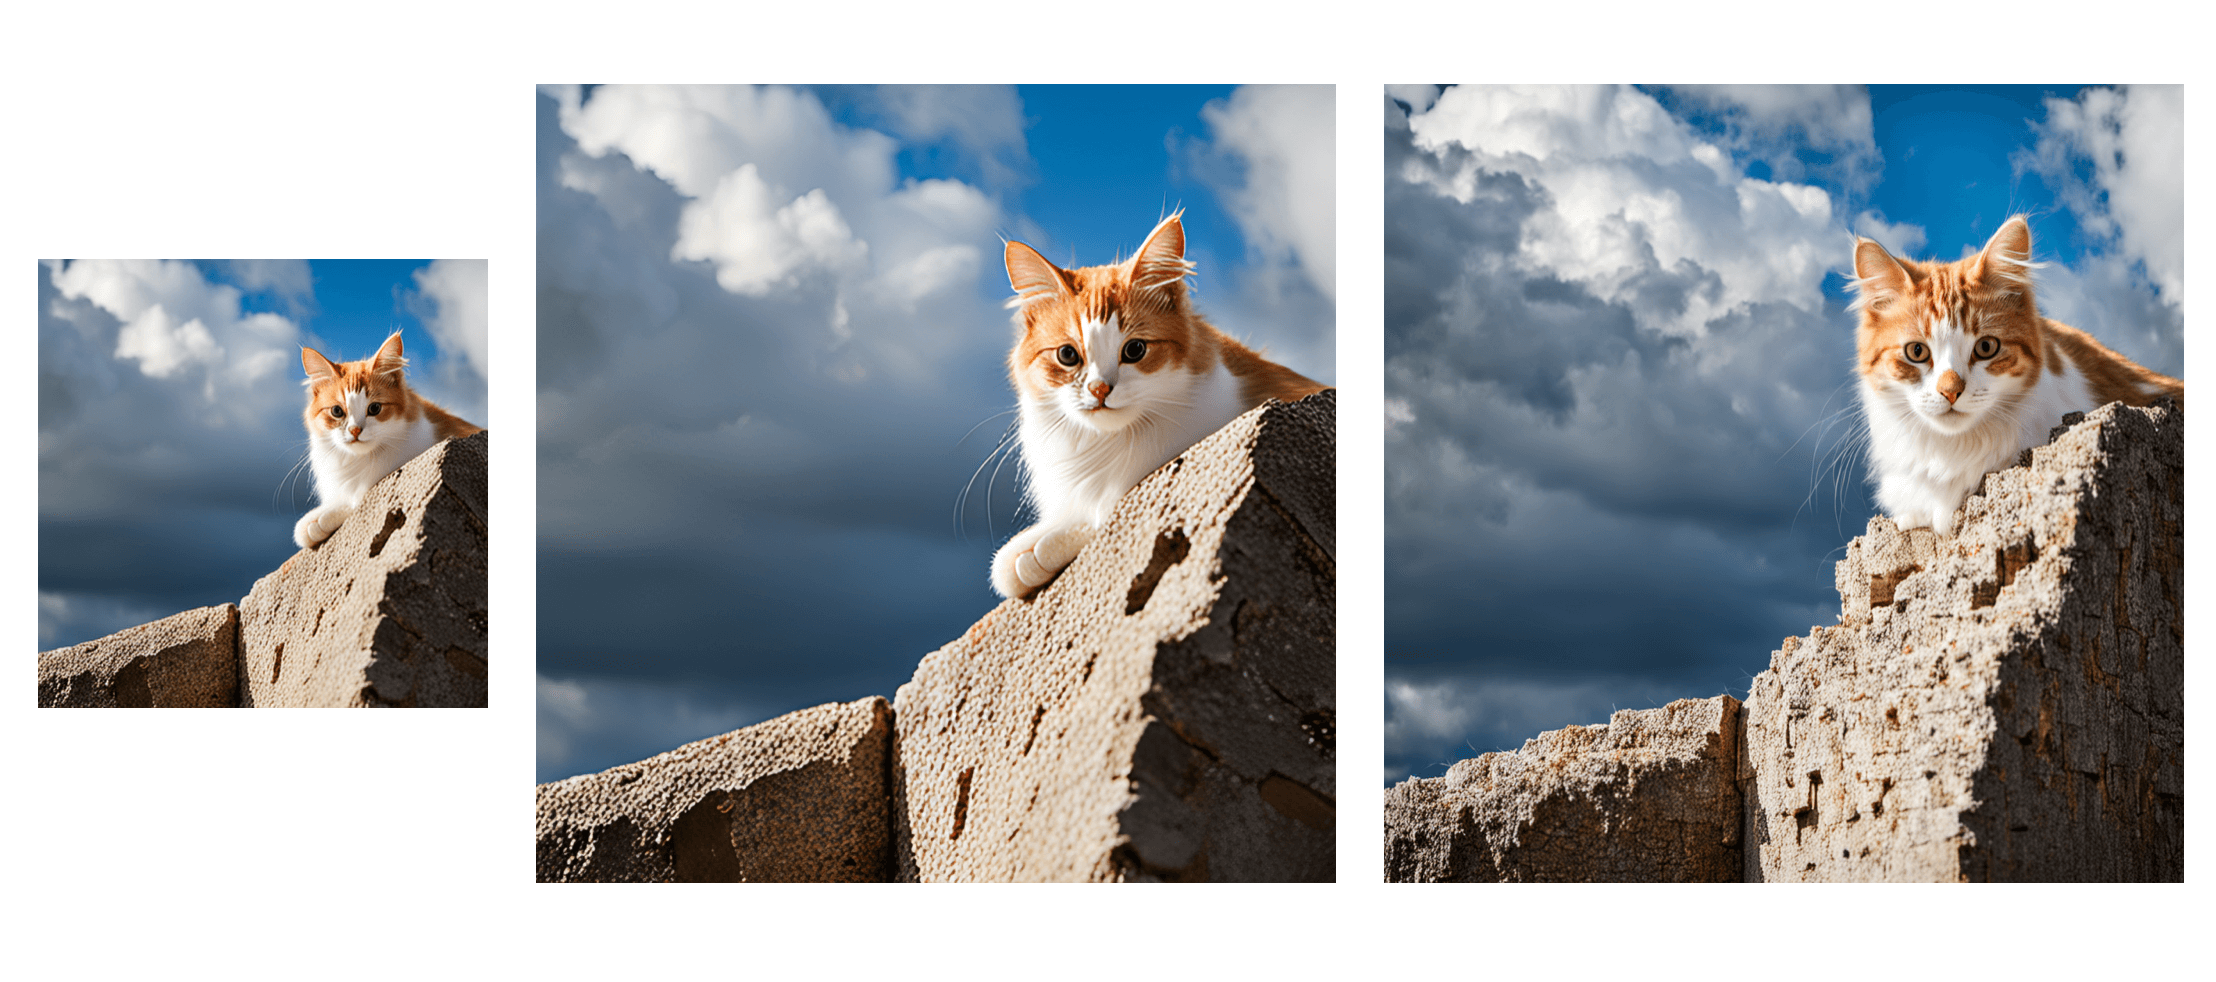
This method, which directly upscales in the latent space, is known as Hi-res Latent fix Upscale. Below are a few effect pictures. The first is a 512X512 picture generated with SD XL, the second is the effect of upscaling 2 times using the Upscale pixel workflow taught before and using the BSRGAN model, and the third is generated using the Hi-res Latent fix Upscale method. Comparing them, we can find that:
- The second picture is enlarged without changing the information of the first picture, but when you look closely at the local picture, there is a sense of algorithmic smearing.
- In addition to enlarging, the third picture also supplements details of the picture, such as the clouds above. However, there are also downsides as the content of the picture may vary slightly, such as the cat's hand disappears (of course, this can be overcome by slight parameter adjustment, but it could be slightly more complicated).
From the comparison, you should be able to distinguish the differences between the two methods:
- Using the BSRGAN Pixel Upscale only magnifies the image without adding new information. Also, in practical use, the generation speed is faster. However, the smearing effect of the algorithm is quite severe, and sometimes after magnification, it seems that the details are missing.
- On the other hand, using the Hi-res Latent fix Upscale method not only magnifies the image, but also changes some of the original information, making the image details more abundant. However, it might deviate from the original image and the generation speed is slower.
You can choose different methods according to your needs.
After comparing the differences, let's take a look at how to build a Hi-res Latent Upscale workflow.
Add an Upscale Latent Node to the Default Workflow
As the first step, right-click → All node → latent to find the Upscale Latent node. Also, there's a quick method to add a node: if you remember the node's name, you can double-click on any blank space to call up the node search window and find the node by typing its name. After adding, connect this node with the Latent of KSampler.
Configure the Upscaler Latent Node Parameters
Apart from adjusting the algorithm, it's also necessary to set the width and height to the final size of the image. For example, if my original image is 512 and I want to enlarge it 2 times, then I will set this as 1024. Crop refers to whether to cut or not, and I select disable here.
If you feel that setting width and height separately is less efficient and you want to set only the multiplication factor, then you might consider using the Upscale Latent By node, which lets you directly set the scale.
Add a KSampler Node
Next, add a new KSampler node and connect it with the recently added Upscale Latent. Also, ensure that the denoise is set to less than 1. I generally set it to 0.5-0.7. The higher this value, the less the output will resemble the original image. The key workflow for the Hi-res Latent Upscale is located in the blue box in the image below:
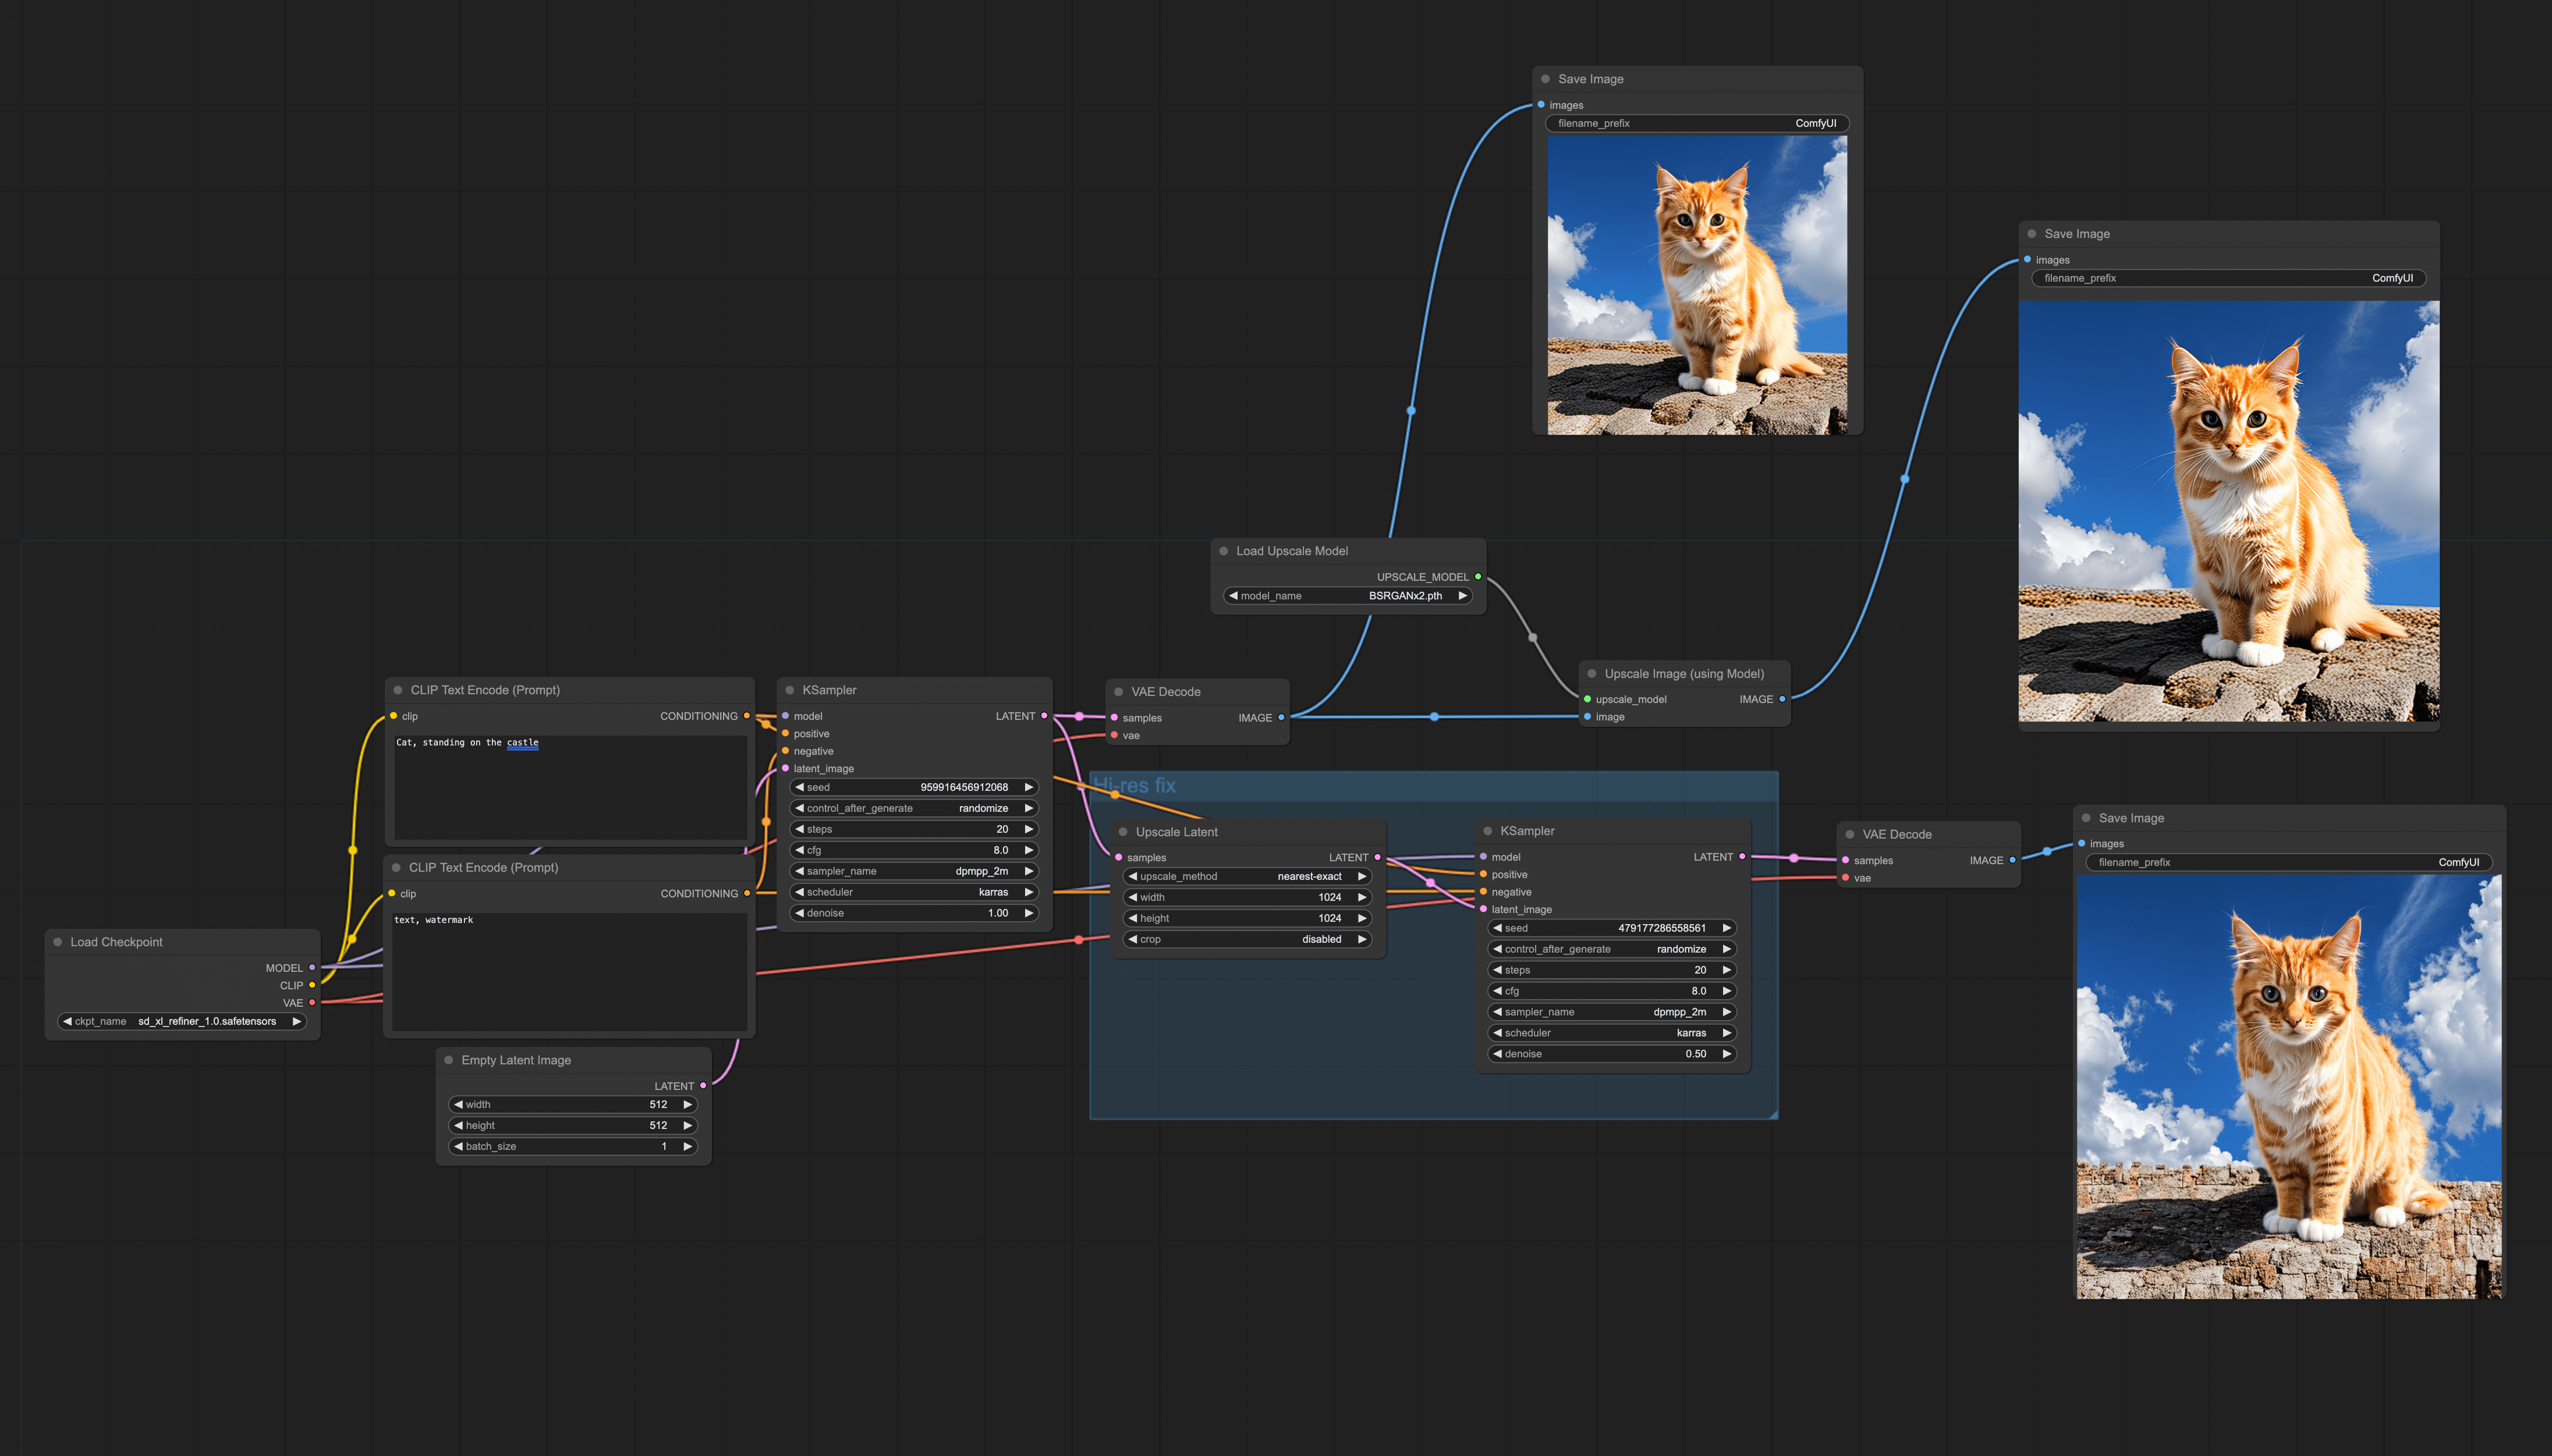
When you have all these nodes connected, consider the underlying principles. Essentially, it first magnifies the image that was first generated in the Latent space and then lets the model generate another image in the image-to-image way.
Upscale Pixel and Hi-res Fix Workflow
In the previous workflow, it is not difficult to see that the two workflow methods do not conflict and can be run separately. But is it possible to link them together?
For example, can the picture after pixel upscale put into the Hi-res fix process for enlargification? You can try to enlarge it again after enlarging. But if you look closely at the pros and cons analysis earlier, you will find that these two workflows could be slightly adjusted to complement each other:
- First use pixel upscale to enlarge, ensuring that the image content does not change too much.
- Then use the Hi-res fix workflow to add details to the picture.
- And to make the image look more detailed, adopt a process of first enlarging and then shrinking.
You might want to try connecting the workflow yourself:
- Try using the Upscale Latent By node to implement the Hi-res workflow.
- Note that you can first enlarge the image 4 times, then reduce it by 1/2.
- Try adding a workflow to your existing workflow to see the effects of different methods.
FAQ
Why we need the upscale latent node?
The size of the output image can be directly adjusted using the Empty latent image. Why is there an upscale latent node and under what circumstances is it necessary to use it? This question was asked by Discord user heiba_wk
Answer from Jimmy: I suggest you take another look at the tutorial about SD principles. Adjusting the size directly with an empty latent image may not produce good results. To explain by comparing it to the stone carving mentioned in the tutorial:
- The empty latent image is like the stone carved by the sculptor (model). However, some sculptors (models) only carve 512x512 stones (images) during training. If you ask them to carve a 1024x1024 stone (image), they won't be able to do it well, and the result will be poor (for example, in case of a 512 image, the human figure is one head, but in a 1024 image, there are two heads).
- But what if I want a 1024x1024 image? This is where you need to call on the Upscale sculptor (model). This sculptor (model) is not particularly good at creating, but is very good at proportional upsizing, and even some can add content details while enlarging.
Answer from Marc: In terms of code logic, the method used by upscale to enlarge the image actually uses basic image processing methods, such as ["nearest-exact", "bilinear", "area", "bicubic", "bislerp"]. These methods are much more cost-effective for generating large-sized images.