Image-to-Image
Before officially starting this chapter, please download the following models and put them into the corresponding folders:
- Dreamshaper (opens in a new tab): place it inside the models/checkpoints folder in ComfyUI.
- stable-diffusion-2-1-unclip (opens in a new tab): you can download the h or l version, and place it inside the models/checkpoints folder in ComfyUI.
- coadapter-style-sd15v1 (opens in a new tab): place it inside the models/style_models folder in ComfyUI.
- OpenAI CLIP Model (opens in a new tab): place it inside the models/clip_vision folder in ComfyUI.
If you want to use the workflow from this chapter, you can either download and use the Comflowy local version or sign up and use the Comflowy cloud version (opens in a new tab), both of which have the chapter's workflow built-in. Additionally, if you're using the cloud version, you can directly use our built-in models without needing to download anything.
After completing the basic learning, you might not be satisfied with the generated images, for example:
- The resolution of the generated images is not enough.
- Some parts of the generated images are not satisfactory and you want to modify them.
- Or maybe you want to enhance control over the generation process, such as controlling the pose of the character in the picture.
The intermediate section will introduce more methods to help you solve the above problems. But before discussing the solutions to these issues, I'd like to introduce another crucial workflow of Stable Diffusion: image-to-image.
Principle Introduction
The two mainstream methods of Stable Diffusion model for image-to-image are:
- Overdraw: Take the input image as a base and use the model to regenerate a new image on it.
- Reference: Take the input image as a parameter, input it and the prompt together into the model, and then generate a new image.
It may be a bit difficult to understand literally, so let's visualize these two methods as per tradition.
Method 1: Overdraw
First, remember the Stable Diffusion principle. The image-to-text process denoises a random noise image into a new image. Image-to-image is to first add noise to the input image and then denoise this noisy image into a new image using the same method. The rough flow is like this. Its corresponding workflow is generally called Simple img2img workflow.
If we use the analogy of sculpture, the process is similar to the sculpture artist (model) taking a statue (initial input image), and sculpting a new one (output image) based on your instructions (Prompt).
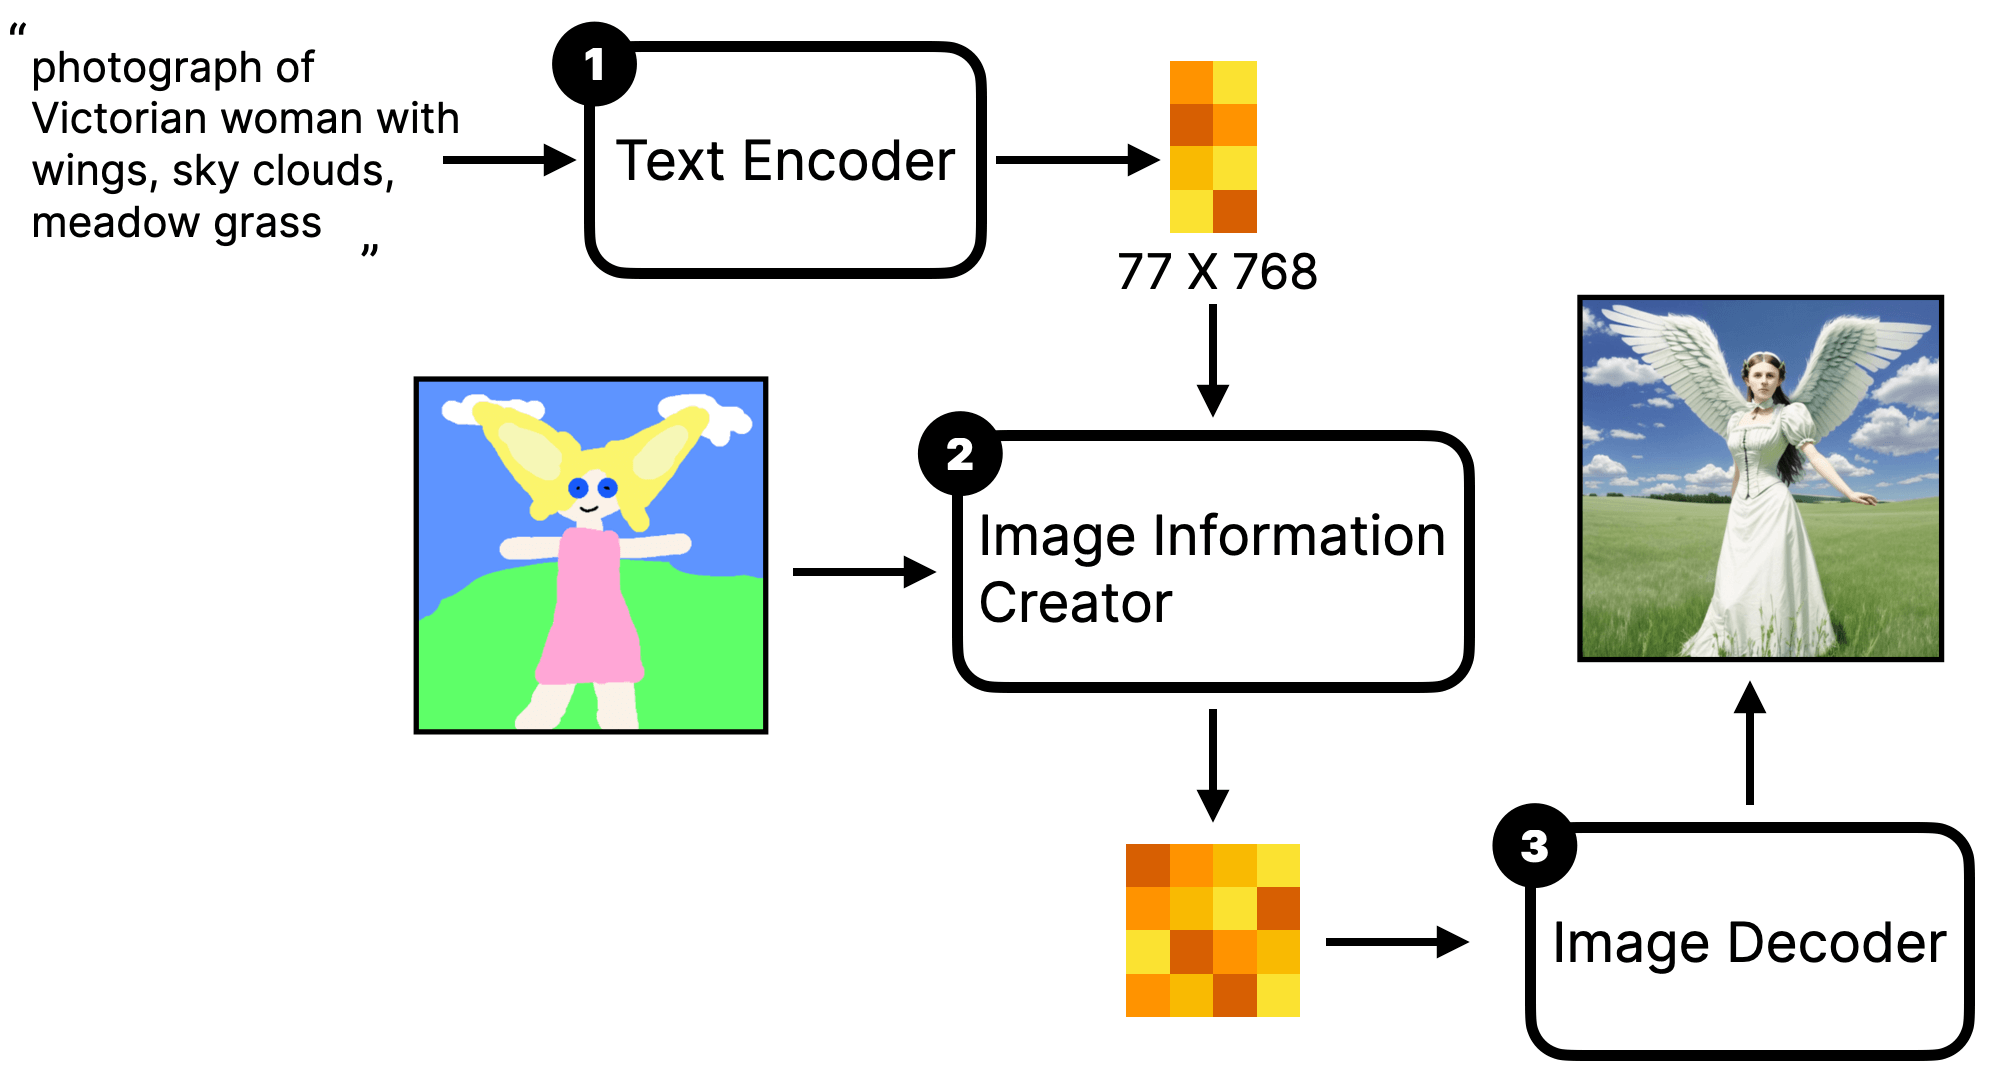
Method 2: Reference
The second method does not redraw the input image, but uses the input image as part of the prompt. It is then input into the model together with the text prompt to finally generate a new image. The rough flow is as follows:
Pay attention, there is one difference in the image compared to what was introduced before, the first step is not a Text Encoder but an Encoder. This is easy to understand because not only the textual prompt needs to be input to the model, but the image prompt also needs to be input.
If you analogise it with sculpture, this process is similar to you giving the sculptor a text instruction (prompt) and also showing the sculptor a picture for reference, and then the sculptor re-sculpts a statue (output image) according to your instruction and picture.
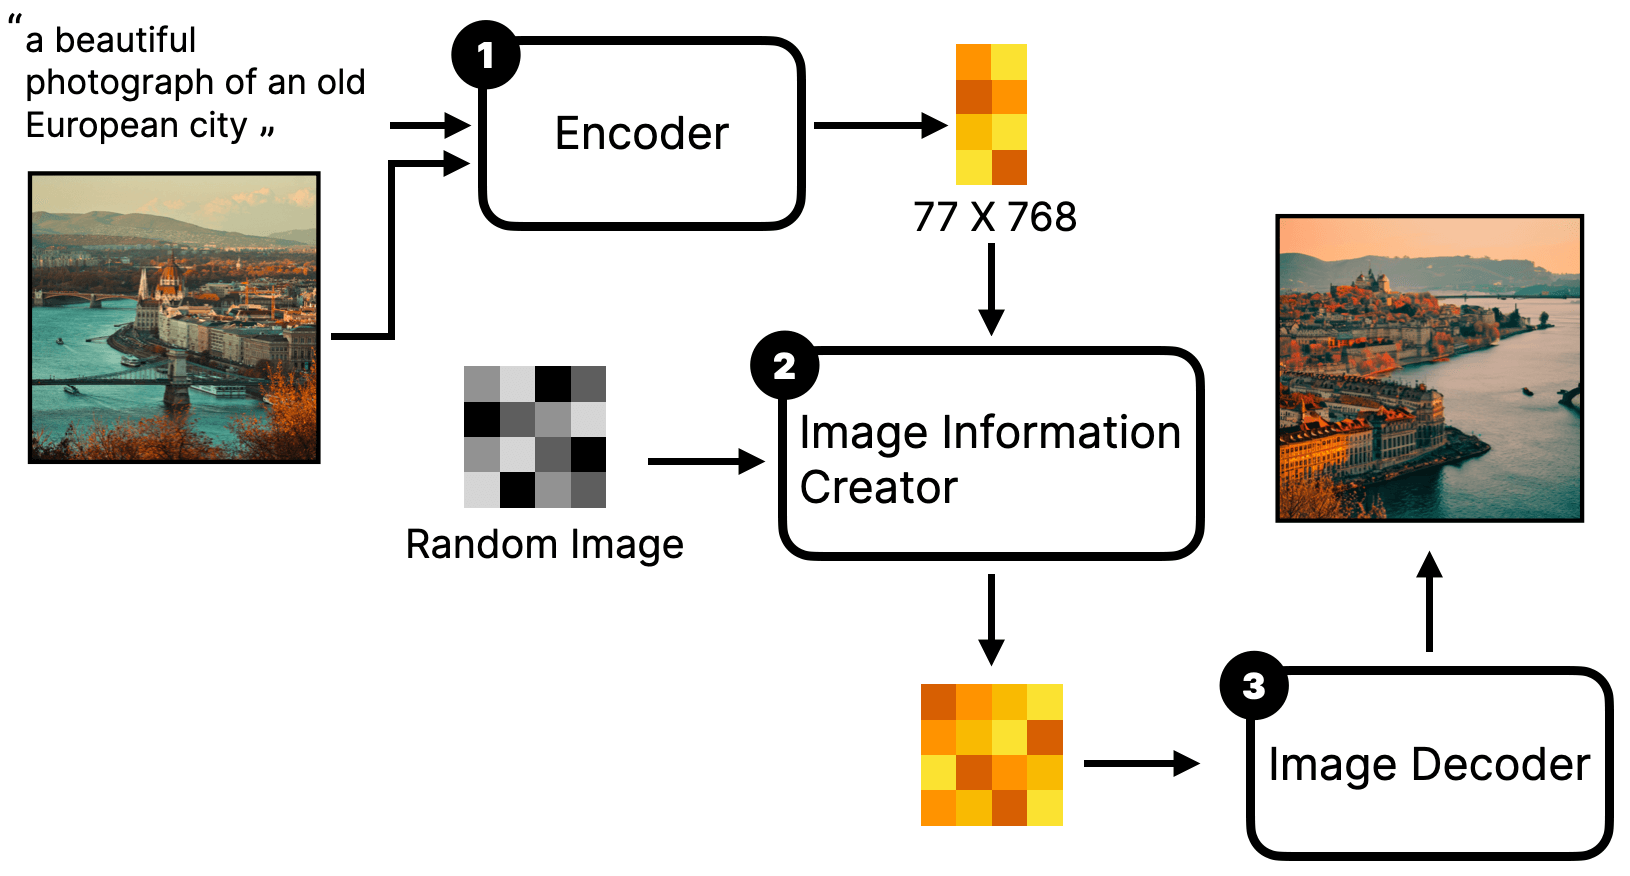
Additionally, how to use the Image data can also affect the effect of the generated image:
- If you use the image as a supplement to the text prompt, the generated image will also contain elements from the original image. For example, in the diagram illustrating the principle above, I input a picture with a bridge, river, city wall into the model, and the text prompt did not mention these contents in the picture. But the final image contains information from the original image (bridge, river, city wall), and even the style is very similar to the original image. This kind of workflow is generally referred to as the unCLIP model workflow.
- Another approach is to input only the style of the original image to the model, so the generated image will have the style of the original image but not the content of the original image. This kind of workflow is generally referred to as the Style model workflow.
Simple img2img workflow
Since the principle is simple, you should be able to guess how to set up a simple img2img workflow. You might as well try it yourself first, set up a workflow 😎
- The key is to input the image into KSampler, and KSampler can only input latent images.
- You can find the option to load images by right-clicking → All Node → image.
unCLIP model workflow
After introducing the redraw, let's talk about the reference. First is the unCLIP model workflow. The previous principle part did not elaborate on how to implement it, let me explain in detail using ComfyUI's workflow.
Add Load Image Node
The first step is to start from the Default workflow. Then, based on the existing foundation, add a load image node, which can be found by right-clicking → All Node → Image.
Add CLIP Vision Encode Node
In the second step, we need to input the image into the model, so we need to first encode the image into a vector. So, we need to add a CLIP Vision Encode node, which can be found by right-clicking → All Node → Conditioning.
Then, we can connect the Load Image node to the CLIP Vision Encode node.
Add unCLIPConditioning Node
Then, we need to fuse the data from the image encoding with the Text Encode data, so we need to add an unCLIPConditioning node. This can be found by right-clicking → All Node → Conditioning.
Next, we connect the Positive Prompt to the unCLIPConditioning node, followed by connecting the CLIP Vision Encode to the unCLIPConditioning node. Then, the unCLIPConditioning node is connected to the KSampler's positive.
Lastly, I'll introduce the two parameters in the nodes:
- strength: This sets the influence strength of the prompt. The larger the number, the closer it is to the description of the prompt. It's somewhat similar to the weight notation you use when writing Prompts in CLIP Text Encode, like (red hat:1.2).
- noise_augmentation: This mainly represents the closeness between the new image and the old image. 0 means the closest, I usually set it between 0.1 - 0.3.
Replace Load Checkpoint Node with unCLIPCheckpointLoader Node
The final step, you will notice that there's a point in the CLIP Vision Encode node we added in the second step that hasn't been connected yet. It reads Clip Vision, but what it actually needs to connect to is a node called unCLIPCheckpointLoader, which can be found by right-clicking → All Node → Loaders.
Then, delete the original Checkpoint and replace it with the unCLIPCheckpointLoader node, and connect it to the CLIP Vision Encode node. Set its model to the sd21-unclip-h model.
Note that although this loader is called unCLIPCheckpointLoader, you can't find the folder for this node in the ComfyUI project folder. In fact, it shares a folder with the Checkpoint node. So, you need to put the unCLIP model files in the Checkpoint.
When you download the unCLIP model, you can download the h or l version. The h version of the model will produce clearer images, but it will be slower to generate.
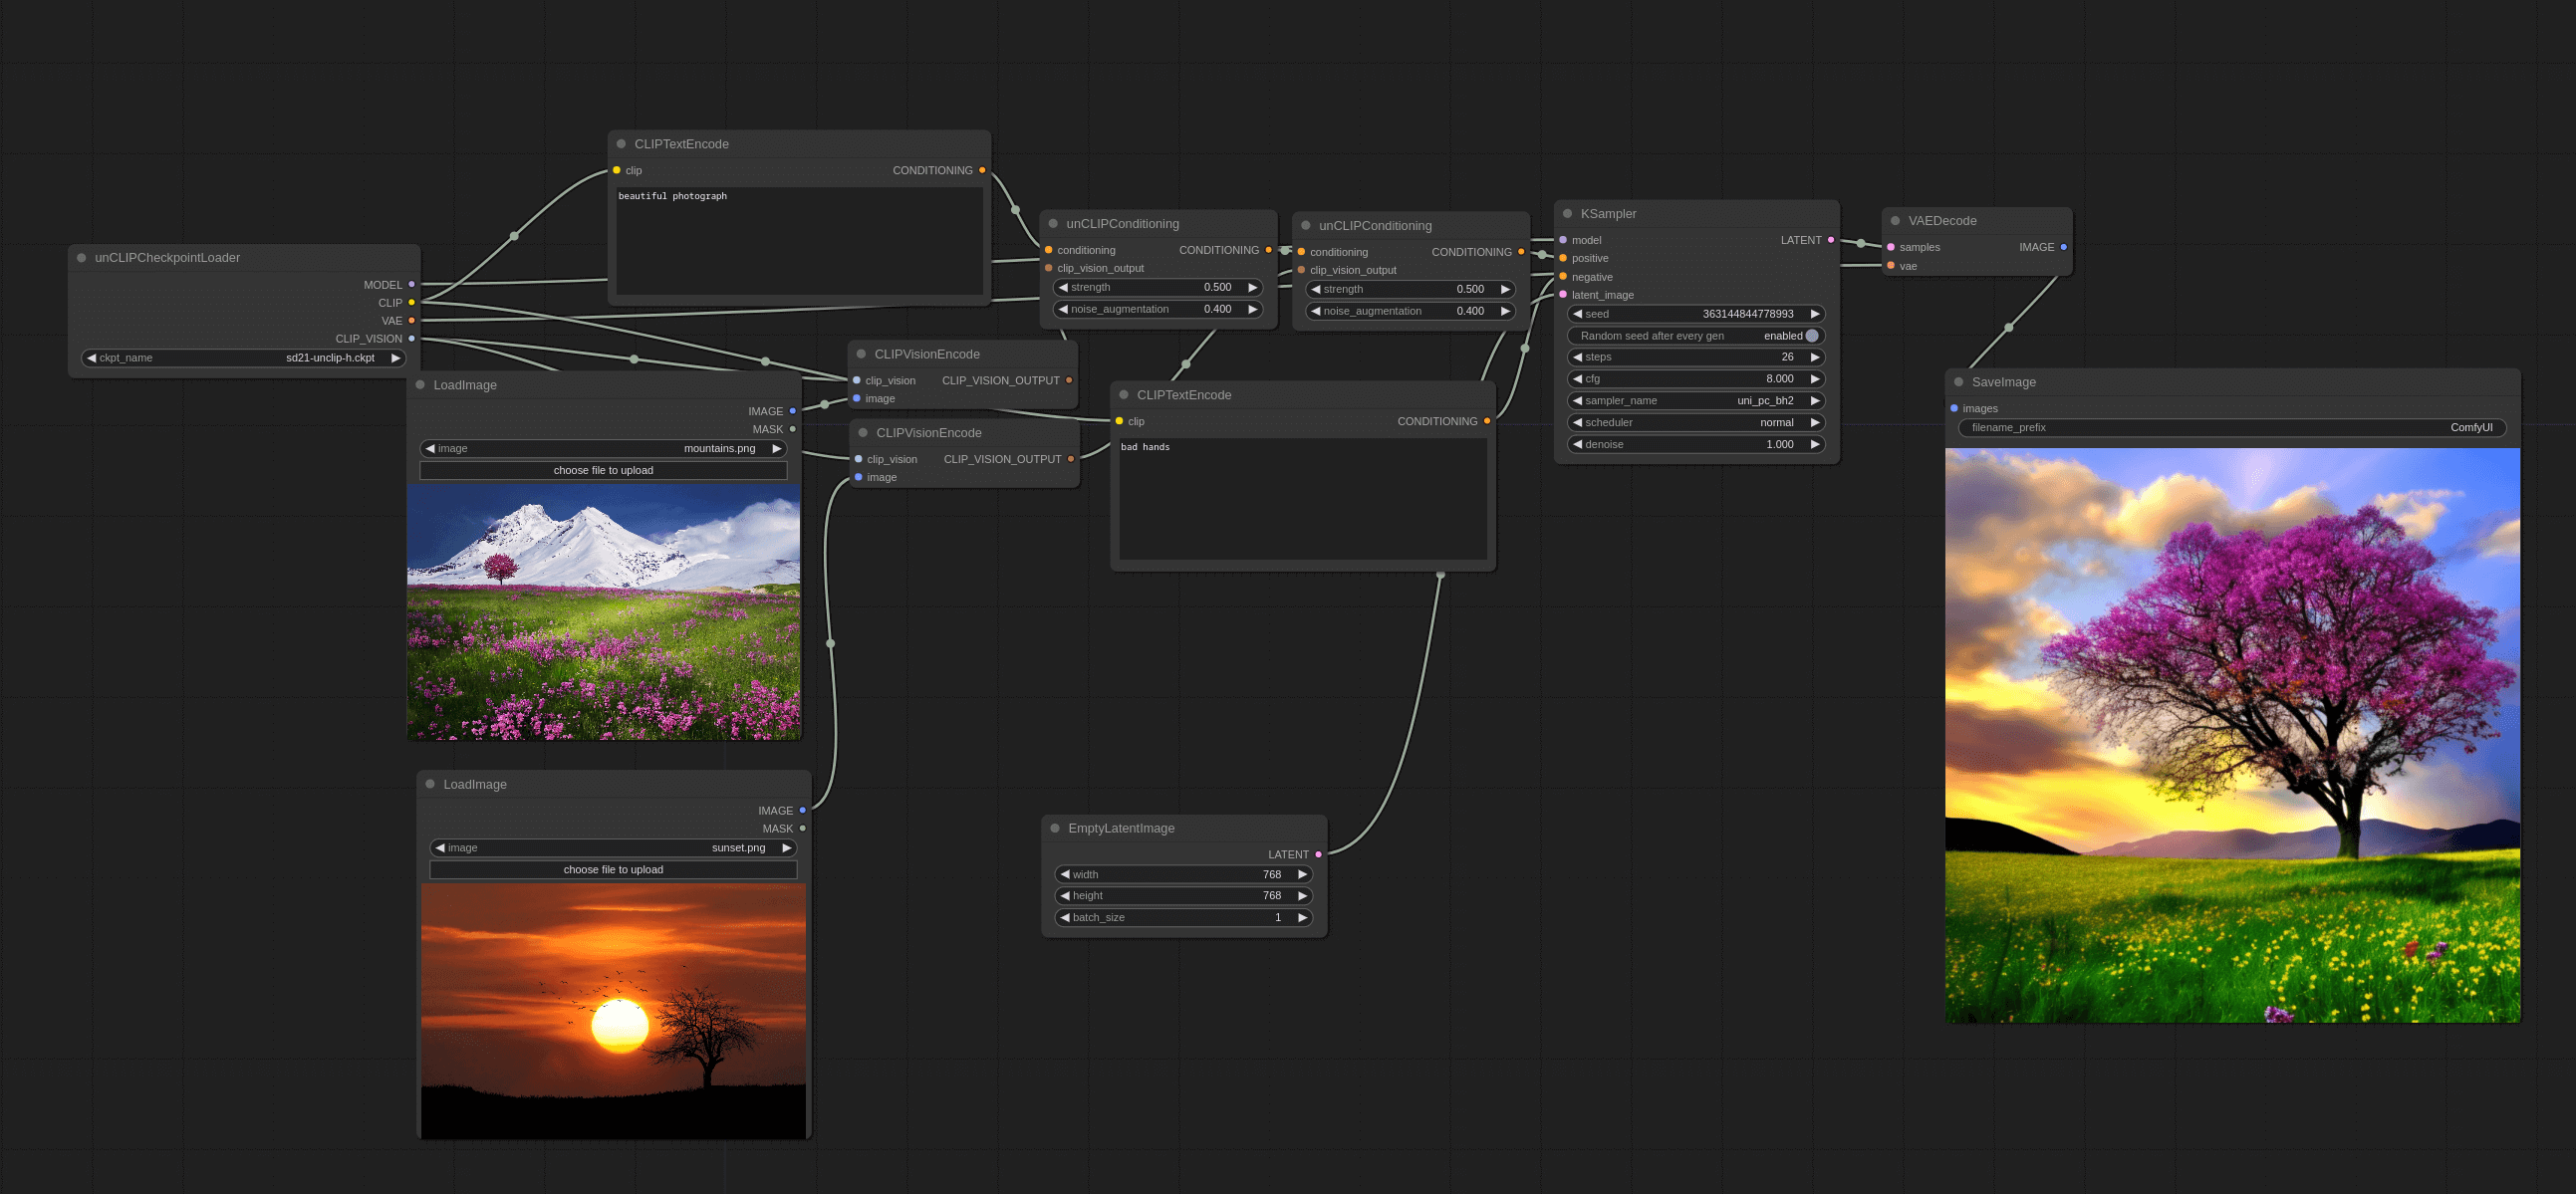
Also, adjust the Empty Latent Image to 768x768, because the unClip model we use is based on SD2.1 training. The final workflow should look like this:
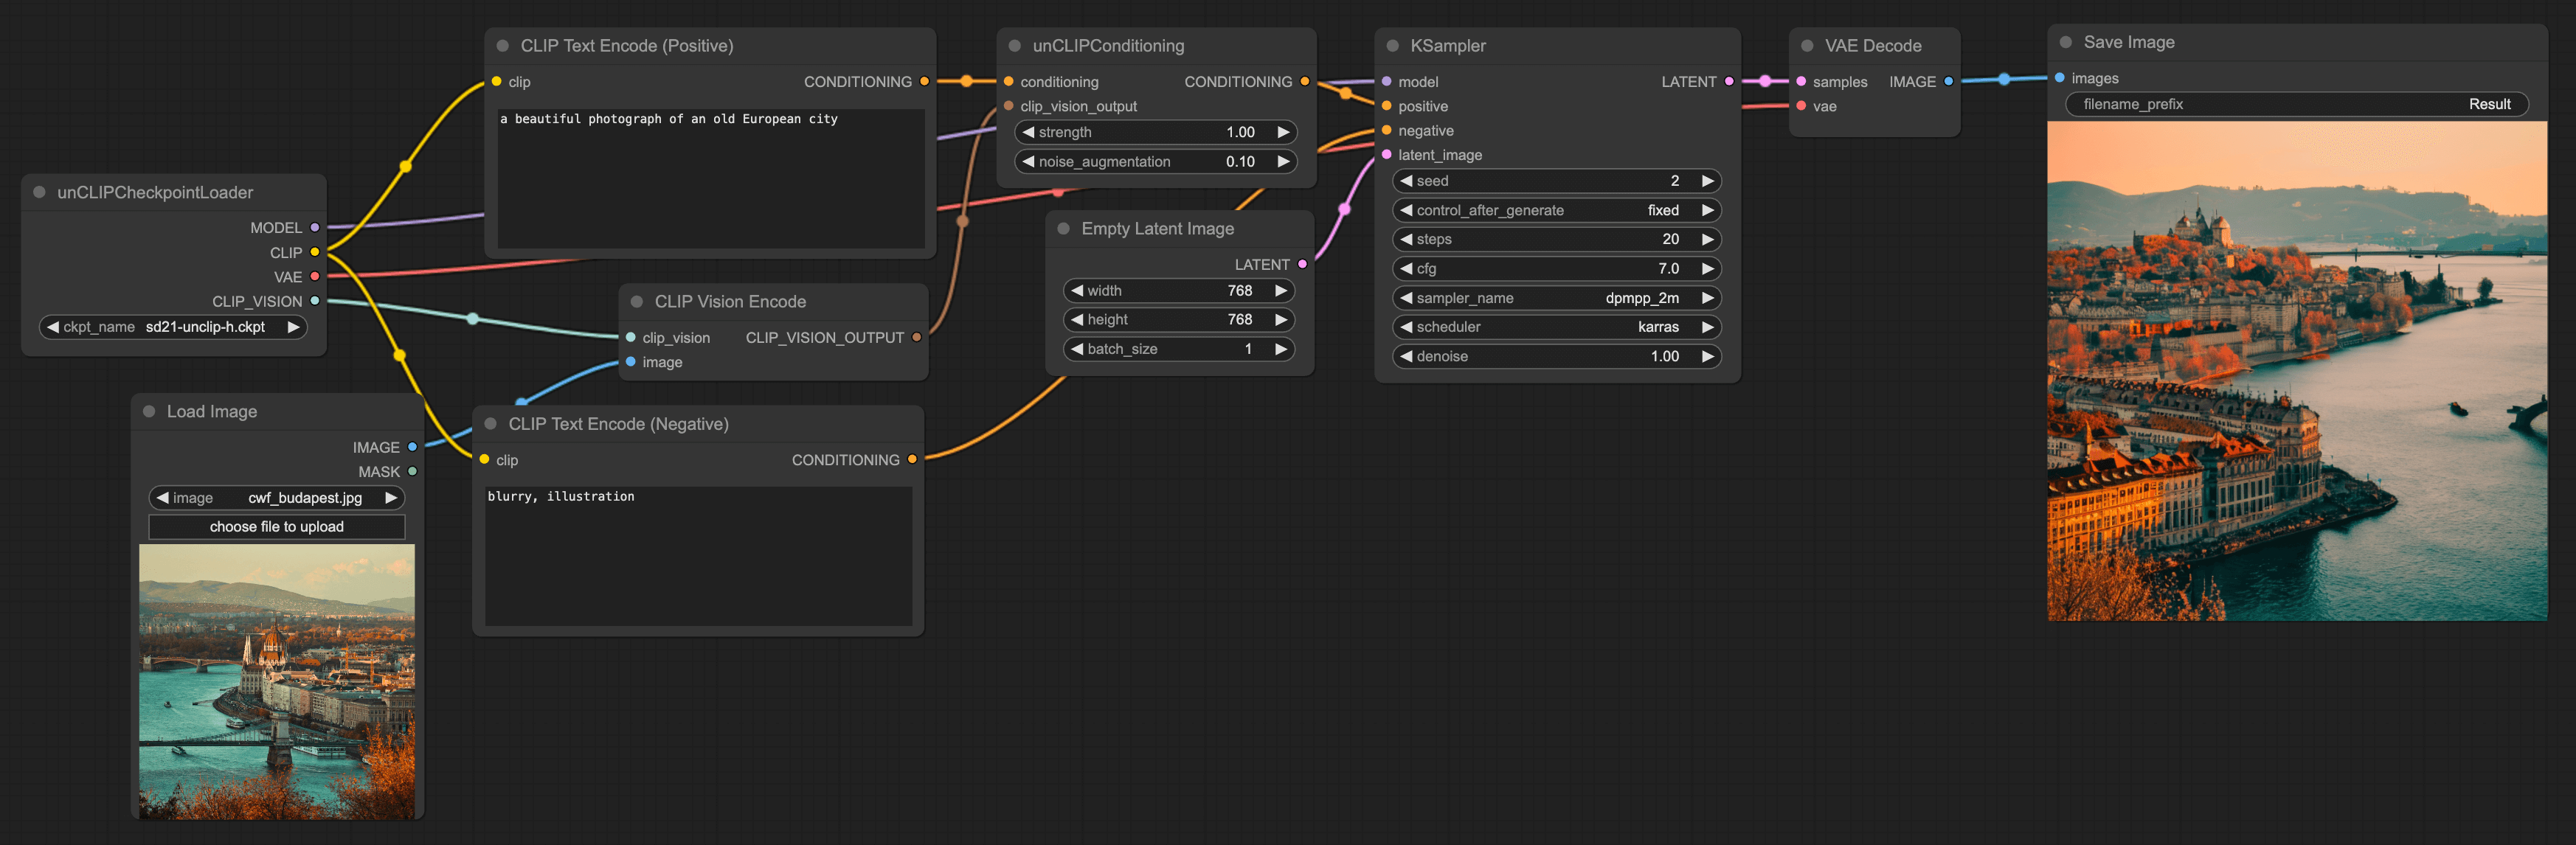
From the workflow, it's not hard to see that essentially, it involves first encoding the image, then encoding the text prompt, finally fusing the two, and inputting them into the model. The images generated in this way will contain elements from the original image.
Additionally, you can also try inputting multiple images into the model, and the generated images will contain elements from multiple images. For example, like this:
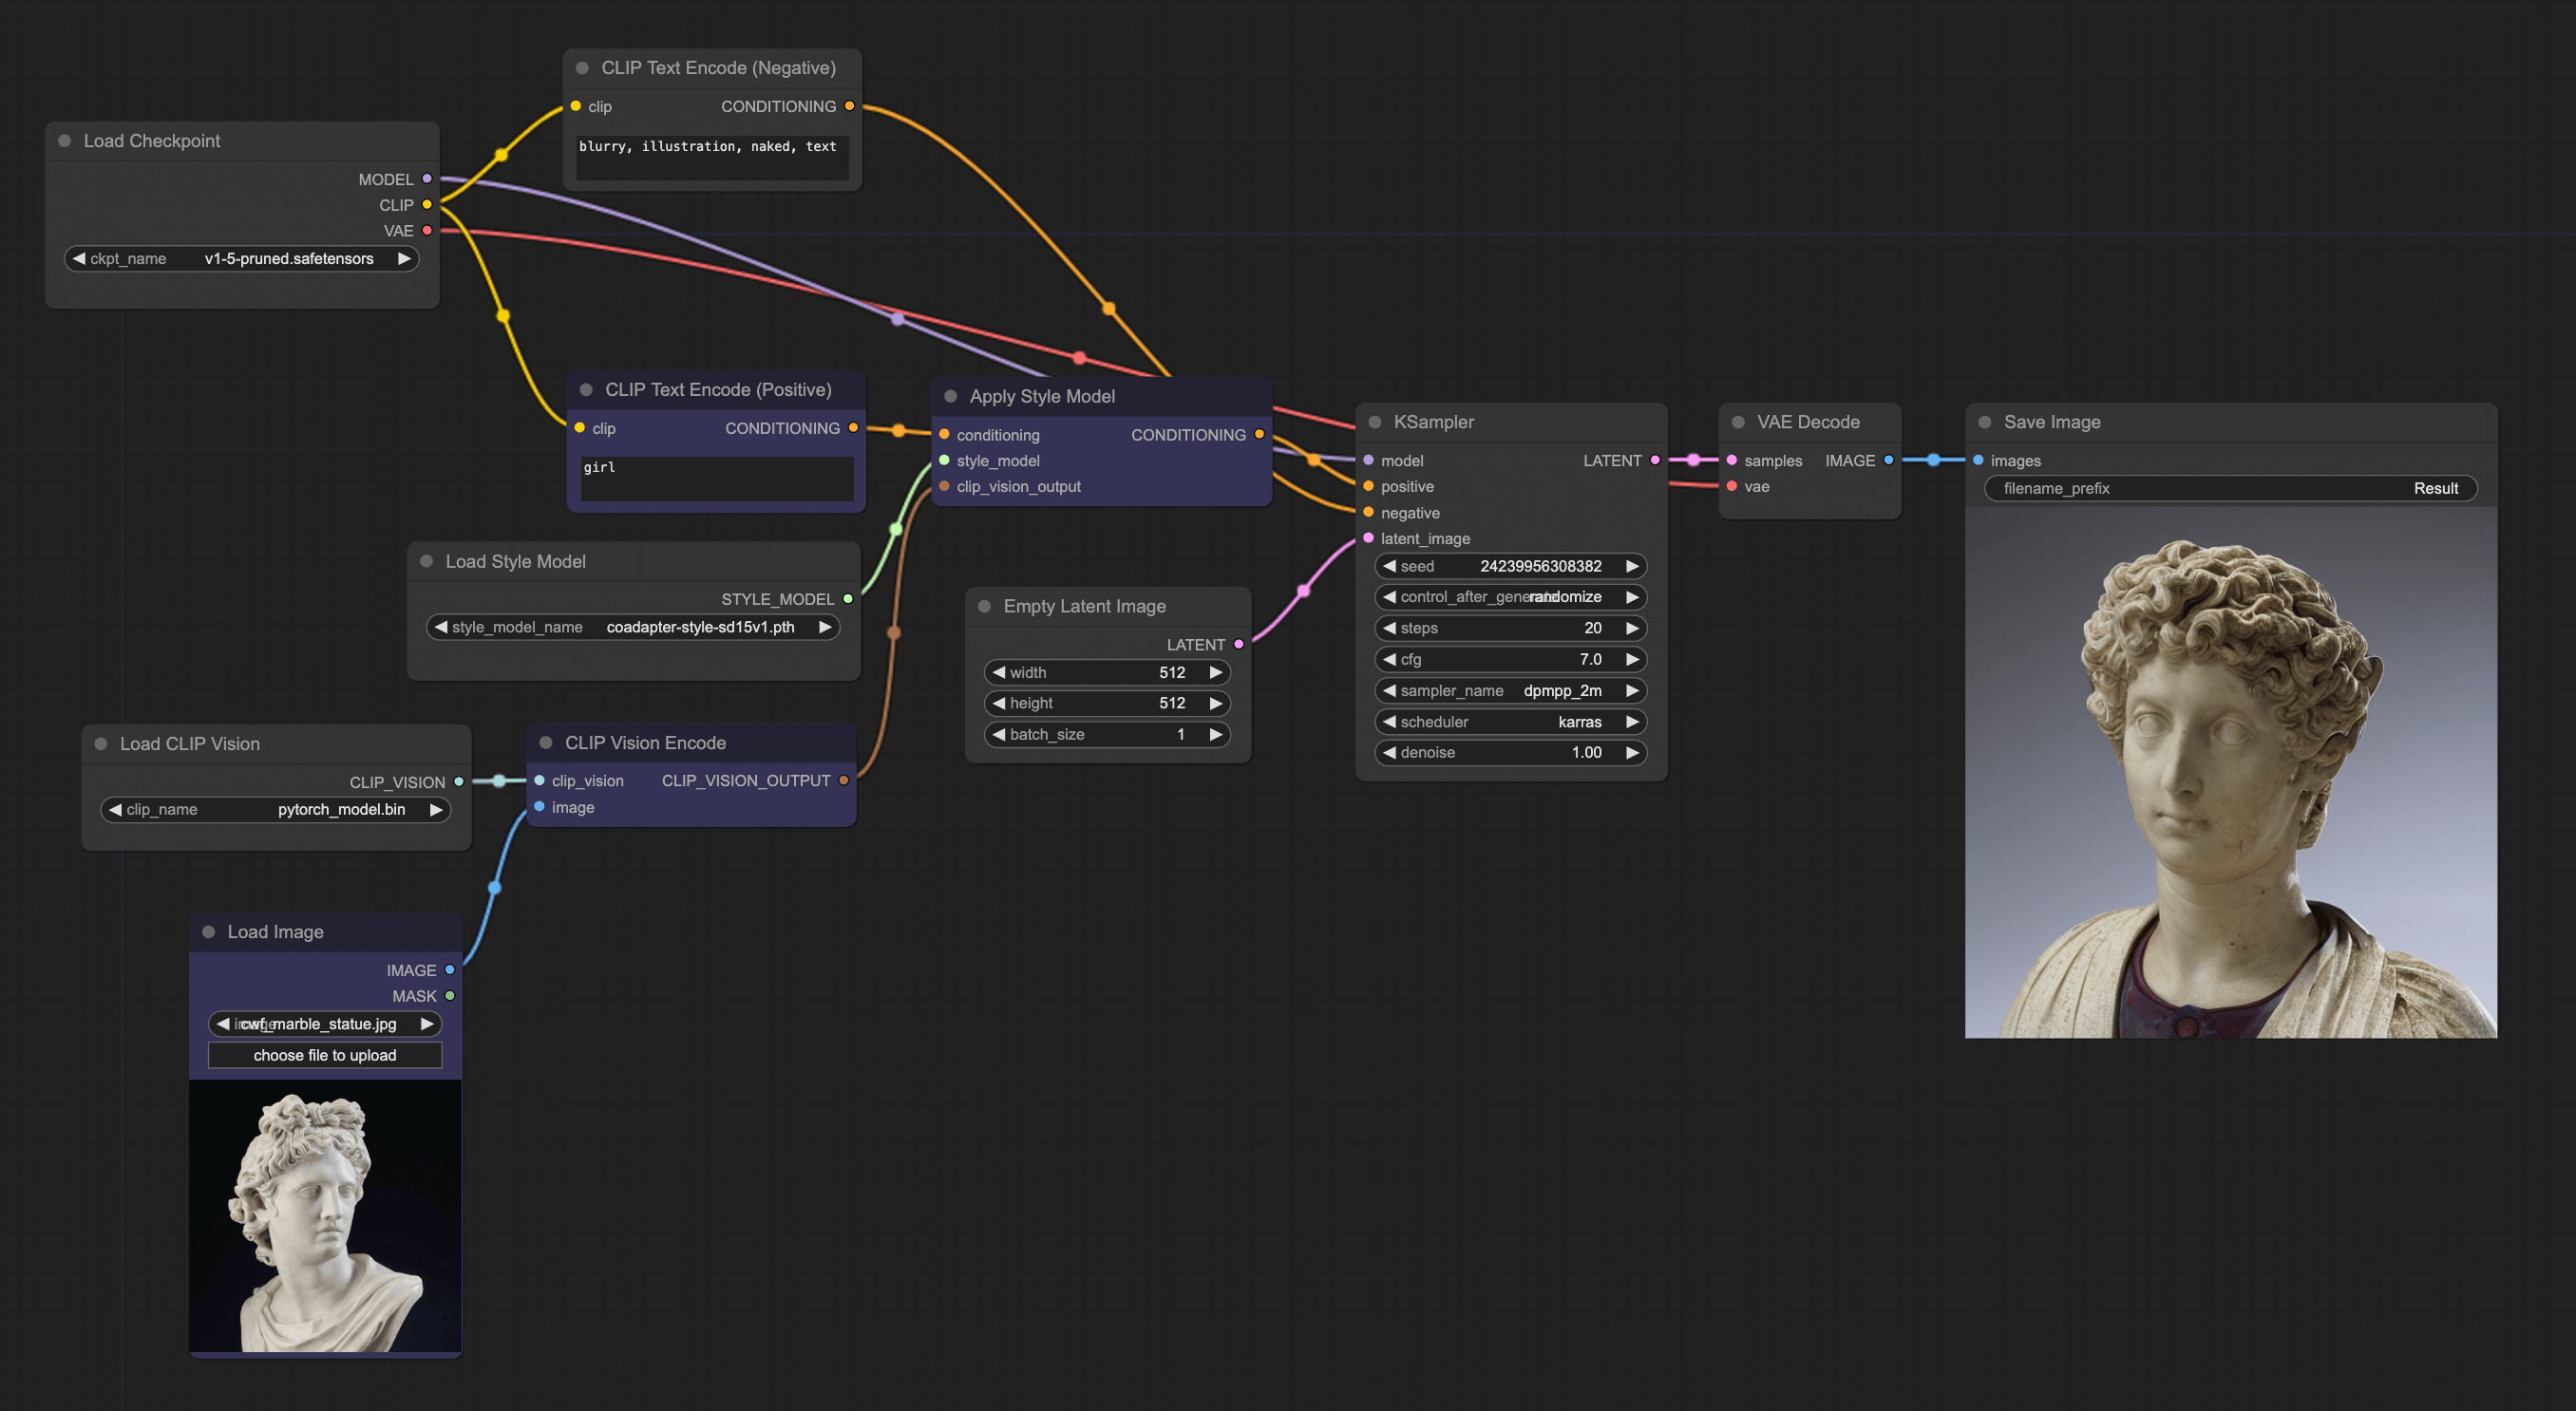
Style model workflow
Another type of redraw involves only using the style of the image and not its content. The implementation is very similar to the unCLIP model workflow, but it requires removing the content of the image and keeping only the style. Let's explain its ComfyUI workflow:
Replace Nodes
The first step is to continue using the workflow from the previous example, but we need to replace some nodes. The first one is to replace the unCLIPCheckpointLoader with a Checkpoint and change the model to v1.5. Then replace the unCLIPCondtioning with the Apply Style Model node, which you can find by right-clicking → All node → conditioning → style_model.
You can then connect these nodes, and you'll find that there are still two endpoints not connected, and we'll move to the next step.
Add Load CLIP Vision and Load Style Model Nodes
These two nodes can be found by right-clicking → All node → loaders. Then connect them to the CLIP Vision Encode node and Apply Style Model respectively. After connecting, let's explain the complete workflow. The whole process is quite easy to understand: input an image, then encode the image, and use Apply Style Model to filter out the Style information from the image, and fuse it with the text prompt and pass it to KSampler.
What's different from the unCLIP model workflow is that it only uses style. So the content of the drawing may not be very similar to the original image, but the style will look alike.
It’s important to note that this style model can only understand common styles. The effects of classic paintings or images of people will be quite good, but if you import some niche and abstract images, the effect will be very poor.