ControlNet Advanced
Before starting this chapter, please download the following models and place the model files in the corresponding folders:
- Dreamshaper (opens in a new tab): Place it within the models/checkpoints folder in ComfyUI.
- ControlNet Scribble (opens in a new tab): Place it within the models/controlnet folder in ComfyUI.
- ControlNet Openpose (opens in a new tab): Place it between the models/controlnet folder in ComfyUI.
- ControlNet Canny (opens in a new tab): Place it between the models/controlnet folder in ComfyUI.
If you want to use the workflow from this chapter, you can either download and use the Comflowy local version or sign up and use the Comflowy cloud version (opens in a new tab), both of which have the chapter's workflow built-in. Additionally, if you're using the cloud version, you can directly use our built-in models without needing to download anything.
In the ControlNet basics, I introduced several ways to use ControlNet, but these methods all require you to directly import Pose, Depth, and other graphics into the workflow. What if these pictures aren't available?
The best way is to directly use the existing images and convert them into Pose or Depth images. The advanced chapters will teach you how to use plugins to convert images for ControlNet use.
Image canny ControlNet workflow
In the compulsory course, I introduced the Scribble ControlNet workflow, which can convert hand-drawn drafts into images. However, if you don't have a hand-drawn draft, but want to generate from someone else's picture, I suggest not converting the picture into a scribble picture, but using Canny. The resulting reference picture is more accurate than the hand-drawn style. For example, like this:
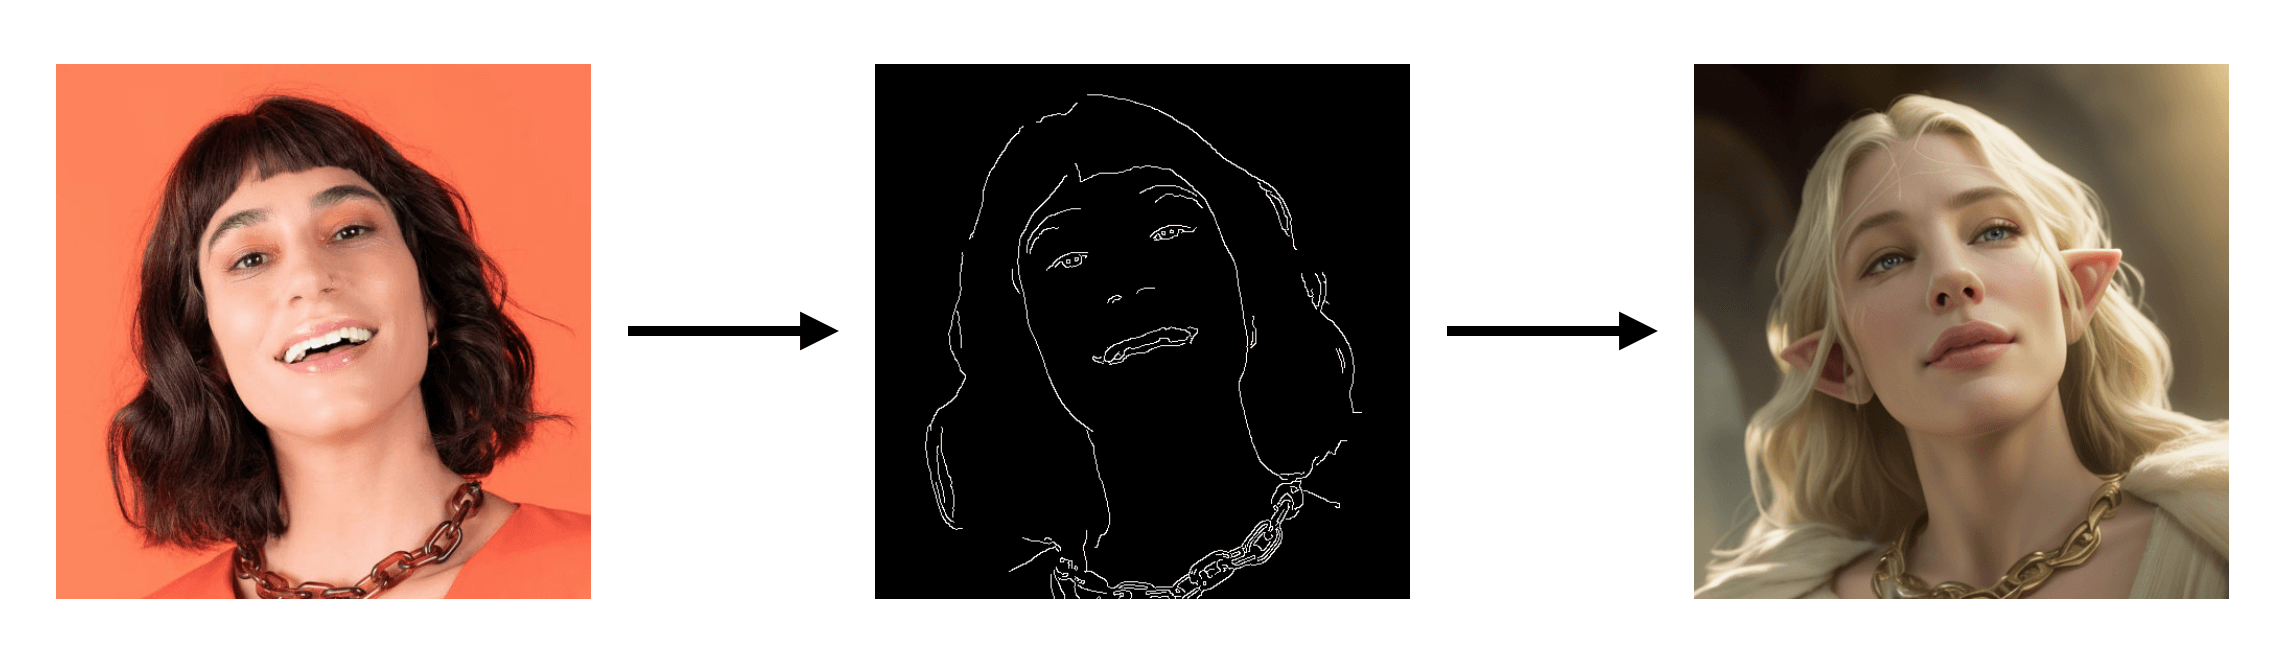
As you can see from the example above, Canny is somewhat similar to the first Scribble. Canny generates edge maps from existing images, while Scribble involves sketching. Its workflow is also quite simple and you can refer to the Pose ControlNet workflow. All you need to do is replace the DWPose Estimation node with the Canny node.
Download Plugin
First, you need to download a plugin called ComfyUI's ControlNet Auxiliary Preprocessors (opens in a new tab). There are two ways to install:
If you have installed ComfyUI-Manager, you can directly search and install this plugin in ComfyUI-Manager.
The method to install ComfyUI-Manager, and plug-ins can refer to the tutorial Install ComfyUI Manager.
Inserting the Canny Node
Next, you need to load the previous Canny workflow (or create a new one), then double-click on the blank space, type 'Canny' in the search box, and add that node. Then connect this node's left endpoint with the Load Image node, and the right endpoint with the Apply ControlNet node. If you want to get the Canny image, you can also add a Preview Image node to the right endpoint of the Canny node, so you can see the Canny image. The final workflow is as shown in the picture:
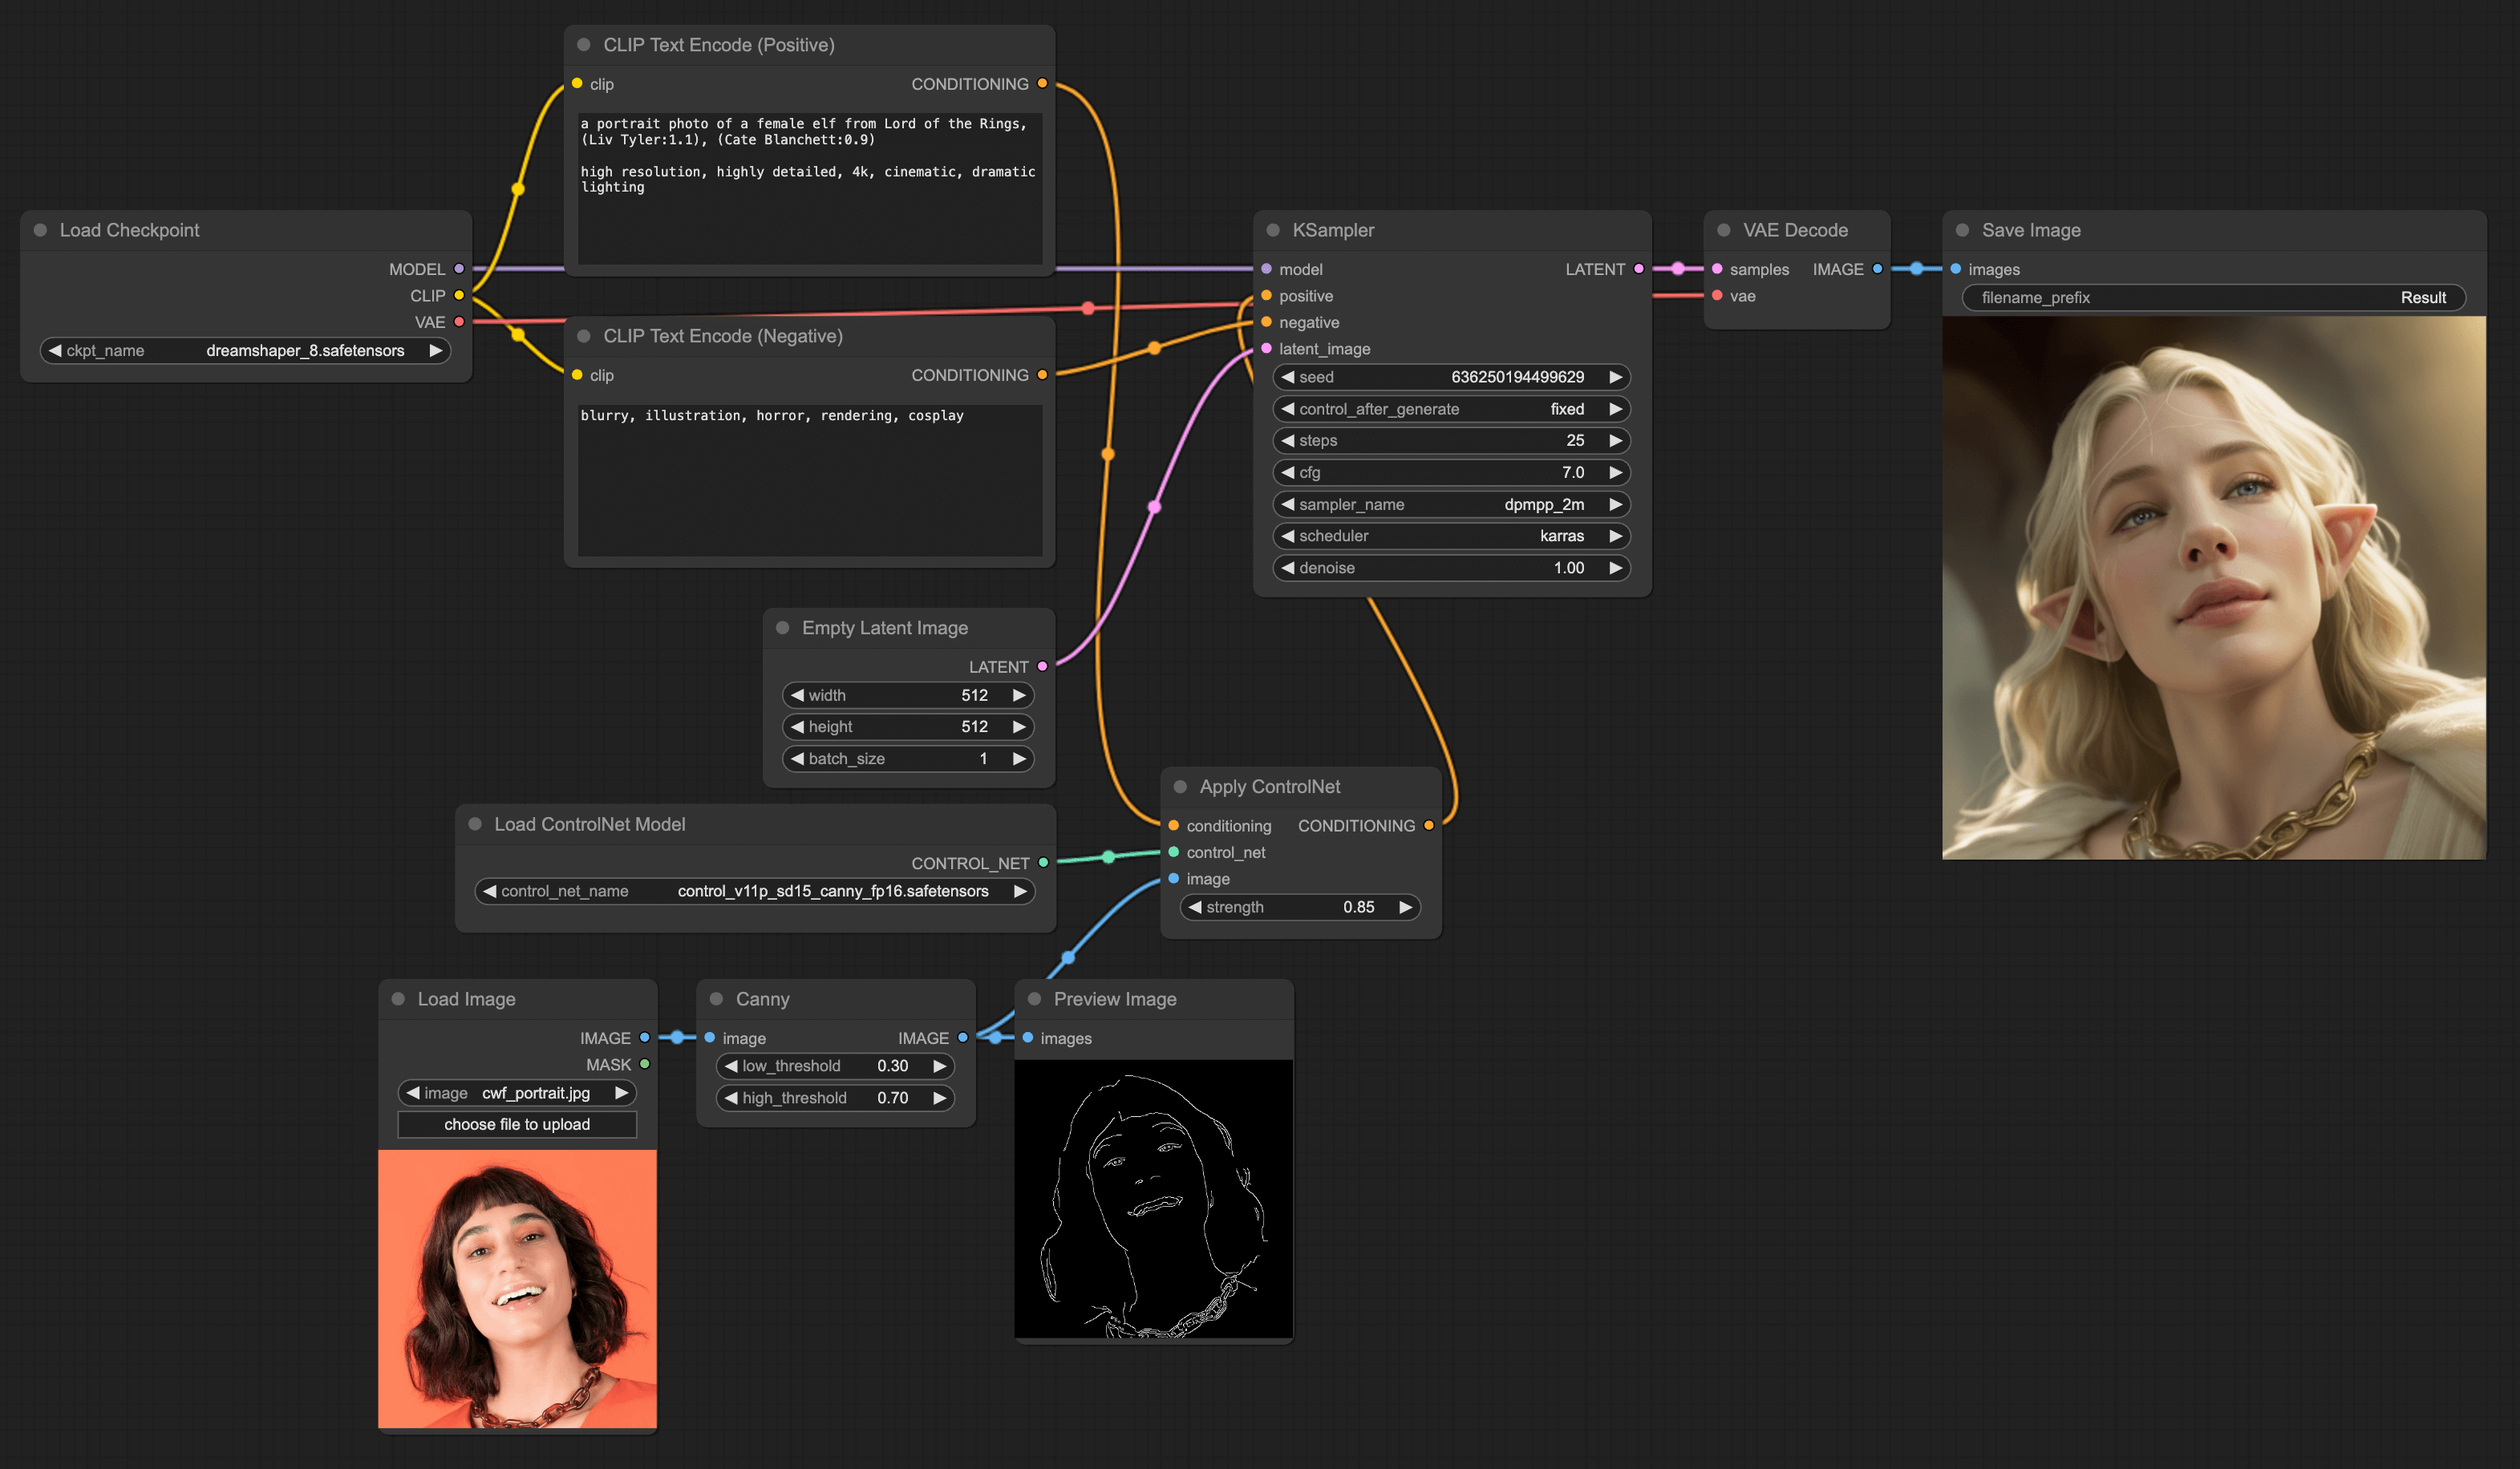
Image pose ControlNet workflow
But if you can't directly draw the pose, you can try importing a picture you think is appropriate, and then convert it into a pose through the plugin, and then input it into the ControlNet model. This way you can control the pose of the character generated by the model through the image.
The method is also simple.
Insert DWPose Estimation Node
Double-click on a blank place, enter DWPose Estimation in the search box, and then add this node. Then connect this node's left endpoint with the Load Image node. Parameter configuration is as follows:
- detect_hand: disable
- detect_body: enable
- detect_face: disable
- resolution: 512 (because the image we generate is 512 * 512 so here is set to 512 * 512)
- bbox_detector: yolox_l.onnx
- pose_estimator: dw-ll_ucoco_384.onnx
The first three, because we mainly want to control the pose of the character, so here we only need to detect the body of the character. The last two settings can be faster.
Add Upscale Image Node(Optional)
The addition of this step is mainly to make the resolution of the picture consistent with the resolution of the generated picture, so as to better control the picture generated by the model. You can use this technique with other ControlNet.
We can also add an Upscale Image node, and then connect the right endpoint of DWPose Estimation with the left endpoint of Upscale Image. The parameter configuration is as follows:
- upscale_method: nearest-exact
- width: 512
- height: 512
- crop: disable
Because the arrangement of the pixels in the pose image is quite regular, we choose nearest-exact, and then set the width and height to match the generated image, and finally disable crop.
After adding this node, we can connect the right endpoint of Upscale Image with the left endpoint of Apply ControlNet.
Also, if you want to get the pose image, you can add a Preview Image node, and then connect it with the right endpoint of DWPose Estimation, so you can see the pose image.
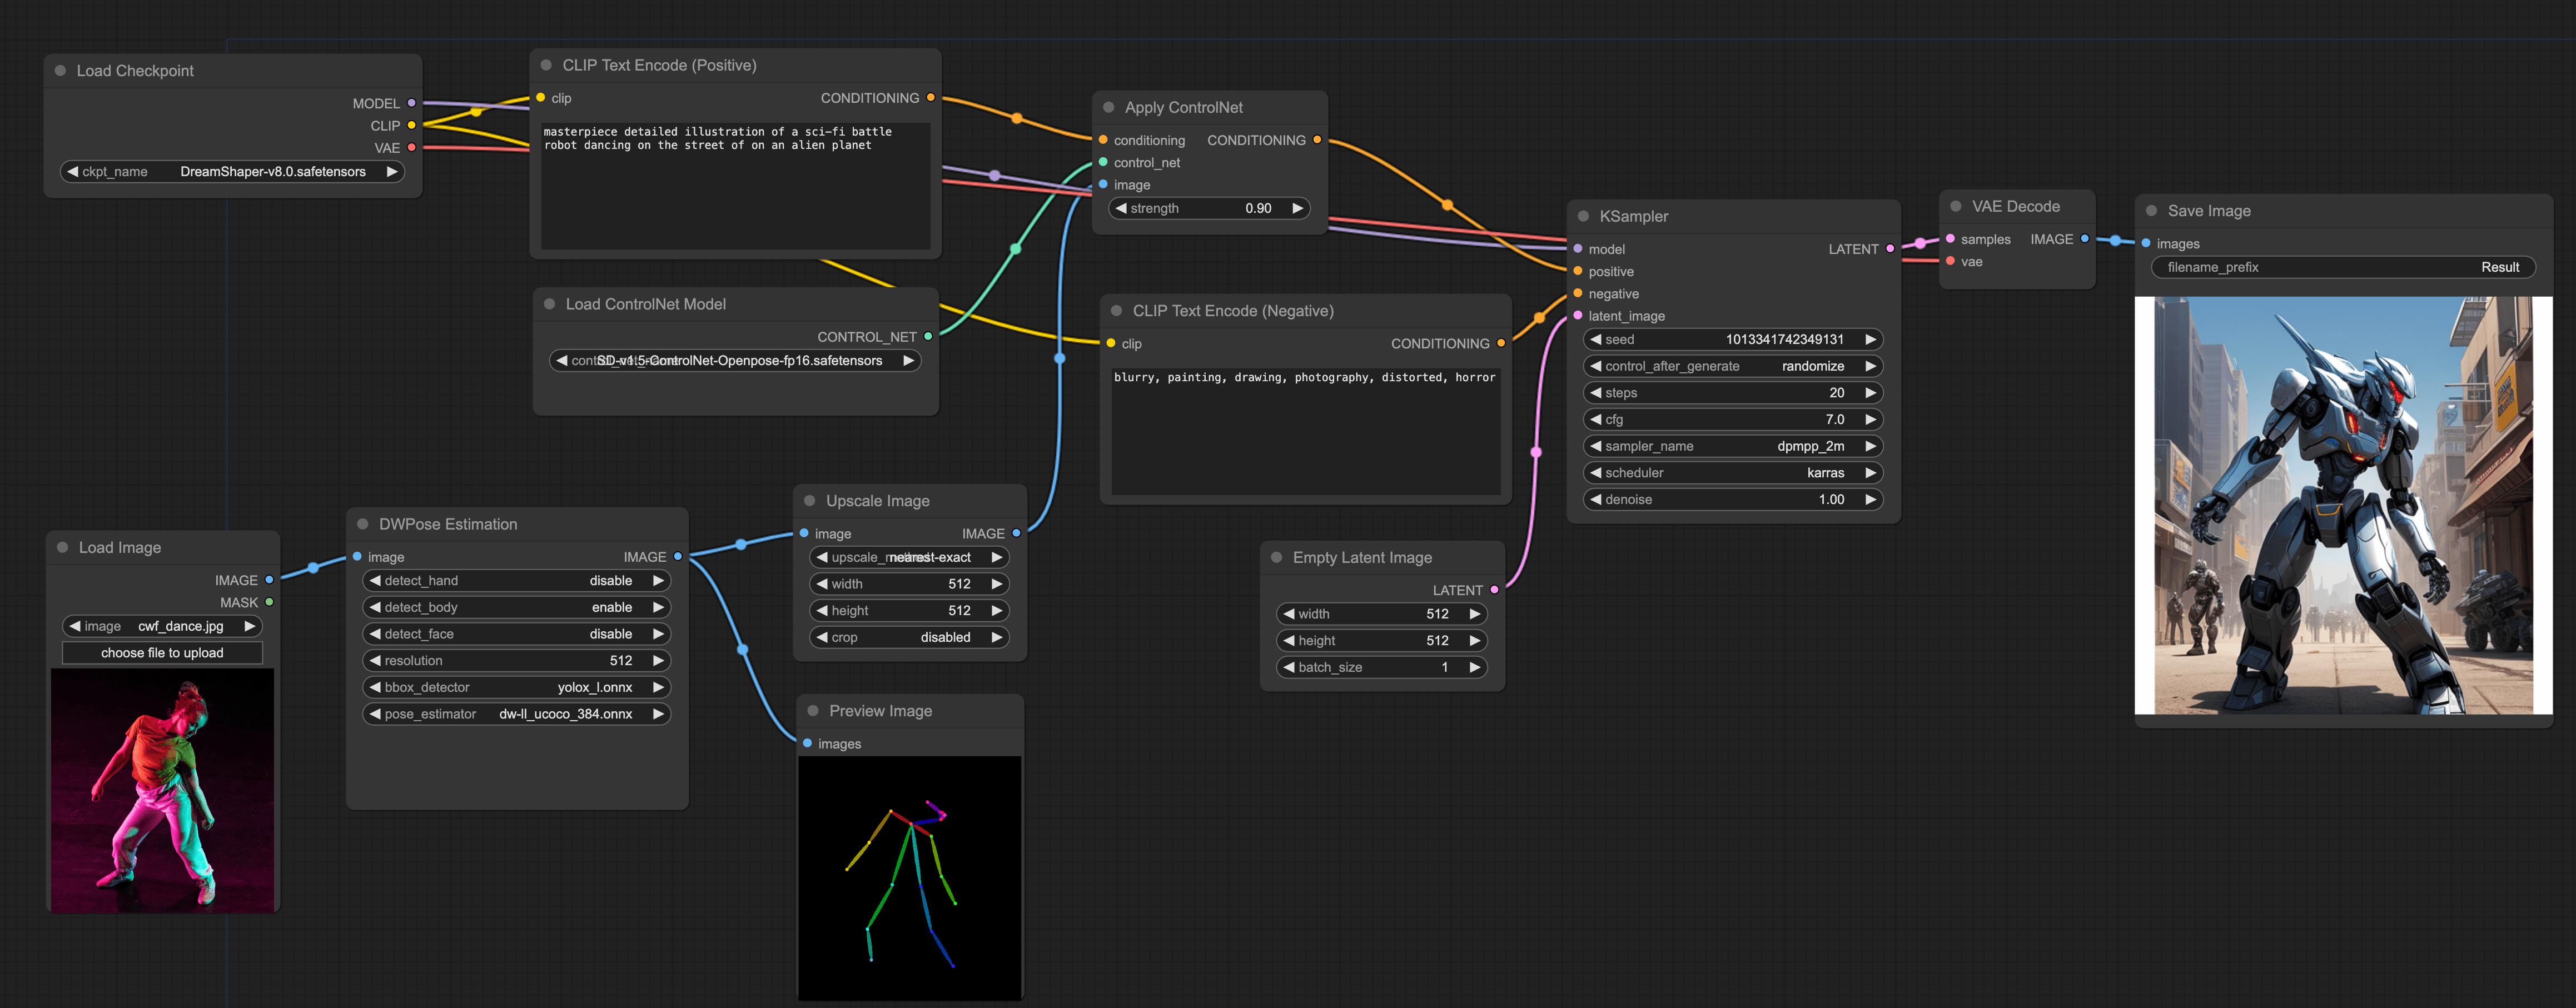
Image depth ControlNet workflow
🚧 Under construction
Reference-only ControlNet workflow
Lastly, you may encounter a situation where your client provides reference images for your design, for example design a logo. In this case, besides letting the AI generate directly, you can also use these reference images to let AI produce a new logo.
If you're interested in how to use AI to generate logos, feel free to read our blog article: How to generate App logo using ComfyUI?
Download the extension
In order to build this workflow, you'll need to use the experimental nodes of ComfyUI, so you need to first install the ComfyUI_experiments (opens in a new tab) plugin. You can use the ComfyUI Manager to install, or manually download and import it for installation.
Insert the ReferenceOnlySimple Node
All you have to do is replace the Empty Latent Image in the original ControlNet workflow with a reference image. First, double-click anywhere blank, search 'Reference' and you'll find the ReferenceOnlySimple node, then add that node and connect it to the Ksampler. Because this node only supports importing latents, you'll need to use VAE Encode to convert the image into latents. The final workflow is as shown in the picture below: