Stable Diffusion Basics
Learning ComfyUI should start with theory first.
The biggest difference between AI drawing tools and traditional drawing tools (such as Photoshop or Figma) is that many of its configurations or operations are not visual, and the results are random. The former means that if you change a certain configuration, there may not necessarily be a reaction on the interface. This makes it difficult to learn it; unlike Figma it's difficult to explore on your own. The latter can make you feel frustrated because even if you follow someone else's tutorial, you might not get the same result.
Is there any solution to this?
I believe the first step to learning such tools is not learning how to use them, but starting with the theory related to AI. After understanding the theory, you will know what the configuration options on the drawing tools are used for, and even can extrapolate from one example to get more usage methods.
So, this tutorial series will start with the basics of Stable Diffusion. After understanding the basic concepts of Stable Diffusion, I will introduce how to use ComfyUI, and then you will be able to understand both the appearance and the essence.
What is Stable Diffusion?
- In the tutorial, you will see highlighted content, such as Latent Space. This means it might be mentioned again in subsequent tutorials, or it may appear in ComfyUI, which you need to pay special attention to.
- To lower the cost of understanding, I will try to reduce the points about mathematics and use analogy as much as possible to help you understand some concepts. So it's possible that some descriptions might not be rigorous enough. If you have a better explanation, feel free to leave a comment, or join our community and contact me.
Strictly speaking, Stable Diffusion is a system composed of several components (models) rather than a single model.
I will use the most common text to image workflow as an example to explain the overall architecture and working principle of Stable Diffusion.
When we input a prompt, such as "Cat, standing on the castle", Stable Diffusion will generate a picture of a cat standing on a castle. It seems to take only one step:

In reality, the entire generation process goes through three major steps. I will first outline what these three steps are to give you all an overall understanding of Stable Diffusion, and then delve into the details:
- First, the user-input Prompt will be compiled into individual word feature vectors by something called a Text Encoder. This step will output 77 equally long vectors, each containing 768 dimensions. I will further explain the role of these vectors later on, but for now, you can simply understand it as 'converting text into groups of numbers that machines can recognize'.
- Then, these feature vectors and a random image (which you can simply understand as an image full of static, or full of information noise), are placed in the Image Information Creator. In this step, the machine will first convert these feature vectors and random image into a Latent Space, and then 'denoise' the random image into an 'intermediate product' based on these feature vectors. Basically, the 'intermediate product' at this moment is an 'image' that humans cannot understand, a bunch of numbers, but the information presented by this intermediate product at this moment is already a cat standing on a castle.
- Finally, this intermediate product is decoded into a real image by the Image Decoder.
If the above three steps are visualized, it would look like this:
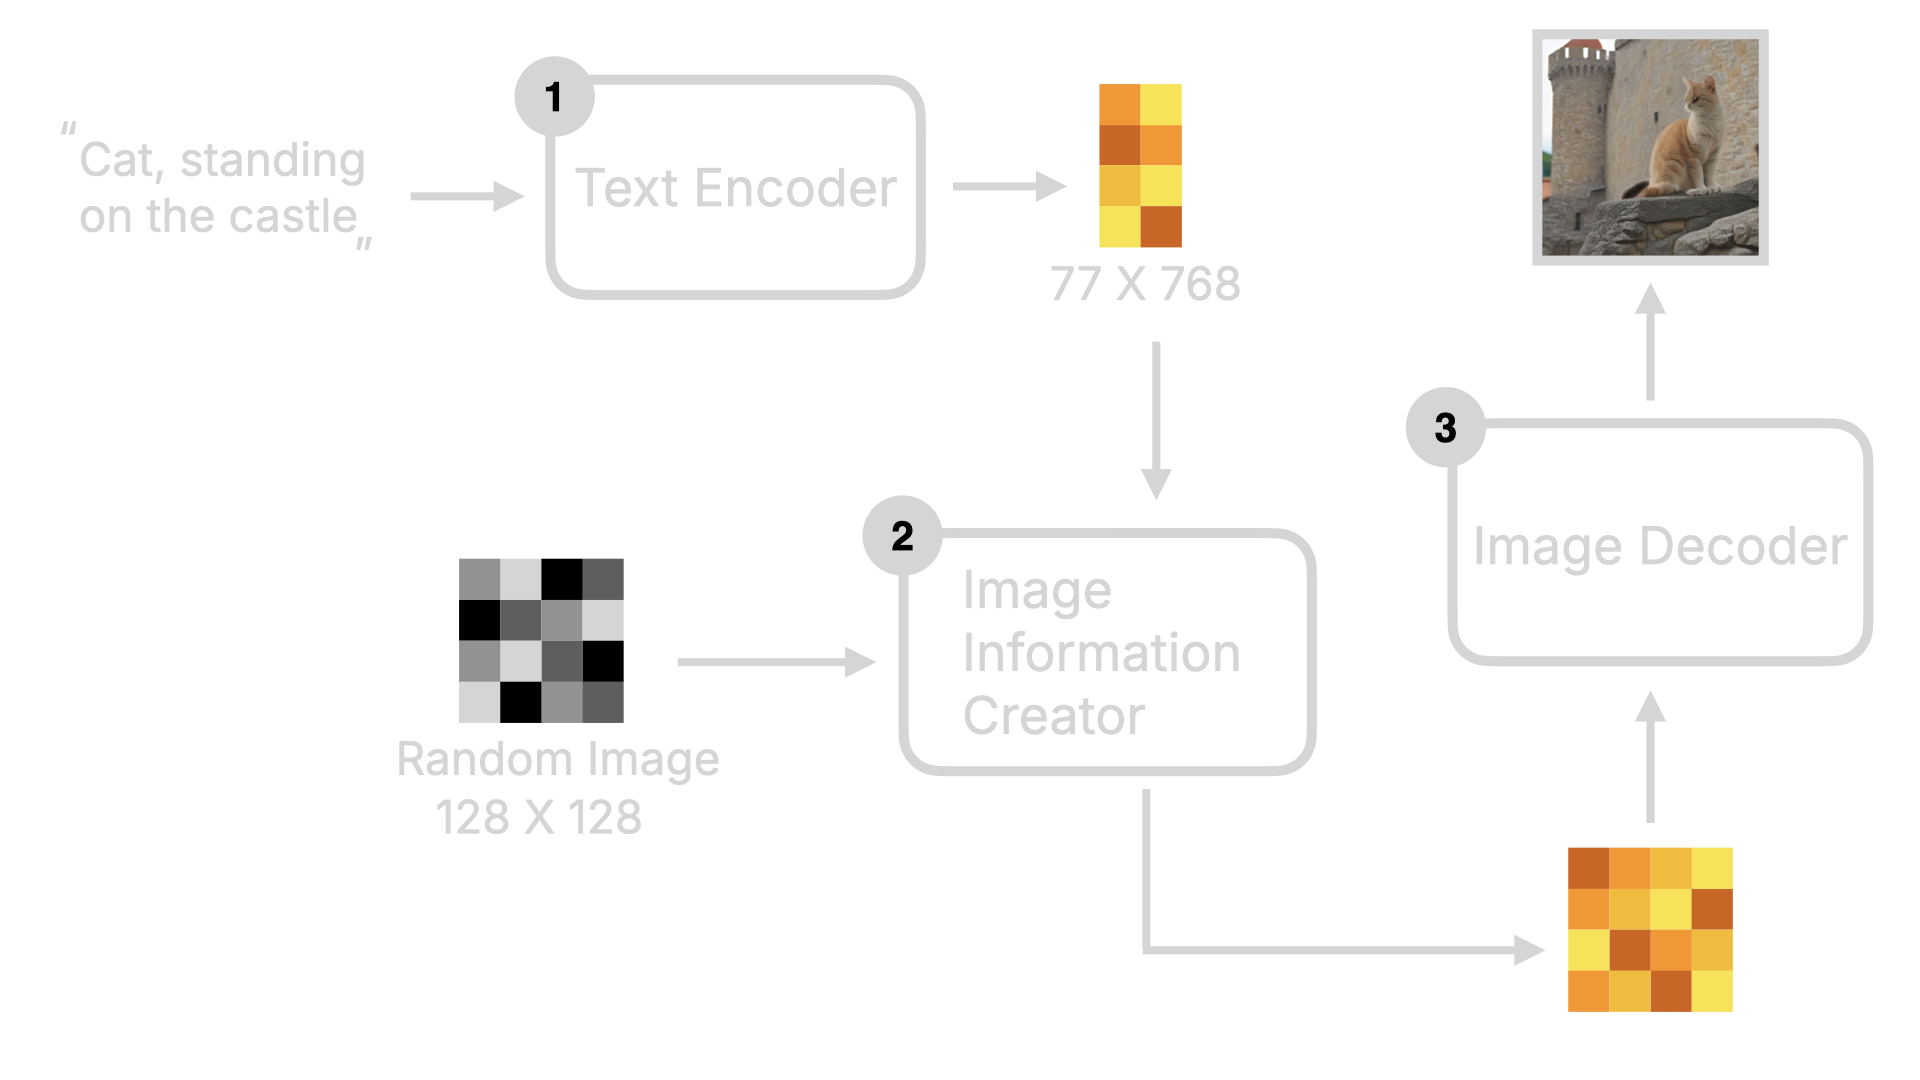
To sum up, in simple terms, the user inputs a Prompt command, and the machine will, according to this command, denoise a random image into a picture matching the command in a latent space.
In the whole process, it is more appropriate to say that the AI is 'sculpting' images rather than 'generating' them. It's just like what Michelangelo said after completing the David statue: The statue was already in the stone, and I just removed the unnecessary parts.
All images exist in an image full of noise, and AI just removes the unnecessary parts. So if you use the Midjourney built with the same Diffusion Model, you will see the following process: at first, it's a blurred or even black image, and then the image will step by step become clearer, which is the 'denoising' or 'sculpting' process I mentioned earlier:

You may be curious why in the previous explanation, Stable Diffusion directly outputs images rather than doing it like Midjourney. In fact, in the second step, the machine denoises the image multiple times, but does not decode each result into an image using the Image Decoder. Instead, it only decodes the final result into a photo. Therefore, when you use Stable Diffusion, you don't see the generation process like Midjourney.
Image Information Creator
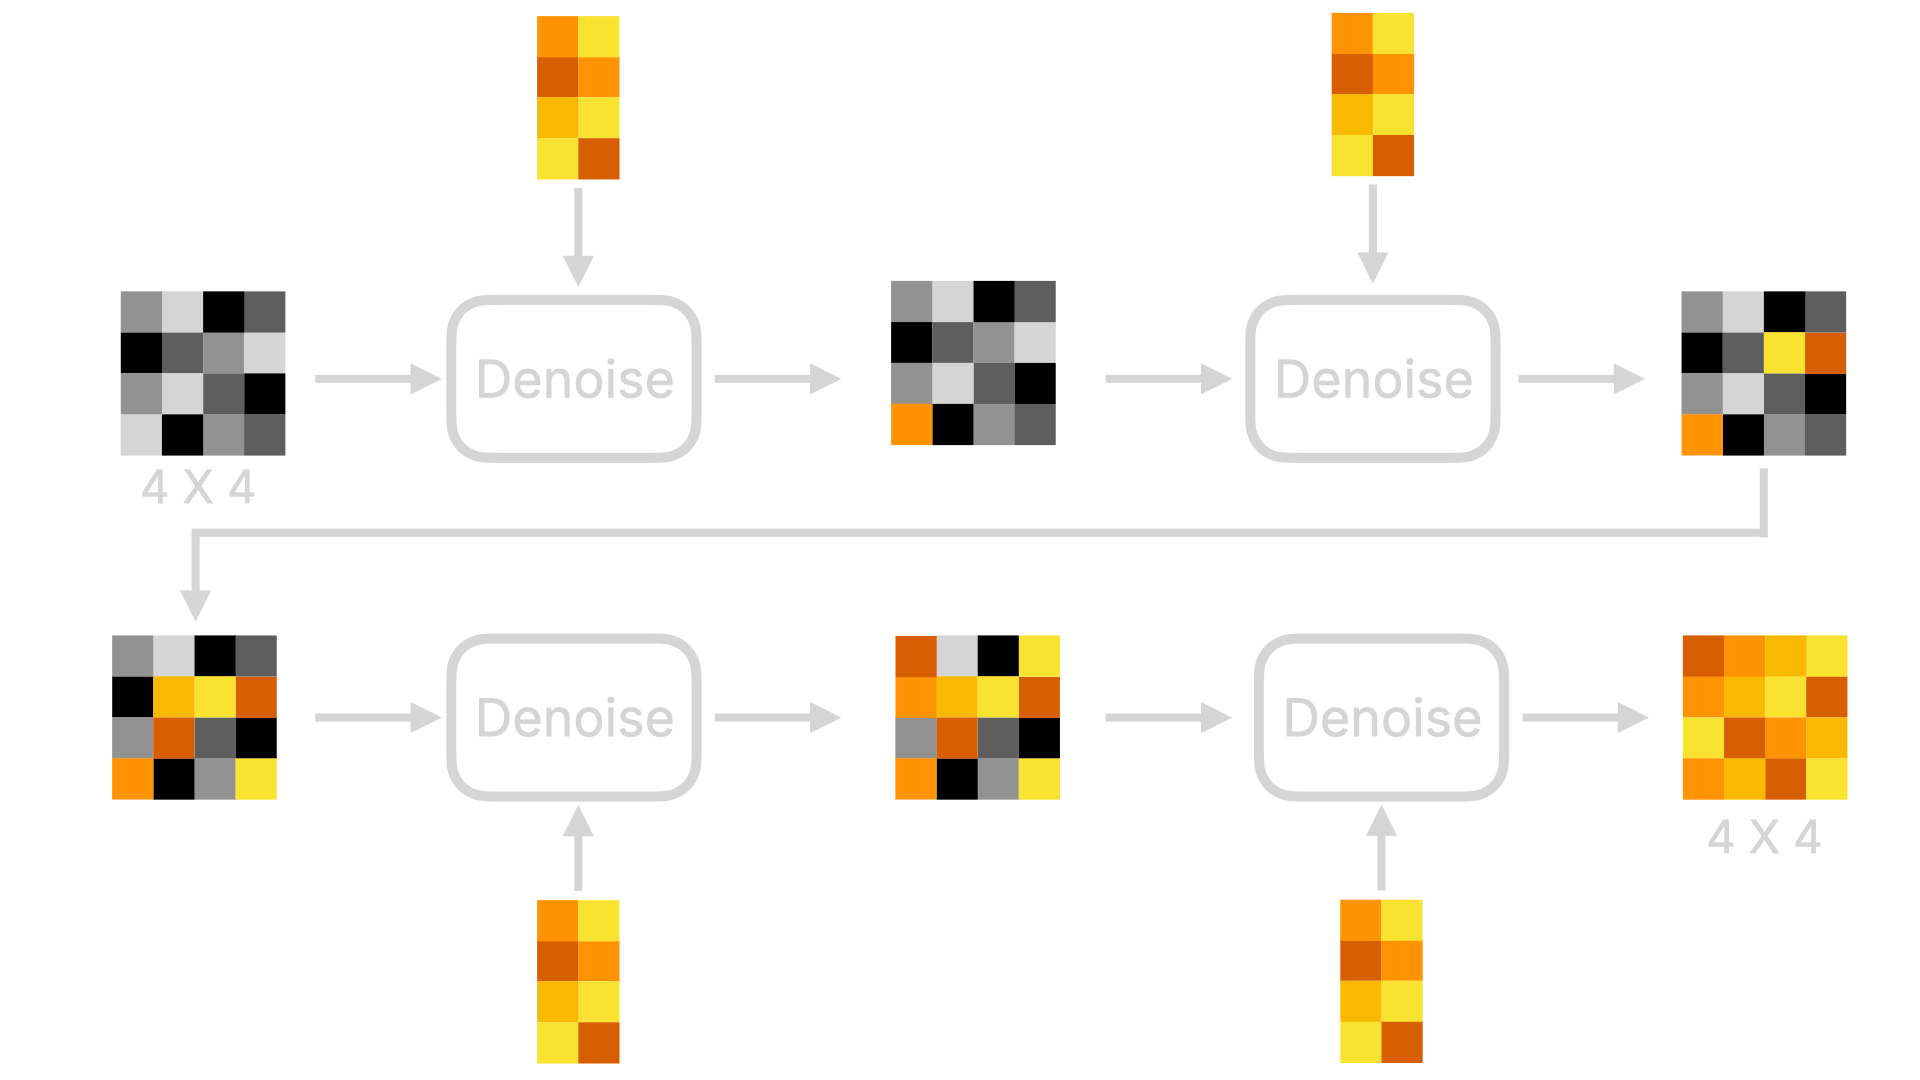
Since we're talking about denoising, let's expand on the whole 'denoising' process.
First, the entire denoising process will take place in a Latent Space, and there will be multiple Steps of denoising. You can adjust these Steps; generally, the more there are, the better the image quality, but the longer it will take. Of course, this also depends on the model. Stable Diffusion XL Turbo can generate an image in one step, taking less than 1 second, and the image quality is quite good. If we visualize this step, it's something like this (to better explain, I've described the black blocks below as images, but essentially they're not images, just a bunch of image-related data):
So what happens in Denoise? The following image is a visualization of the first Denoise process:
The previous image might look complex, but there's no need to fear. As long as we understand basic operations like addition, subtraction, multiplication, and division, we can understand every step of Denoise.
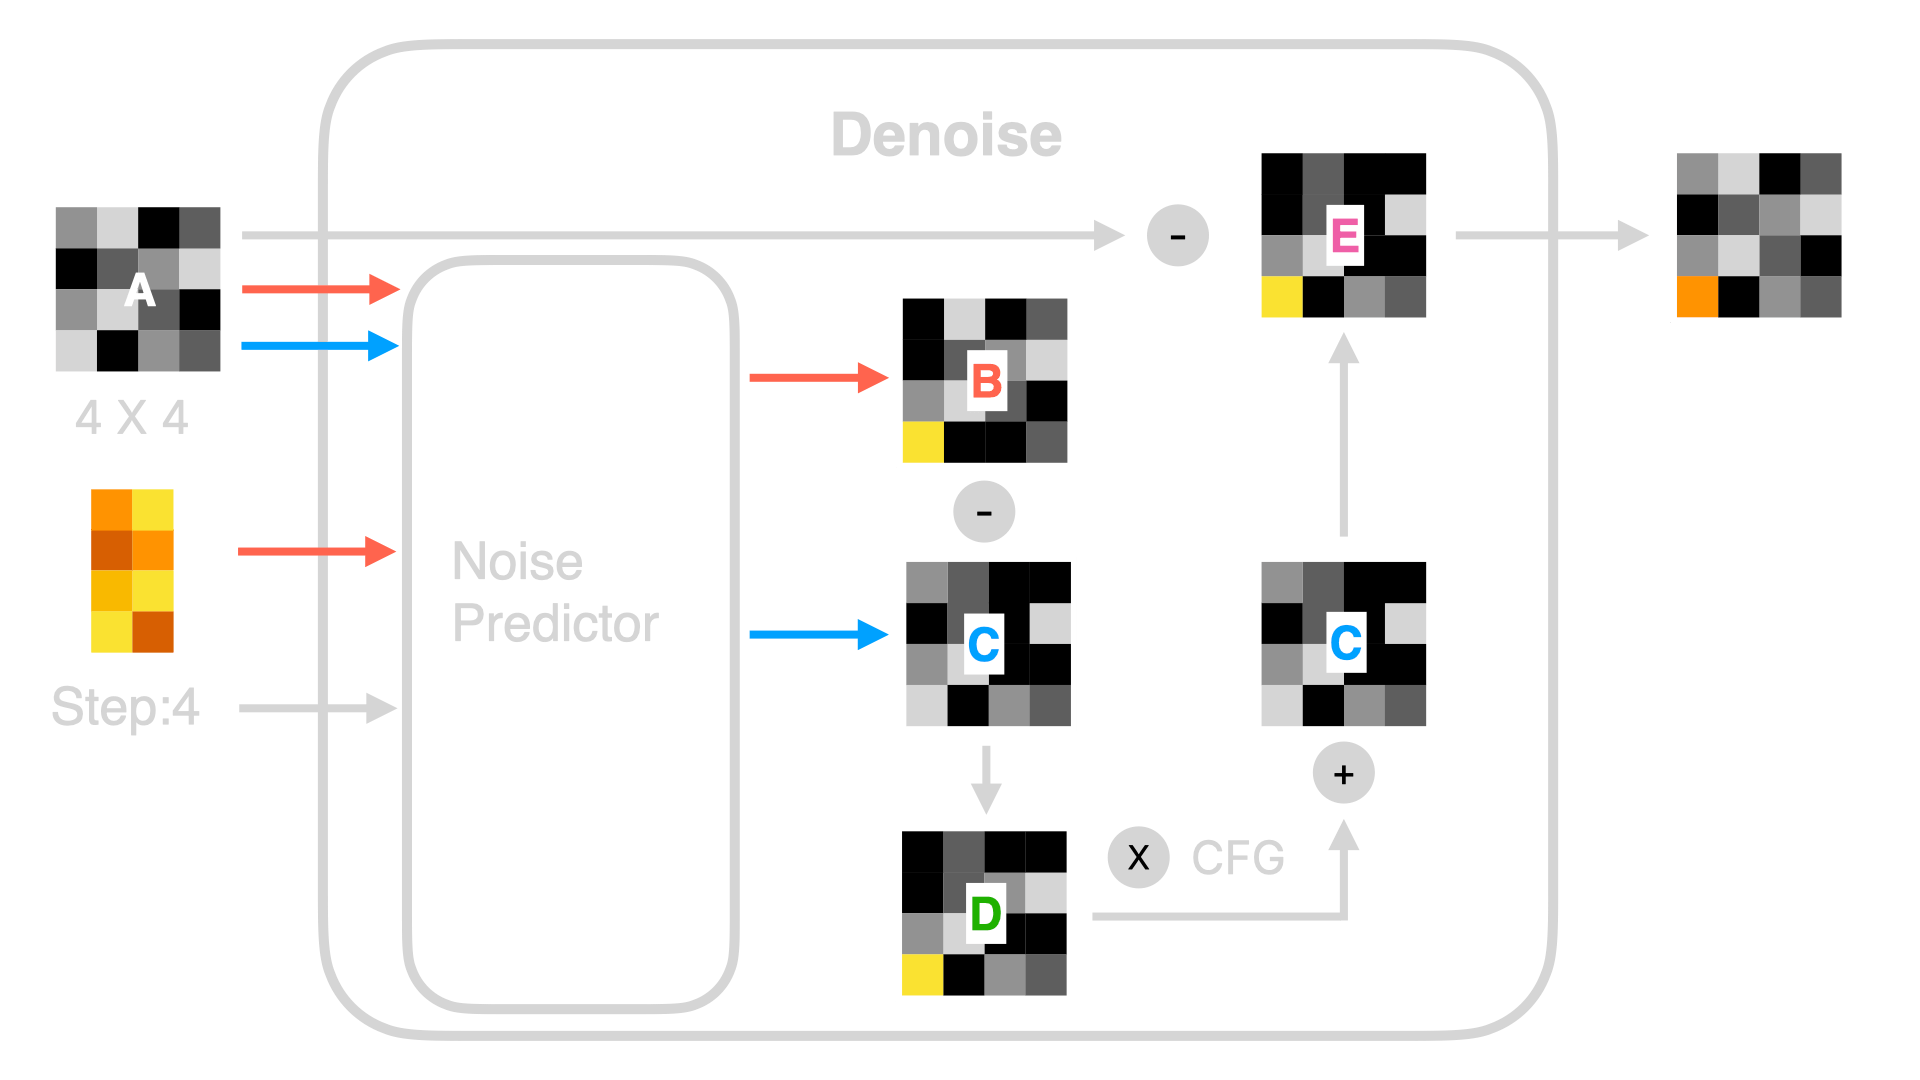
- First, there is a Noise Predictor in Denoise. As the name suggests, it's a model that predicts what noise the random graph contains. In addition to the input of a random graph and the word feature vectors of the Prompt, the current Step number is also required. Even though in the above visualization process you see many Denoises, the actual program runs the same Denoise, so it is necessary to notify the Noise Predictor of the current Step for calculation.
- Next, let's look at the orange line. The Noise Predictor uses the random image (for example, a 4 X 4 image) and the word feature vectors of the Prompt to predict a noise image B. Note that it doesn't predict and output the actual image, but a noisy image. In other words, the Noise Predictor predicts what unnecessary noise there is in this random image based on the word vectors. If we use the previous carving example as an analogy, what it outputs is the waste not needed for the carving of the statue. At the same time, the Noise Predictor also predicts a noise image C without using the word feature vector of the Prompt (which is the blue line in the image).
You might be wondering why I've highlighted 4 X 4. Looking back at the entire Denoise process, you'll find that initially, the random image was 4 X 4, and the result is also 4 X 4. This means that if you want to change the final image ratio or size, you need to adjust the random image's ratio or size, not through the Prompt command. To draw a comparison with carving, no matter how skilled the sculptor is, one can't use a cubic meter of stone to sculpt a statue 10 meters tall. The highest statue that one can carve is one meter.
- Then, Denoise subtracts noise map C from noise map B to produce map D. Let's simplify this with a mathematical interpretation. Map B is the predicted noise from the Prompt and random image, containing both "noise predicted based on the Prompt" and "noise predicted based on the random image". C represents "noise predicted based on the random image". Therefore, B minus C equals "noise predicted based on the Prompt".
- Next, Denoise magnifies the noise of C, usually by multiplying it by a coefficient. This coefficient is often represented as CFG, CFG Scale, or Guidance Scale in some Stable Diffusion implementations. Then it adds this magnified image to noise image C to form image E. The reason for this is to increase the accuracy of image generation. Thus the "noise predicted based on the Prompt" is deliberately emphasized by multiplying by a factor. Without this step, the generated image would not be so related to the Prompt. This method is also known as Classifier Free Guidance.
- Finally, Denoise subtracts image E from image A to derive a new image. This refers to the 'carving' process mentioned earlier, where unnecessary noise is eliminated.
If you've used Stable Diffusion tools, you'll notice there are two input fields for the Prompt, one positive and one negative. How does the negative Prompt work? Using the aforementioned mathematical approach for simplicity, when a negative Prompt is entered, a noise map, B2, is also generated. But at this point, we subtract B2 and C from the noise map B1 produced by the positive Prompt to result in D. This implies that the final image produced will deviate further from B2, as more noise related to B2 has been subtracted.
You might be curious why it's "denoise" rather than other methods? You can refer to the section on Advanced Stable Diffusion.
Image Decoder
Now let's talk about Latent Space. When I was studying this concept, my biggest question was, why operate in latent space instead of directly denoising the image?
To answer this question, we must first understand what latent space is.
Latent space, in the field of machine learning and deep learning, is the low-dimensional space used to represent data. Latent space is created by encoding and dimension reduction of original data, resulting in a set of latent variables. The dimension of the latent space is usually lower than that of the original data, allowing us to extract the most crucial features and structure from the data.
It seems complex, but in simple terms, the latent space encodes the image into a set of numbers and compresses these numbers. Let's visualize this process:
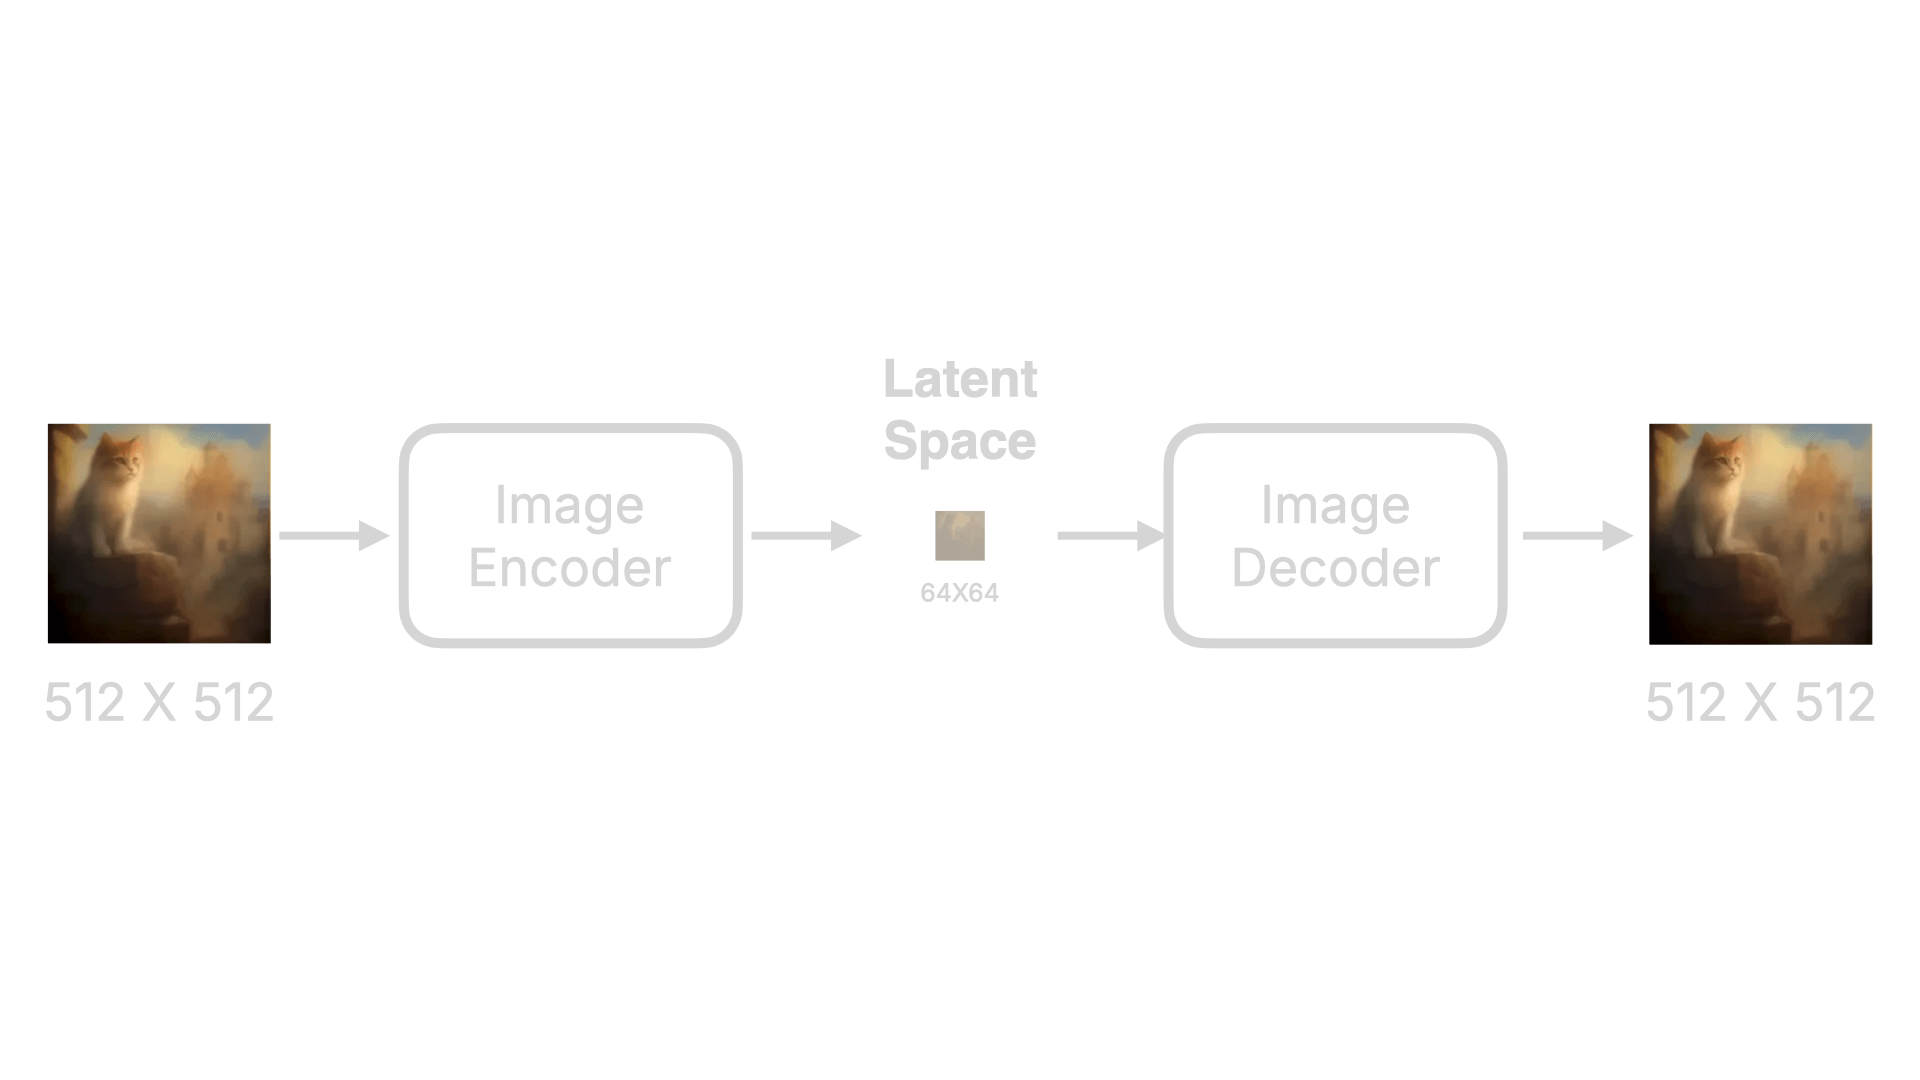
The image will first be encoded into a set of data by an Image Encoder and then compressed. If we measure the effect of this data compression from a pixel perspective, an original 512x512 image might be compressed to 64x64, greatly reducing the data. Finally, the Image Decoder restores it. This Encoder and Decoder component is also known as the Variational Auto Encoder (VAE). Hence, in some products, the Image Decoder is also referred to as the VAE Decoder.
So, what are the advantages and disadvantages of using this technology?
Advantages:
- Firstly, of course, efficiency has greatly improved. Using VAE, even consumer-grade GPUs can perform denoising calculations at relatively high speeds. At the same time, the time to train the model will also be shorter.
- In addition, the dimensions of the latent space are typically much lower than the original image dimensions, which means it can represent the image's features more effectively. By operating and interpolating in latent space, the image can be controlled and edited more finely. This allows for better control of the details and style of the image during generation, thereby improving the quality and realism of the generated images.
Disadvantages:
- Encoding and then restoring data will result in some data loss. Plus, because the dimensions of the latent space are lower, it may not fully capture all the details and features of the original data. This can ultimately lead to the restored image looking a bit odd.
Why is text in the images generated by Stable Diffusion often strange? This is because, on one hand, some detail features of the text are lost during the process. On the other hand, when predicting noise, text prediction is not as coherent as image prediction. For instance, predicting cat features are relatively simple as cats likely have two eyes, and beneath the eyes is the nose, it's coherent. But the English word "Cat" and Chinese character "猫" are quite different and hard to predict. For example, Chinese characters are likely composed of horizontal, vertical, hook, slash, and squiggle strokes, but what comes after the slash?
Text Encoder
In the initial process, I mentioned that the Text Encoder would translate your input prompt into individual word feature vectors. This step outputs 77 equal-length vectors, each containing 768 dimensions. What's the use of these vectors?
Further, there is a more interesting question. When we only input "Cat" in the prompt, without adding "orange," why is the final output cat orange? To answer these questions, we need to first understand the implementation of the Text Encoder.
The currently popular Text Encoder used in Stable Diffusion is OpenAI's open-source (opens in a new tab) CLIP model, which stands for Contrastive Language Image Pre-training. As usual, let's draw a picture:
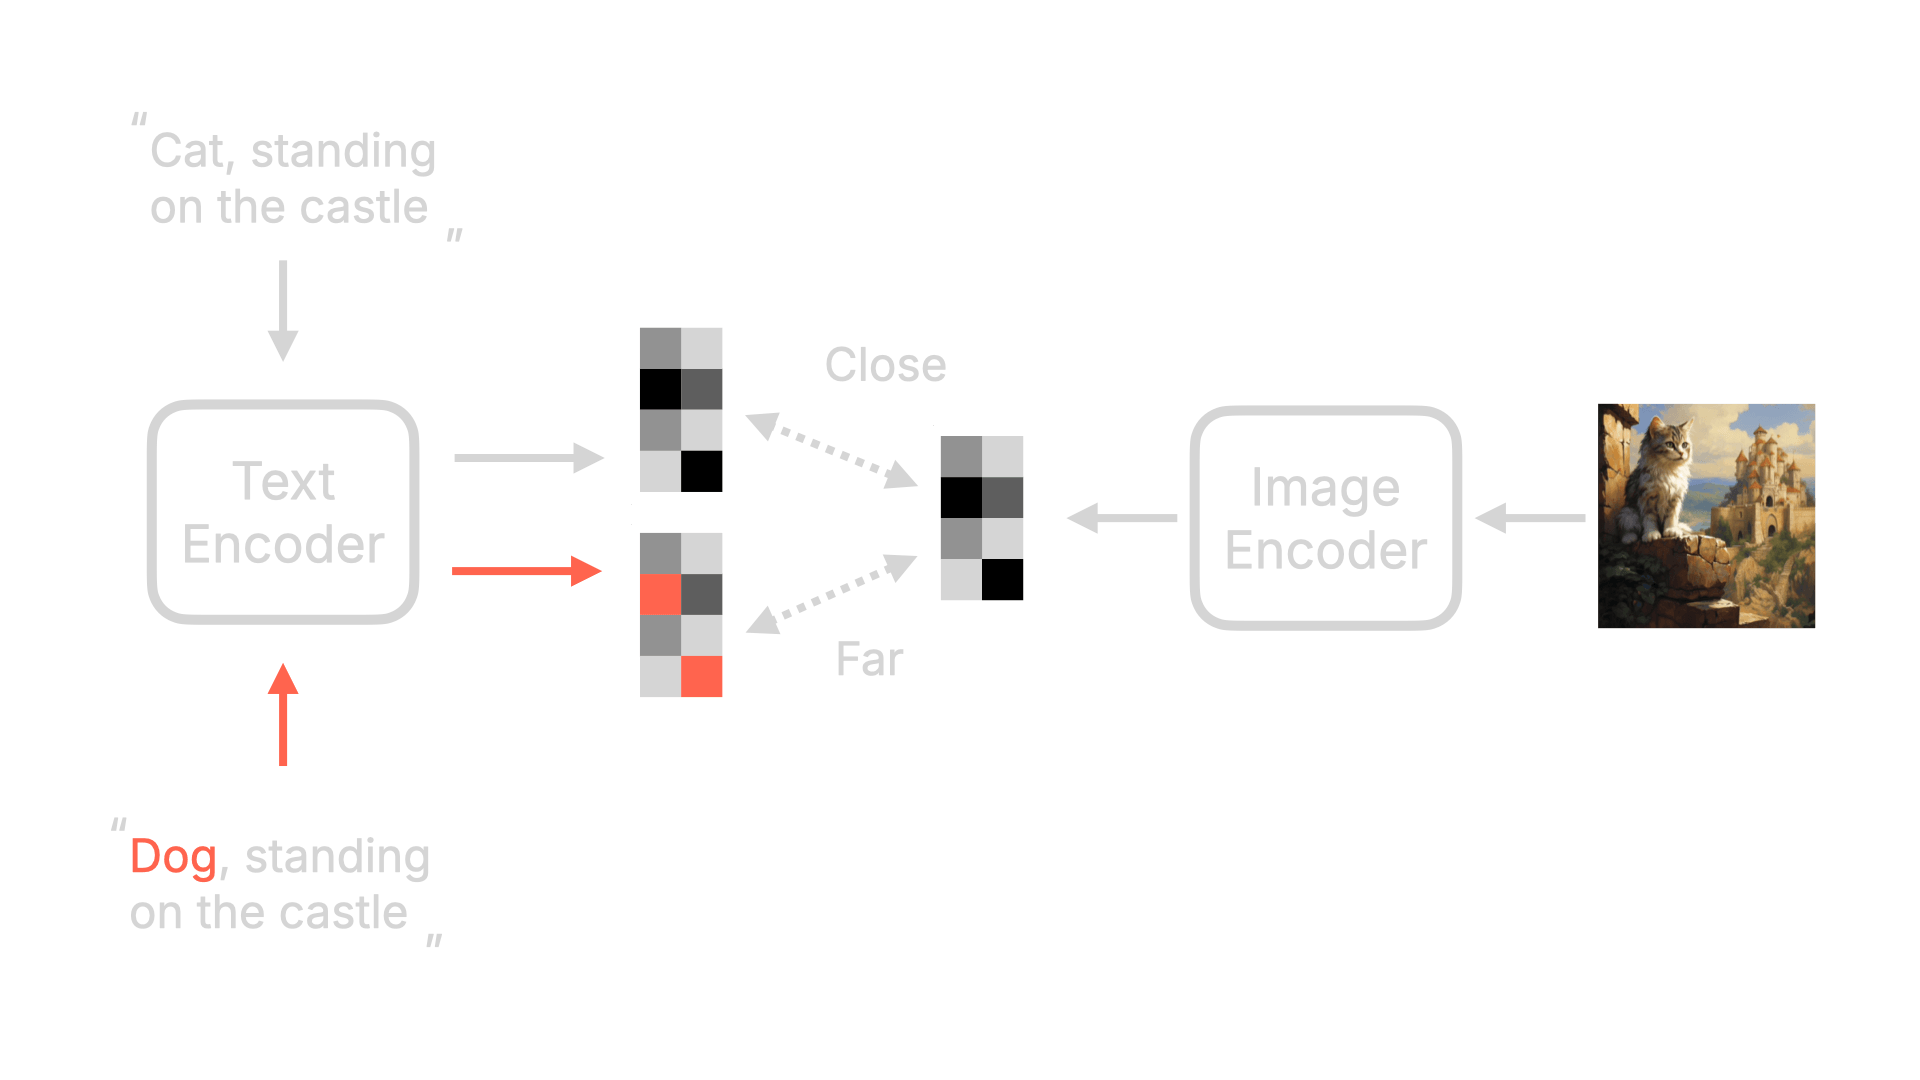
First, this CLIP also has a Text Encoder that converts text into a feature vector. Then, it has an Image Encoder that transforms images into various feature vectors as well. The closer these two vectors are, the closer this description is to the content of the image. The further apart they are, the less related they are.
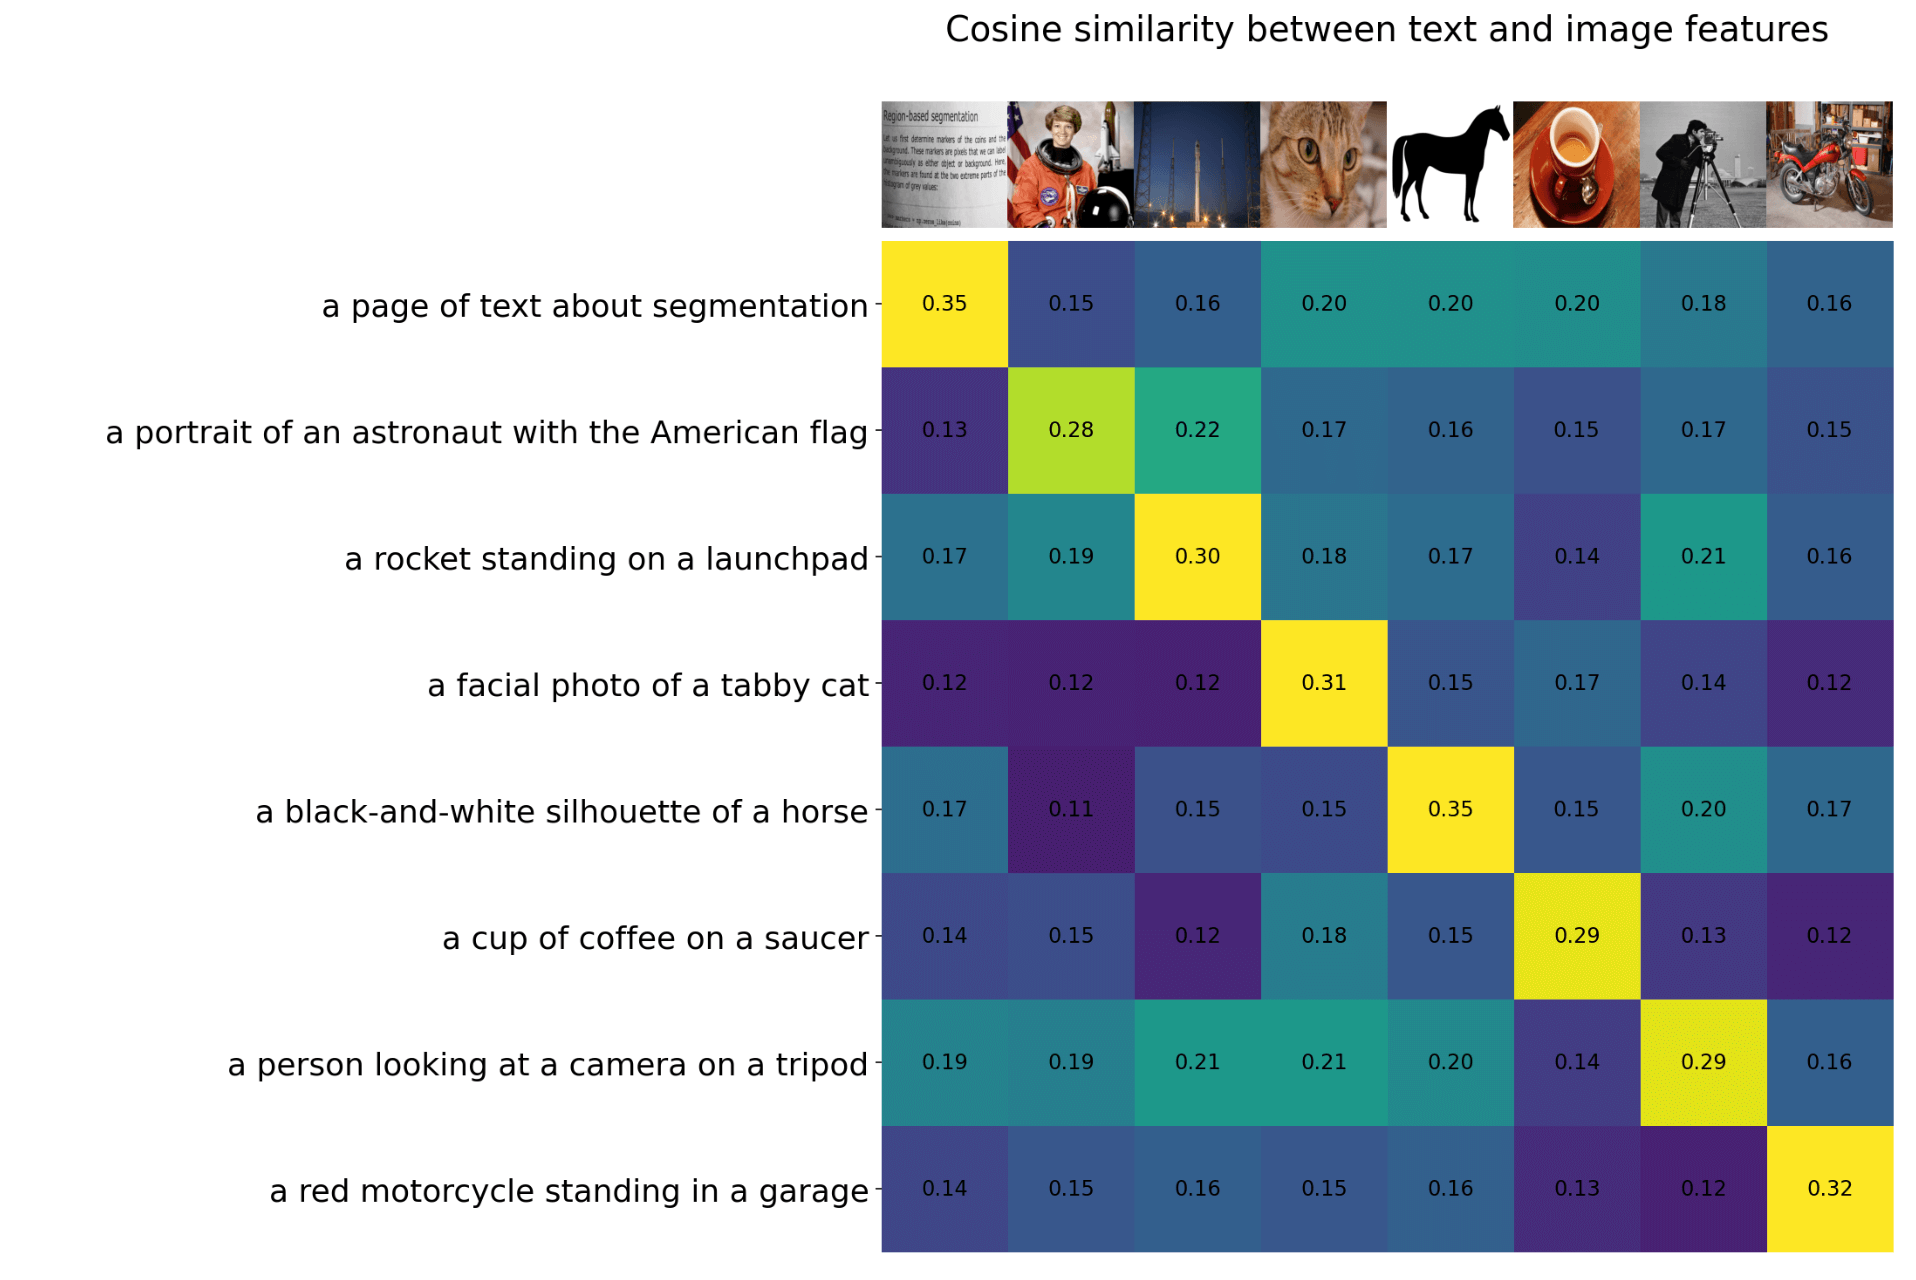
OpenAI used 400 million sets of image-text pairs to train this model. The final trained CLIP model effect is shown in the diagram below. When we input a description of an image, CLIP can determine which picture is closest to this description. For example, in the fourth row of the diagram below, the description is "a facial photo of a tabby cat" and it's most related to the fourth image vertically, with a similarity of 0.31, and only 0.12 for the first screenshot of the book.
Returning to Stable Diffusion, within Stable Diffusion, we only use part of the Text Encoder of CLIP, as it can transform text into corresponding text feature vectors, and these vectors will have a correlation with existing pictures in reality.
Going back to the two questions mentioned earlier, in fact, they answer each other 😁
Why, when we input "Cat," is the generated image most likely an orange cat or a cheetah? This is because the Text Encoder turns "Cat" into 77 equal-length vectors, and the "Embedding" in these vectors will contain some features and meanings related to "Cat":
-
Morphological features: The vector representation may catch morphological features of the cat, such as its body shape, the shape of its head, the position of its limbs, etc. These features can help distinguish the cat from other animals or objects.
-
Visual features: The vector representation may contain visual features of the cat, such as its color, patterns, the shape of its eyes, etc. These features can help identify the appearance characteristics of the cat.
-
Semantic meanings: The vector representation may entail semantic meanings related to "Cat," such as it being a pet, an independent animal, having an intimate relationship with humans, etc. These meanings can help understand the role and significance of cats in human culture and society.
Note: Due to the unexplainability in some areas of the model, these vectors may not necessarily contain these features. The specific examples are primarily used for better explanation.
In conclusion, since only a part of CLIP's Text Encoder is used in Stable Diffusion, it is referred to as the "CLIP Text Encoder," or "CLIP Text Encode" in some products.
Why, when using Stable Diffusion or Midjourney, do we not need to worry about grammar and case sensitivity in the prompts? This is because these prompts are converted into feature vectors by the Text Encoder. After being converted into feature vectors, grammar and case are reduced to a sequence of numbers, which are not sensitive in the absence of any model adjustments.
Summary
Thank you for reading through this lengthy explanation of Stable Diffusion basics. In the next chapter, we will officially start with the ComfyUI tutorial. Trust me, after understanding these basic concepts, you will find learning ComfyUI more intuitive and enjoyable.